주요 콘텐츠로 건너뛰기
IBM ThinkPad T42 Modem Daughter Board Replacement

IBM ThinkPad T42 Modem Daughter Board Replacement

Gerald Watanabe

Gerald Watanabe4 다른 기여자

최종 수정일 June 28, 2019

20 - 25 분
조정
더 나은 이미지가 필요함
누락된 단계
잘못된 도구

This guide will demonstrate the removal and replacement procedures for an IBM ThinkPad T42 Modem Daughter Board.

필요한 것

도구

  1. IBM ThinkPad T42 Modem Daughter Board Replacement, Bottom cover: 1 단계, 이미지 1개 중 1개
    • Use a Phillips #0 screwdriver to remove the twenty screws on the underside of the T42.

  2. IBM ThinkPad T42 Modem Daughter Board Replacement, Rear screws: 2 단계, 이미지 1개 중 1개
    • Remove the four Phillips screws located on either side of the rear of the T42 (there are two on each end.)

  3. IBM ThinkPad T42 Modem Daughter Board Replacement, Keyboard and Trackpad: 3 단계, 이미지 1개 중 1개
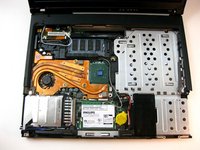
    • Flip the laptop over and open the screen to access the keyboard and trackpad.

    • The keyboard and trackpad are connected to the motherboard. Before removing the keyboard and trackpad, disconnect both components from the motherboard, as shown in the following step.

    • The bezel and keyboard will be loose, be careful.

  4. IBM ThinkPad T42 Modem Daughter Board Replacement: 4 단계, 이미지 2개 중 1개 IBM ThinkPad T42 Modem Daughter Board Replacement: 4 단계, 이미지 2개 중 2개
    • Carefully maneuver the palm rest away from the keyboard, as both the keyboard and palm rest/trackpad will come off together.

    • Remember, both the keyboard and trackpad have connectors to the motherboard. Disconnect these before completely removing either component.

  5. IBM ThinkPad T42 Modem Daughter Board Replacement, Plastic Edge Cover: 5 단계, 이미지 2개 중 1개 IBM ThinkPad T42 Modem Daughter Board Replacement, Plastic Edge Cover: 5 단계, 이미지 2개 중 2개
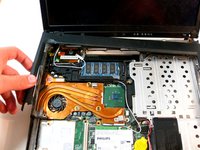
    • Starting from the bottom right, carefully remove the bezel by pulling it up gently. If needed use a spudger or flathead screwdriver to help.

  6. IBM ThinkPad T42 Modem Daughter Board Replacement, Lower Bracket: 6 단계, 이미지 2개 중 1개 IBM ThinkPad T42 Modem Daughter Board Replacement, Lower Bracket: 6 단계, 이미지 2개 중 2개
    • Grasp the metal bracket to remove it from the device.

  7. IBM ThinkPad T42 Modem Daughter Board Replacement, Microphone cover: 7 단계, 이미지 1개 중 1개
    • Remove the rubber cover from the microphone.

  8. IBM ThinkPad T42 Modem Daughter Board Replacement, Daughterboard Unscrewing: 8 단계, 이미지 1개 중 1개
    • Next, unscrew the 3 Phillips screws in red.

  9. IBM ThinkPad T42 Modem Daughter Board Replacement, Removing the Daughterboard: 9 단계, 이미지 1개 중 1개
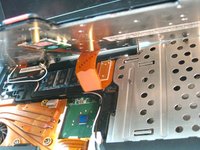
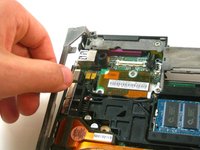
    • The cables are routed through different components for organization, carefully disconnect them, unwrap them and pull the card free.

  10. IBM ThinkPad T42 Modem Daughter Board Replacement, Remove Bracket: 10 단계, 이미지 1개 중 1개
    • Lastly, remove the bracket sitting beneath it.

    • The end!

결론

To reassemble your device, follow these instructions in reverse order.

다른 2명이 해당 안내서를 완성하였습니다.

작성자

4다른 기여자 명과 함께

Gerald Watanabe

회원 가입일: 04/14/10

288 평판

안내서 7개를 작성함

Cal Poly, Team 29-76, Johann Spring 2010 Cal Poly, Team 29-76, Johann Spring 2010 회원

CPSU-JOHANN-S10S29G76

4 회원들

안내서 37개를 작성함

댓글 0개

댓글 쓰기

조회 통계:

지난 24시간: 0

지난 7일: 0

지난 30일: 4

전체 시간: 5,053