이 번역은 원본 안내서의 최신 업데이트를 반영하지 않을 수 있습니다. 번역 업데이트를 돕거나 아니면 원본 안내서 보기를 참조하세요.
소개
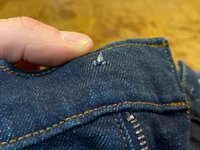
청바지 단추(택이라고도 함)는 청바지를 허리에 단단히 고정하는 역할을 합니다.
이 안내서는 새 청바지 단추를 부착하는 방법을 설명합니다.
수리를 시작하기 전에 안내서 전체를 읽고 필요한 도구와 부품을 준비하세요. Patagonia 전용 소재가 있으면 이상적이지만 반드시 필요하지는 않습니다. Patagonia 교체 부품은 Patagonia 고객 서비스에 전화 또는 메시지하면 구할 수 있습니다.
대안으로, Patagonia 제품을 현지 소매점에 가져가 수리 견적을 받거나 우편 수리 서비스를 통해 Patagonia로 보낼 수 있습니다.
수리를 시작합시다!
경고! 작은 부품. Patagonia는 3세 이하 아동용 의류에 대해서는 이런 수리를 권하지 않습니다. 대신 우리는 관련 물품을 반품하여 전문 수리 서비스를 받을 것을 권합니다.
필요한 것
-
-
-
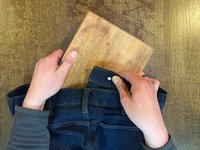
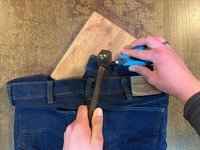
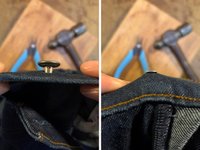
청바지를 뒤집고 단추 바로 아래에 부드러운 나무나 가죽과 같은 평평한 작업 표면을 놓으세요.
-
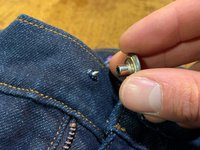
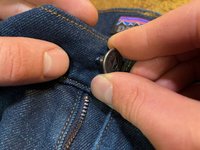
펜치를 사용하여 택을 제자리에 잡고 택과 단추가 여전히 정렬되어 있는지 확인하세요.
-
수직으로 똑바로 내려치면서 택을 망치로 두드려 고정하세요.
-


다른 51명이 해당 안내서를 완성하였습니다.
다음 번역가들에게 특별히 감사 드립니다:
75%

Christian Kim님은 저희가 세상을 수리하는데 동참하신 분입니다! 기여하시겠습니까?
번역 시작하기 ›


10가이드 댓글
Nice, but let's consider how this situation occurs. The tack comes out of its hole, just simply replacing it is not realistic, unless the new tack is significantly bigger. So how do you "repair" the hole such that it will hold a tack again?
Gabe Misura - 답글 공유
As noted in step 2, you can move the tack over to where the denim isn't damaged. If that will cause the jeans not to fit properly, you can sew a folded piece of denim behind the hole (sew around the edges on the inside of the jeans) and punch the tack through the new piece.
I didn´t have a new button and was in a pinch. Just ripped the old button off completely, jammed it in the tail end of a hammer and yanked it apart with som pliers. Then i followed the instructions in this fix. Worked like a charm, so far...
Thanks I’m gonna try this first!
The best thing to do is patch the hole. I simply use fabric glue and some pieces of blue jeans that you probably have hanging around. Trim off the extra threads and then apply fabric glue to the back of the waist band covering the hole made by the old button. Do the same on the front and then let dry. about 30 minutes or so, if you have a machine I always stitch back and for on the edges. Trim any edges or use additional glue to tack them down. Now because you have strengthened the hole carefully push the back of the button through where you can see the end, add the front to the nail end and turning the garment face down on a protected hard surface hammer about 3 times and check to see if it is sturdy, continue to hammer until you have reached the objective. Now you have got many more years with that button.
melanie1150 - 답글 공유