주요 콘텐츠로 건너뛰기
LG K7 Motherboard Replacement

LG K7 Motherboard Replacement

Christopher Chheng

Christopher Chheng2 다른 기여자

최종 수정일 December 9, 2021

20 - 40 분
조정

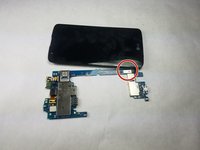
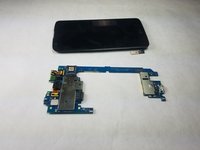
If this device were to take water damage or similar issues to the motherboard, then it might seem like it is essentially unusable and must be replaced, but if you can obtain a replacement motherboard, then you can easily replace it and continue using the phone. This allows you to reduce how much of the phone is going to waste when only part of it is damaged.

필요한 것

도구

  • Spudger
    Spudger
  • Phillips #0 Screwdriver
    Phillips #0 Screwdriver
  1. LG K7 Motherboard Replacement, Motherboard: 1 단계, 이미지 3개 중 1개 LG K7 Motherboard Replacement, Motherboard: 1 단계, 이미지 3개 중 2개 LG K7 Motherboard Replacement, Motherboard: 1 단계, 이미지 3개 중 3개
    • Place phone face-down and use your nail to pry the back off the back.

  2. LG K7 Motherboard Replacement: 2 단계, 이미지 2개 중 1개 LG K7 Motherboard Replacement: 2 단계, 이미지 2개 중 2개
    • Use a plastic spudger or your nail to lift the battery out of the device and put it to the side.

    • The battery should lift out with little effort. If it does not, do not force it.

  3. LG K7 Motherboard Replacement: 3 단계, 이미지 3개 중 1개 LG K7 Motherboard Replacement: 3 단계, 이미지 3개 중 2개 LG K7 Motherboard Replacement: 3 단계, 이미지 3개 중 3개
    • Use a Phillips #0 screwdriver to remove the single 3.5 mm screw holding the power button and volume rocker in place and lift it out and put it to the side.

  4. LG K7 Motherboard Replacement: 4 단계, 이미지 3개 중 1개 LG K7 Motherboard Replacement: 4 단계, 이미지 3개 중 2개 LG K7 Motherboard Replacement: 4 단계, 이미지 3개 중 3개
    • Use a Phillips #0 screwdriver to unscrew the three 3.5mm screws in the bottom portion of the phone and put them to the side.

  5. LG K7 Motherboard Replacement: 5 단계, 이미지 3개 중 1개 LG K7 Motherboard Replacement: 5 단계, 이미지 3개 중 2개 LG K7 Motherboard Replacement: 5 단계, 이미지 3개 중 3개
    • Use a spudger to pry the plastic bit off. Be warned, it will snap out and might fling itself when you attempt prying it out.

  6. LG K7 Motherboard Replacement: 6 단계, 이미지 3개 중 1개 LG K7 Motherboard Replacement: 6 단계, 이미지 3개 중 2개 LG K7 Motherboard Replacement: 6 단계, 이미지 3개 중 3개
    • Use a Phillips #0 screwdriver to unscrew the five 3.5 mm screws holding the housing into the device and use a spudger to pop it out of the back of the device exposing the motherboard.

  7. LG K7 Motherboard Replacement: 7 단계, 이미지 3개 중 1개 LG K7 Motherboard Replacement: 7 단계, 이미지 3개 중 2개 LG K7 Motherboard Replacement: 7 단계, 이미지 3개 중 3개
    • Use a plastic spudger to lift the motherboard out of the casing.

    • You must use a plastic tool for this step or you may risk shorting the logic board.

  8. LG K7 Motherboard Replacement: 8 단계, 이미지 3개 중 1개 LG K7 Motherboard Replacement: 8 단계, 이미지 3개 중 2개 LG K7 Motherboard Replacement: 8 단계, 이미지 3개 중 3개
    • Turn the device over and locate the connector between the digitizer and the motherboard.

    • Use a plastic spudger to disconnect the connector.

  9. LG K7 Motherboard Replacement: 9 단계, 이미지 2개 중 1개 LG K7 Motherboard Replacement: 9 단계, 이미지 2개 중 2개
    • You have now successfully removed the motherboard from your LG K7.

결론

To reassemble your device, follow these instructions in reverse order.

다른 한 분이 해당 안내서를 완성하였습니다.

작성자

2다른 기여자 명과 함께

Christopher Chheng

회원 가입일: 11/01/18

559 평판

안내서 2개를 작성함

IUPUI, Team S3-G4, Harley Fall 2018 IUPUI, Team S3-G4, Harley Fall 2018 회원

IUPUI-HARLEY-F18S3G4

3 회원들

안내서 4개를 작성함

댓글 0개

댓글 쓰기

조회 통계:

지난 24시간: 0

지난 7일: 4

지난 30일: 6

전체 시간: 839