소개
Over time, keyboards tend to accumulate dust, grease, and other debris from our fingers. This makes them a great place for germs to hang out, and can ultimately lead to sticky or otherwise malfunctioning keys. This guide will show you how to clean your laptop keyboard.
Example photos are taken with a MacBook Pro keyboard, but these techniques apply to just about any laptop keyboard.
If you have an Apple laptop with a “butterfly” keyboard (as on any 2015+ MacBook or 2016+ MacBook Pro), we don't recommend attempting to remove keys from your keyboard. The butterfly mechanism and the extra-thin key caps are particularly fragile and difficult to remove intact. If you have keyboard problems with one of these laptops, you may qualify for the Keyboard Service Program.
This guide begins with routine maintenance cleaning steps, and progresses to deep cleaning techniques. Feel free to stop wherever you feel satisfied. Or, if you’re here for a specific problem, you can skip straight to it:
필요한 것
-
-
Run compressed air back and forth across the keyboard.
-
If you can, hold or rest your laptop upside-down (so the keyboard is facing the ground) while you perform this step so that the debris will fall down away from the laptop.
-
-
이 단계에 사용된 도구:Microfiber Cleaning Cloths$3.99
-
Use a microfiber cloth or a vacuum to remove any debris that the compressed air dislodged from the keyboard.
-
-
-
-
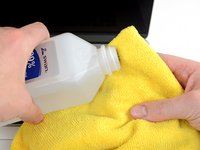
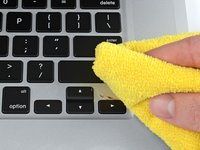
Dampen a microfiber cloth with >90% isopropyl alcohol and wipe down the entire surface of the keyboard, paying special attention to the space between keys, and areas that are noticeably grimy.
-
-
이 단계에 사용된 도구:iFixit Opening Picks (Set of 6)$4.95
-
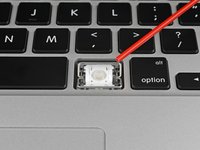
If you've got a sticky key or large debris stuck under one of your keys, use an Opening Pick or another thin tool to carefully pry up the keys in question.
-
This can be done by carefully inserting the opening pick into the small gap between the key and the chassis, and gently prying upward.
-
-
-
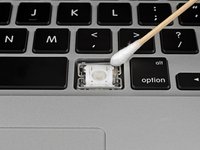
Once the key is removed, use compressed air to blow away any debris around the key retainer.
-
To remove any grime buildup around the key retainer, wet a q-tip or a cotton swab with isopropyl alcohol and wipe the area.
-
-
-
To reinstall key caps, take note of where the clips are on the underside, then align the key with the key retainer and apply pressure with your finger to snap the clips back into place.
-


Congratulations, your keyboard is clean! Repeat these steps every once in a while as needed to keep your keyboard squeaky clean and extend the life of your laptop.
다른 51명이 해당 안내서를 완성하였습니다.

7가이드 댓글
Bonjour, est ce possible d’enlever une touche facilement sur MacBook Pro 2018?
Non ce n'est pas si facile.
Ben Capehart - 답글 공유
If anybody needs more information on how to remove the keycaps. Apple has published the original instructions on there website: https://support.apple.com/manuals/maclap...
Laptop ka battery kaise change Karen
Sheetal Lala - 답글 공유