주요 콘텐츠로 건너뛰기

Lenovo Edge 2-1580 Motherboard Replacement

필요한 것

  1. Lenovo Edge 2-1580 Motherboard Replacement, Battery: 1 단계, 이미지 1/2 Lenovo Edge 2-1580 Motherboard Replacement, Battery: 1 단계, 이미지 2/2
    • Using the Phillips #0 screwdriver, remove the (11) eleven 5.4 mm screws from the back panel.

  2. Lenovo Edge 2-1580 Motherboard Replacement: 2 단계, 이미지 1/2 Lenovo Edge 2-1580 Motherboard Replacement: 2 단계, 이미지 2/2
    • Using a plastic opening tool, pull out the back panel from the laptop.

  3. Lenovo Edge 2-1580 Motherboard Replacement: 3 단계, 이미지 1/3 Lenovo Edge 2-1580 Motherboard Replacement: 3 단계, 이미지 2/3 Lenovo Edge 2-1580 Motherboard Replacement: 3 단계, 이미지 3/3
    • Using the Phillips #0 screwdriver, remove the (2) 5.4 mm screws.

    • Disconnect the battery connector from the motherboard.

  4. Lenovo Edge 2-1580 Motherboard Replacement: 4 단계, 이미지 1/1
    • Pull the battery outward and remove it from the rest of the laptop.

  5. Lenovo Edge 2-1580 Motherboard Replacement, Hard drive: 5 단계, 이미지 1/2 Lenovo Edge 2-1580 Motherboard Replacement, Hard drive: 5 단계, 이미지 2/2
    • Using the Phillips #0 screwdriver, remove the (3) three 3 mm screws.

  6. Lenovo Edge 2-1580 Motherboard Replacement: 6 단계, 이미지 1/2 Lenovo Edge 2-1580 Motherboard Replacement: 6 단계, 이미지 2/2
    • Slide the drive away from the connector by applying pressure on the two side tabs where screws were removed. Use a plastic opening tool as a lever to lift the drive out.

  7. Lenovo Edge 2-1580 Motherboard Replacement: 7 단계, 이미지 1/2 Lenovo Edge 2-1580 Motherboard Replacement: 7 단계, 이미지 2/2
    • Carefully, using your hand, remove the hard drive from the laptop.

  8. Lenovo Edge 2-1580 Motherboard Replacement, Fan: 8 단계, 이미지 1/3 Lenovo Edge 2-1580 Motherboard Replacement, Fan: 8 단계, 이미지 2/3 Lenovo Edge 2-1580 Motherboard Replacement, Fan: 8 단계, 이미지 3/3
    • Remove the 5.4 mm Phillips #0 screw holding the Wireless Network Card.

    • The network card will pop up by itself.

  9. Lenovo Edge 2-1580 Motherboard Replacement: 9 단계, 이미지 1/2 Lenovo Edge 2-1580 Motherboard Replacement: 9 단계, 이미지 2/2
    • Grab the network card and gently pull it out.

  10. Lenovo Edge 2-1580 Motherboard Replacement: 10 단계, 이미지 1/2 Lenovo Edge 2-1580 Motherboard Replacement: 10 단계, 이미지 2/2
    • Pull out the RAM metallic cover.

  11. Lenovo Edge 2-1580 Motherboard Replacement: 11 단계, 이미지 1/2 Lenovo Edge 2-1580 Motherboard Replacement: 11 단계, 이미지 2/2
    • Grab the black insulating tape and pull it out.

  12. Lenovo Edge 2-1580 Motherboard Replacement: 12 단계, 이미지 1/2 Lenovo Edge 2-1580 Motherboard Replacement: 12 단계, 이미지 2/2
    • Using the Phillips #0 screwdriver, remove the (6) six fan screws from the device.

    • (5) Five copper and (1) one silver Phillips #0 5.4mm screws.

    • Disconnect the fan from the motherboard.

  13. Lenovo Edge 2-1580 Motherboard Replacement: 13 단계, 이미지 1/2 Lenovo Edge 2-1580 Motherboard Replacement: 13 단계, 이미지 2/2
    • Unplug the Fan connector from its socket on the motherboard.

  14. Lenovo Edge 2-1580 Motherboard Replacement: 14 단계, 이미지 1/2 Lenovo Edge 2-1580 Motherboard Replacement: 14 단계, 이미지 2/2
    • Carefully remove the fan from the laptop.

  15. Lenovo Edge 2-1580 Motherboard Replacement, Motherboard: 15 단계, 이미지 1/2 Lenovo Edge 2-1580 Motherboard Replacement, Motherboard: 15 단계, 이미지 2/2
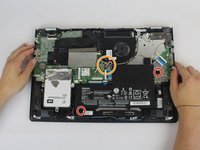
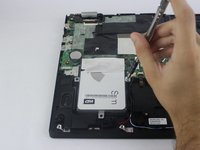
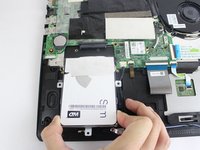
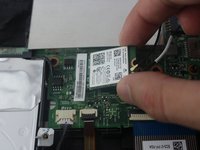
    • Using the Phillips #0 screwdriver, remove the (2) two 5.4 mm Phillips screws.

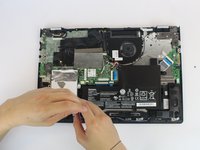
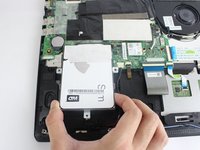
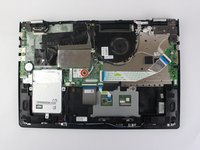
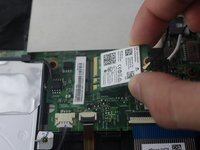
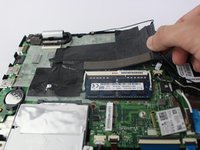
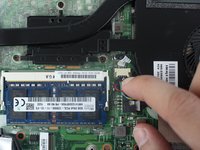
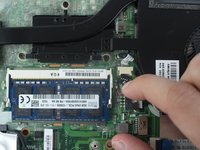
    • Disconnect these connectors from the motherboard.

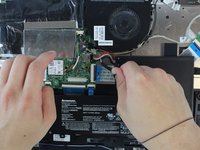
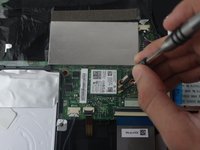
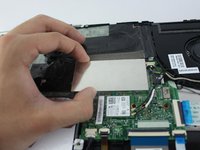
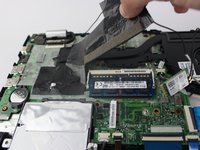
    • Disconnect the four ribbon cables from the motherboard.

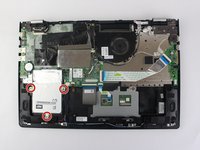
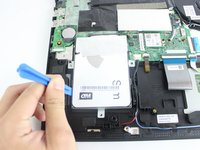
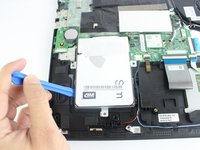
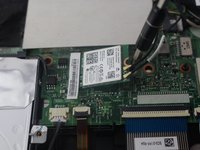
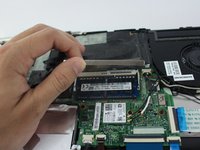
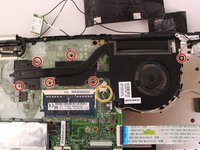
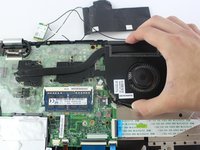
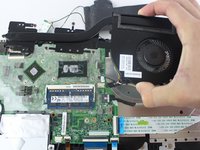
    • Unscrew and remove the (2) two Phillips #0 screws.
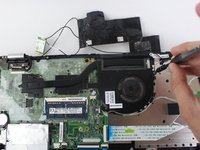
  16. Lenovo Edge 2-1580 Motherboard Replacement: 16 단계, 이미지 1/3 Lenovo Edge 2-1580 Motherboard Replacement: 16 단계, 이미지 2/3 Lenovo Edge 2-1580 Motherboard Replacement: 16 단계, 이미지 3/3
    • Lift up the black latch of the ribbon cable with the brown tab on top by holding the cable in to the motherboard.

    • Grab the tab with a pair of pliers and pull out the cable.

  17. Lenovo Edge 2-1580 Motherboard Replacement: 17 단계, 이미지 1/3 Lenovo Edge 2-1580 Motherboard Replacement: 17 단계, 이미지 2/3 Lenovo Edge 2-1580 Motherboard Replacement: 17 단계, 이미지 3/3
    • Lift the beige latch of the ribbon cable with the blue tab by holding the cable in to the motherboard, and with a pair of tweezers, pull out the cable.

  18. Lenovo Edge 2-1580 Motherboard Replacement: 18 단계, 이미지 1/3 Lenovo Edge 2-1580 Motherboard Replacement: 18 단계, 이미지 2/3 Lenovo Edge 2-1580 Motherboard Replacement: 18 단계, 이미지 3/3
    • Lift up the black latch of the ribbon cable with the blue tab at the lower right corner of the motherboard and disconnect it with a pair of tweezers.

    • Grab the tab and pull out the cable.

  19. Lenovo Edge 2-1580 Motherboard Replacement: 19 단계, 이미지 1/3 Lenovo Edge 2-1580 Motherboard Replacement: 19 단계, 이미지 2/3 Lenovo Edge 2-1580 Motherboard Replacement: 19 단계, 이미지 3/3
    • Locate the last ribbon cable with a blue tab and lift the beige latch holding the cable in to the motherboard.

    • With a pair of tweezers grab the tab and remove the cable.

  20. Lenovo Edge 2-1580 Motherboard Replacement: 20 단계, 이미지 1/2 Lenovo Edge 2-1580 Motherboard Replacement: 20 단계, 이미지 2/2
    • Lift the black latch of the black connector at the top left corner of the motherboard by holding it in to the motherboard.

    • Grab the cable and pull it outwards to remove it.

  21. Lenovo Edge 2-1580 Motherboard Replacement: 21 단계, 이미지 1/2 Lenovo Edge 2-1580 Motherboard Replacement: 21 단계, 이미지 2/2
    • Pull the wire besides the brown tab ribbon cable out and disconnect it.

  22. Lenovo Edge 2-1580 Motherboard Replacement: 22 단계, 이미지 1/2 Lenovo Edge 2-1580 Motherboard Replacement: 22 단계, 이미지 2/2
    • Grab the small black connector by the RAM module and disconnect it from the motherboard.

  23. Lenovo Edge 2-1580 Motherboard Replacement: 23 단계, 이미지 1/2 Lenovo Edge 2-1580 Motherboard Replacement: 23 단계, 이미지 2/2
    • Unplug the remaining connector besides the RAM module and remove it from the motherboard.

  24. Lenovo Edge 2-1580 Motherboard Replacement: 24 단계, 이미지 1/2 Lenovo Edge 2-1580 Motherboard Replacement: 24 단계, 이미지 2/2
    • Gently grab the motherboard and pull it up lightly. Then pull it towards you and remove the motherboard.

결론

To reassemble your device, follow these instructions in reverse order.

다른 4명이 해당 안내서를 완성하였습니다.

Julian Escallon

회원 가입일: 09/27/17

714 평판

안내서 5개 작성하였습니다

USF Tampa, Team S14-G1, Boczar Fall 2017 USF Tampa, Team S14-G1, Boczar Fall 2017 회원

USFT-BOCZAR-F17S14G1

4 회원들

안내서 5개 작성하였습니다

댓글 0개

댓글 쓰기

조회 통계:

24 시간 전: 3

7일 전: 8

30일 전: 22

전체 시간: 2,145