
Lenovo ThinkPad E570 Hard Drive Replacement
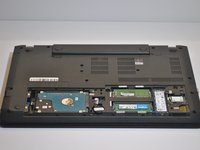
This guide will show you how to replace the hard drive in your Lenovo ThinkPad E570 laptop. Is your device screen suddenly taking you to a blue screen with the message "Your PC ran into a problem and needs to restart?" Do other frequent error messages happen during normal operations? Do you have irregular system crashes and disk errors? This could be an indication of a faulty hard drive that needs to be replaced. Replacing the hard drive will ensure your device doesn't have frequent error messages and disappearing files and folders.
Power down your laptop and disconnect from any external power sources before beginning this guide. Also, be sure to back up the data from your device.
필요한 것
수리 키트
이 키트는 이 안내서를 완료하는데 필요한 모든 부품과 도구를 포함하고 있습니다.


부품


도구

더보기...


To reassemble your device, follow these instructions in reverse order.
To reassemble your device, follow these instructions in reverse order.
다른 한 분이 해당 안내서를 완성하였습니다.
팀

Western Carolina University, Team 1-1, Virtue Fall 2021 Western Carolina University, Team 1-1, Virtue Fall 2021 회원
WCU-VIRTUE-F21S1G1
4 회원들
안내서 5개를 작성함