주요 콘텐츠로 건너뛰기
Lenovo ThinkPad P50s RAM Replacement

Lenovo ThinkPad P50s RAM Replacement

Evan G

Evan G2 다른 기여자

최종 수정일 December 19, 2024

20 - 35 분
쉬움

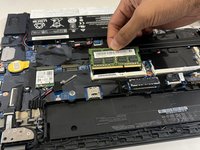
The following guide will show you how to remove your random-access memory (RAM) stick from a Lenovo ThinkPad P50s, and replace it with a new one. The RAM stores the data your computer processor needs to run your applications and open files on your laptop. It keeps the data easily available so your processor can quickly retrieve it to complete immediate processing tasks.

When you need to replace the RAM, your laptop will usually tell you with a notification saying, “low memory” or “out of memory.” If you are experiencing poor performance in everyday tasks, programs are taking longer than usual to load, or programs don’t respond, this could also mean it’s time for a new one.

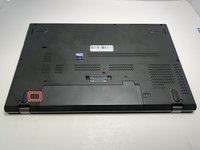
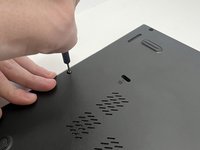
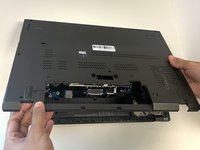
Before you begin this guide, you should disable the built-in battery. Here is a link with instructions on how to do so on page 123. Also, turn off the laptop and disconnect it from the AC charger.

필요한 것

도구

더보기...

  1. Lenovo ThinkPad P50s RAM Replacement, Battery: 1 단계, 이미지 2개 중 1개 Lenovo ThinkPad P50s RAM Replacement, Battery: 1 단계, 이미지 2개 중 2개
    • Flip the device over so the bottom is facing you.

  2. Lenovo ThinkPad P50s RAM Replacement: 2 단계, 이미지 2개 중 1개 Lenovo ThinkPad P50s RAM Replacement: 2 단계, 이미지 2개 중 2개
    • Use your thumb to slide the right lock switch button outward.

  3. Lenovo ThinkPad P50s RAM Replacement: 3 단계, 이미지 3개 중 1개 Lenovo ThinkPad P50s RAM Replacement: 3 단계, 이미지 3개 중 2개 Lenovo ThinkPad P50s RAM Replacement: 3 단계, 이미지 3개 중 3개
    • With your thumb slide the left lock switch button outward while sliding the battery out with your other hand.

    • When replacing the battery, make sure that the connectors are aligned properly.

    • You may hear a click when the battery is fully seated and the lock engages.

  4. Lenovo ThinkPad P50s RAM Replacement, Base Cover: 4 단계, 이미지 2개 중 1개 Lenovo ThinkPad P50s RAM Replacement, Base Cover: 4 단계, 이미지 2개 중 2개
    • Use a Phillips #00 screwdriver to unscrew the eight 2 mm captive screws.

    • These screws should not be removed entirely; you will be able to take off the base cover once they are loosened.

  5. Lenovo ThinkPad P50s RAM Replacement: 5 단계, 이미지 3개 중 1개 Lenovo ThinkPad P50s RAM Replacement: 5 단계, 이미지 3개 중 2개 Lenovo ThinkPad P50s RAM Replacement: 5 단계, 이미지 3개 중 3개
    • With the plastic opening tool, pry up the base cover.

    • Slide the opening tool around the edge of the laptop to release the snap tabs.

    • You may need to use opening picks to hold the tabs apart, as the base is securely attached and tends to snap back into place.

  6. Lenovo ThinkPad P50s RAM Replacement: 6 단계, 이미지 2개 중 1개 Lenovo ThinkPad P50s RAM Replacement: 6 단계, 이미지 2개 중 2개
    • Lift the base cover off the laptop.

  7. Lenovo ThinkPad P50s RAM Replacement, RAM: 7 단계, 이미지 3개 중 1개 Lenovo ThinkPad P50s RAM Replacement, RAM: 7 단계, 이미지 3개 중 2개 Lenovo ThinkPad P50s RAM Replacement, RAM: 7 단계, 이미지 3개 중 3개
    • With your thumbs, press outward on the two white retaining arms to release the RAM stick.

    • Slide the RAM out of the socket at the same angle it was released to avoid bending the connecting pins.

    • When sliding the RAM stick into the socket, carefully align the connecting pins to avoid damaging the connector or the RAM stick. Push down on the RAM until the white arms click into place.

결론

To reassemble your device, follow these instructions in reverse order. Take your e-waste to an R2 or e-Stewards certified recycler.

작성자

2다른 기여자 명과 함께

Evan G

회원 가입일: 09/09/24

193 평판

안내서 2개를 작성함

댓글 0개

댓글 쓰기

조회 통계:

지난 24시간: 0

지난 7일: 3

지난 30일: 5

전체 시간: 47