
Lenovo ThinkPad W540 Display Replacement

If your Lenovo ThinkPad W540 has a black, distorted, or a physically cracked screen, this guide should help you replace the display itself. Displays are important as they obviously show you what you are currently doing with the laptop. A faulty display will lead to a poor user experience to the user.
Note that this guide assumes that you have already checked that your video drivers are ok, and the display brightness is not on the lowest setting.


-
-
Open your laptop so that the screen is at around a 180 degree angle.
-
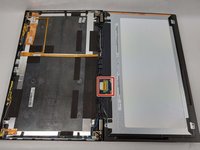
Using a plastic opening tool, pry open the outer frame of the display.
-
-


To reassemble your device, follow these instructions in reverse order.
To reassemble your device, follow these instructions in reverse order.
다른 2명이 해당 안내서를 완성하였습니다.

팀

UMass Dartmouth, Team 3-2, Konn Fall 2023 UMass Dartmouth, Team 3-2, Konn Fall 2023 회원
UMASSD-KONN-F23S3G2
3 회원들
안내서 4개를 작성함