주요 콘텐츠로 건너뛰기

Lenovo ThinkPad W540 Optical Disk Drive (ODD) Replacement

필요한 것

  1. Lenovo ThinkPad W540 Optical Disk Drive (ODD) Replacement, Optical Disk Drive (ODD): 1 단계, 이미지 1/2 Lenovo ThinkPad W540 Optical Disk Drive (ODD) Replacement, Optical Disk Drive (ODD): 1 단계, 이미지 2/2
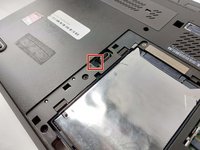
    • Turn your laptop over so the backplate is facing you.

    • Start with your Phillips #0 screwdriver and unscrew the 2 screws in each of the top corners of the backplate.

    • These screws should stay put on the backplate, and should not fall off.

  2. Lenovo ThinkPad W540 Optical Disk Drive (ODD) Replacement: 2 단계, 이미지 1/2 Lenovo ThinkPad W540 Optical Disk Drive (ODD) Replacement: 2 단계, 이미지 2/2
    • With your Phillips #00 screwdriver, simply remove the one 3mm screw on the upper left side.

  3. Lenovo ThinkPad W540 Optical Disk Drive (ODD) Replacement: 3 단계, 이미지 1/3 Lenovo ThinkPad W540 Optical Disk Drive (ODD) Replacement: 3 단계, 이미지 2/3 Lenovo ThinkPad W540 Optical Disk Drive (ODD) Replacement: 3 단계, 이미지 3/3
    • Remove the ODD by using a plastic opening tool to push the drive out of the side of the laptop.

    • Make sure to place the tool where we removed the screw holding the drive in place in Step 2.

  4. Lenovo ThinkPad W540 Optical Disk Drive (ODD) Replacement: 4 단계, 이미지 1/1
    • Once the ODD has popped out, simply grab and pull out the drive bay.

결론

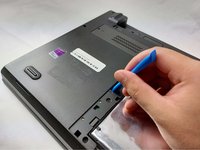
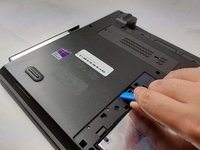
To reassemble your device, follow these instructions in reverse order.

Isaac

회원 가입일: 10/30/23

109 평판

안내서 1개 작성함

UMass Dartmouth, Team 4-1, Shaddix Spring 2024 UMass Dartmouth, Team 4-1, Shaddix Spring 2024 회원

UMASSD-SHADDIX-S24S4G1

4 회원들

안내서 1개 작성하였습니다

댓글 0개

댓글 쓰기

조회 통계:

24 시간 전: 0

7일 전: 2

30일 전: 12

전체 시간: 72