소개
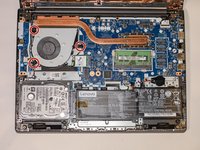
Fan damage or normal wear may cause the computer to overheat during use. This guide shows how to replace the fan within the Lenovo V14-IIL laptop. Be sure to remove small parts carefully.
Before using this guide, make sure to review the Lenovo V14-IIL troubleshooting page to review if there may be a solution that does not require component replacement.
Make sure to power off your laptop completely and disconnect from any external power source before beginning the process.
필요한 것
-
-
Flip your laptop over and place on a flat surface so you can access the screws on the base cover.
-
Remove the six 7 mm screws from the back panel of the laptop using a Phillips #0 screwdriver.
-
Remove the four 4 mm screws from the bottom edge of the laptop using a Phillips #0 screwdriver.
-
-


To reassemble your device, follow these instructions in reverse order.
다른 2명이 해당 안내서를 완성하였습니다.

팀

Tennessee Tech University, Team 1-2, Pickering Spring 2024 Tennessee Tech University, Team 1-2, Pickering Spring 2024 회원
TNTECH-PICKERING-S24S1G2
3 회원들
안내서 4개를 작성함