
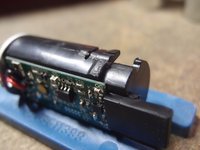
Here is how to get access to the battery in the Lezyne Micro drive using a vice and ratchet sockets (no special tools).
I found that my brilliant new light that I bought from the UK did not charge, so rather then paying the ridiculous amounts of postage to claim warranty, I thought I would try to fix it myself.
필요한 것
도구


더보기...
-
-
-
You can see where the electronics slides into.
-
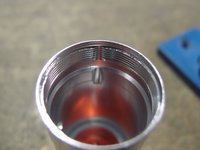
You can see how it is held in with friction from the raised plastic bevel. If you wish to make it easier to disassemble, file the friction bevel down. Don't file down the keying semi circular bevel.
-
The last picture shows the plastic filed down.
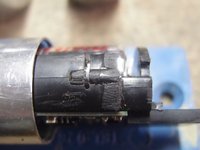
I think the gunge around the main LED board is heat-transfer compound. I would recommend cleaning off the old stuff and replacing if you have some. On the same note, it would be wise not to run the light on full ( at least for the front lamp I have ) for too long without the case to avoid the LED overheating.
mikejwatts - 답글
Useful but, it would be great to know spec of battery, how to source etc.
Thanks for this. I thought it was great of you to do this as I love that light myself and Lezyne no longer make the light, gutted!! However, you call this "Lezyne Micro Drive Battery Replacement" and then don't even show how you replace the battery??🤔 What battery size, what voltage and the rest of the jazz, funk and refusion!!
powernab
A very useful guide - thank you. Original batteries are branded Lezyne, marked LIR123A Lithium Ion 3.6V 600 mAh - 2 Amp (Rechargeable). Equivalent battery code to LIR123A (rechargeable version of CR123A) is 16340. I found 700 mAh capacity cells freely available on eBay etc. Some vendors offer vastly inflated capacities (even 1500 mAh etc.) but I suspect these are fake.
-


To reassemble your device, just put it back together.
To reassemble your device, just put it back together.
다른 11명이 해당 안내서를 완성하였습니다.
댓글 30개
Thanks just repaired my Lezyne Macro Drive front light. Light would flicker, just needed to re-solder the top left resistor shown in step 4.
you can just push the electronics and battery out with your thumb. Usually the issue with these batteries is the battery contact gets slightly corroded. Clean it with battery cleaner, and twist the battery a bit for a new and clean connection.
Thanks for this!
I found that my battery was not charging correctly, flashing green for 3mins and then going solid, but only taking 0.6V charge, not the normal 3V+.
The solution was to remove battery and charge it independently with a more powerful charger. Once replaced, all is well, it charges perfectly now.
A correctly assembled unit will NOT have its internal parts removeable by thumb pressure, unless youre Marius Pujanowski.
It relies on the grip for its seal. The socket thing is the way to go as the large socket is there to accept the tray as it is being pushed out. Do it in your hand and you risk snapping the USB donglerooney.
When stripped down there is a small wavey washer... can anyone confirm where this goes? Is it between the led and the lense?
the washer should be placed between the LED and the battery cartridge. there are three little plastic pegs on top of the battery cartridge. place it inside of them. I guess its purpose is to push the LED against the lens.
Thanks Rupert... I came to the same conclusion in the end and my lights are running again with new batteries.
Neil -
I have the macro drive front light. It flashes green when charging but before long goes constant green. when I switch it on it lasts about 30 seconds before turning off. There is no red low battery warning. I can turn it straight back on and again it lasts for 30 seconds only. has anyone got any ideas please?
David
Hi David, I'm having the exact same issue. Have you found any resolutions?
I had the same issue. My light went dimm after a few seconds and switched off completely after some more seconds. I found out, that the part U1 was loose. It is located next to the LED at the very front and I assume it’s a temperature sensor. It’s probably used for overheating checks and without the sensor working, the light switches off for security reasons. I was able to fix it by resoldering the three legs of part U1.
Hey, thanks! Simple but effective. My macro drive started to flicker and switching off unintentionally. I thougt it was a loose contact somewhere but couldn’t find any bad soldering on the electronics. After pulling out the battery I saw that one of the battery contacts was a little corroded. I cleaned the part with contact spray and a brass brush. Now it works like new!
My macro shows fully charge but soon as I turn it on it switches off after a flash….. any idea why?..
Battery buggered and needing replacing?
I don’t have a vice, so I used a silicone gun, the top off of my herb grinder (plugs the end of the gun perfectly) and 2 sockets (22mm & 12mm), I only had to squeeze once and the light came apart. Nice guide, useful, thank you.
Thanks for this, I was going to send my macrodrive off for repair but thanks to your instructions, I was able to change the battery in a few minutes, much cheaper and easier, especially as the light is a few years old now
Hi, managed to get the unit out and battery of my lezyne microdrive thanks to your help and I’ve contacted upgrade bikes to get a replacement however it will be a four week wait and £11 each! Does anyone know which is the best alternative, finding exactly the same battery is proving impossible! The battery is the LIR123A 3.6b 600mah - 2 amp protected.
cheers, tom
I have this issue, as an earlier poster states;
I have the macro drive rear light. It flashes green when charging but before long goes constant green. when I switch it on it lasts about 30 seconds before turning off. There is no red low battery warning. I can turn it straight back on and again it lasts for 30 seconds only. has anyone got any ideas please?
I have swapped out the battery from the front light to eliminate the battery as the root cause but still does same thing, are the electronics damaged?
I managed to do the same with a Macro Duo, without a vice using a small-ish socket, a big freewheel/centrelock brake socket, and some gentle hammering on a hard surface. Thanks! Replacement batteries with a higher capacity also available on eBay for peanuts.
I’ve just managed to pop mine out with my thumb.
I pushed it in quite firmly first, then applied pressure to the lens and out it popped.
I fear that the microswitch has gone on mine, I can set it off using the end of a biro, but the rubber button won’t apply sufficient pressure in the right place to turn the light on/off… brilliant lights, had it for about 5 years.
Although thinking back I did get it repaired once before (for free by Lezyne, after I got biblically drenched) so perhaps the bevelled plastic was smoothed a little during that removal?
Excellent tutorial nonetheless!
Note the later Hecto drive lights look similar but the lens won’t allow you to push the internals out the same way as the micro drive. I was able to extract the internals but levering them out with a small spoon inserted between the battery & rear wall of internals. They run the same 123A battery as micro.
Does it take 3V or 3.7V battery? I found several different CR123A’s and im not sure which one to buy.
My friend asked me to repair his micro drive. Upon disassembly, the SMD 4x4 button was missing and there 2 mysterious pairs of pads as well on top and below of the pads for the button. There are text beside these pairs of pads, namely DG & DR. Do you have any idea what components are missing? Thank you and keep safe!