주요 콘텐츠로 건너뛰기
수리 커뮤니티 가입 - 계정 만들기

Logitech Webcam Pro 9000 Camera Replacement

필요한 것

  1. Logitech Webcam Pro 9000 Camera Replacement, Front and Back Cover: 1 단계, 이미지 2개 중 1개 Logitech Webcam Pro 9000 Camera Replacement, Front and Back Cover: 1 단계, 이미지 2개 중 2개
    • Remove the two 8 mm Phillips #0 screws on the back cover.

    • The motherboard connects the two covers together. DO NOT separate the two yet.

    • There is a button that loosens as the Phillips screws are removed. Don't be alarmed if it falls out.

    댓글 쓰기

  2. Logitech Webcam Pro 9000 Camera Replacement: 2 단계, 이미지 2개 중 1개 Logitech Webcam Pro 9000 Camera Replacement: 2 단계, 이미지 2개 중 2개
    • Remove the four 6mm Phillips #0 screws connecting the motherboard and front cover.

    • DO NOT detach the wire connecting the motherboard to the front cover.

    댓글 쓰기

  3. Logitech Webcam Pro 9000 Camera Replacement, Camera: 3 단계, 이미지 1개 중 1개
    • Remove the two 8mm Phillips#0 screws on the back of the motherboard.

    댓글 쓰기

  4. Logitech Webcam Pro 9000 Camera Replacement: 4 단계, 이미지 3개 중 1개 Logitech Webcam Pro 9000 Camera Replacement: 4 단계, 이미지 3개 중 2개 Logitech Webcam Pro 9000 Camera Replacement: 4 단계, 이미지 3개 중 3개
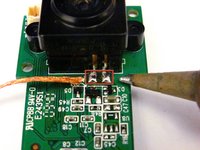
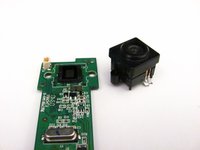
    • Remove the camera from the motherboard by desoldering the two connections as shown.

    • Follow this link to learn how to properly solder and desolder your parts.

    댓글 쓰기

결론

To reassemble your device, follow these instructions in reverse order.

취소: 해당 안내서를 완성하지 않았습니다.

작성자

9다른 기여자 명과 함께

nieko

회원 가입일: 04/18/13

63 평판

안내서 2개를 작성함

Cal Poly, Team 12-34, Amido Spring 2013 Cal Poly, Team 12-34, Amido Spring 2013 회원

CPSU-AMIDO-S13S12G34

4 회원들

안내서 16개를 작성함

0가이드 댓글

댓글 쓰기

조회 통계:

지난 24시간: 0

지난 7일: 7

지난 30일: 26

전체 시간: 2,825