소개
Use this guide to replace the trackpad.
필요한 것
-
-
이 단계에 사용된 도구:P5 Pentalobe Screwdriver Retina MacBook Pro and Air$5.99
-
Use a P5 Pentalobe driver to remove ten screws securing the lower case, of the following lengths:
-
Two 9 mm screws
-
Eight 2.6 mm screws
 FixBot에 문의하기
-
-
-
Wedge your fingers between the display and the lower case and pull upward to pop the lower case off the Air.
-
Remove the lower case and set it aside.
-
-
-
-
-
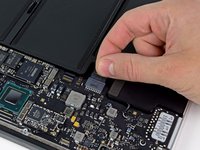
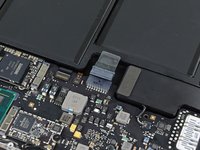
Grab the clear plastic pull tab attached to the battery connector and pull it toward the front edge of the Air to disconnect the battery from the logic board.
-
-
-
Remove the following five screws securing the battery to the upper case:
-
Three 6.3 mm T5 Torx screws
-
Two 2.4 mm T5 Torx screws
-
-
-
-
Lift the battery from its edge nearest the logic board and remove it from the upper case.
-
Charge it to 100%, and then keep charging it for at least 2 more hours. Then, unplug and use it normally to drain the battery. When you see the low battery warning, save your work, and keep your laptop on until it goes to sleep due to low battery. Wait at least 5 hours, then charge your laptop uninterrupted to 100%.
-
If you notice any unusual behavior or problems after installing your new battery, you may need to reset your MacBook's SMC.
-
-
-
-
-
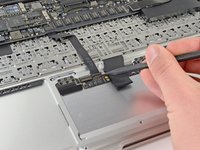
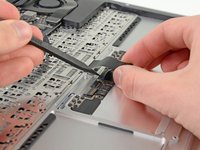
Use the tip of a spudger or your fingernail to flip up the retaining flap on the trackpad ribbon cable ZIF socket.
-
Pull the trackpad ribbon cable straight out of its socket toward the rear edge of the Air.
-
-
-
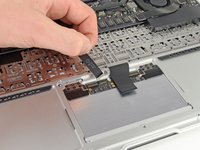
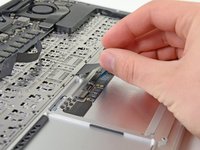
While carefully lifting the keyboard ribbon cable with one hand, use the tip of a spudger or your fingernail to flip up the retaining flap on the keyboard ribbon cable ZIF socket.
-
Pull the keyboard ribbon cable straight out of its socket toward the front edge of the Air.
-
-
-
Remove the following twelve screws:
-
Six 1.6 mm Phillips screws securing the trackpad to the upper case.
-
Six 1.6 mm Phillips screws securing the trackpad brackets to the trackpad.
-
A Phillips #000 should be sufficient, but a JIS #000 may also work as well.
-
-
-
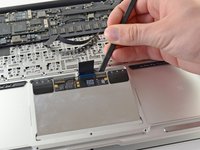
Remove the 1.4 mm T5 Torx set screw from its tapped hole near the front edge of the upper case.
-
-
-
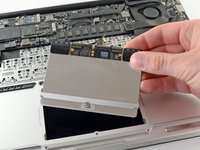
Use the flat edge of a spudger to carefully lift the edge of the trackpad closest to the keyboard from its recess in the upper case by lifting it away from the brackets attached to the upper case.
-
Remove the trackpad from the upper case.
-
-


To reassemble your device, follow these instructions in reverse order.
다른 56명이 해당 안내서를 완성하였습니다.


9가이드 댓글
The Apple tech repair guide for this model of Macbook Air states that the flexures use Phillips #000 screws, but I didn't have good luck using #000 drivers on them. A high quality precision Phillips #00 driver worked a little better, but I'm wondering if this is actually a JIS cross point phillips #00 or #000 screwdriver? The screws look more like JIS (Japanese Industry Standard) instead of Phillips, anyone try a JIS with better luck on these?
Great guide, all worked as described. Thanks!
Yes, the screws don't seem to quite match expectations; I used three different #00/#000 drivers before I got a good fit.
Step 7: Could use just a bit more detailed explanation and/or picture. The retainer is on the "back" edge of the connector (facing off the long edge of the trackpad, opposite of Step 6), and takes a mix of delicate firmness to raise. Practice on your replacement (if available).
Step 8: My replacement trackpad came with the trackpad bracket attached, so no need to remove the 6 (orange-circled) screws attaching bracket to trackpad, which can be removed and installed with the bracket attached.
Step 10, reinstalling: Getting the set-screw correctly adjusted was a bit hit-n-miss. My assumption was in far enough to just stop movement, then back off a turn or so. That ended up too loose. YMMV.
I have just finished, there was a scary moment when I managed to somehow cause the retainer clip for keyboard ribbon to fall off the new track pad while I was fitting the cable. I put it together anyway but - of course the keyboard did not work!!! I then took it apart and somehow with the use of an illuminated magnifier, I managed to push the retainer clip back on to the prongs and it works!!
Michael S
Hi,
friend mine did replacement of complete top case with keyboard and trackpad. Seller claimed it is ok but we face one problem. when I touch case (palm rest) trackpad stops responding. Both cases were from A1369 model but on mine was black plastic foil over part of keyboard whiel on other not. So I am not sure there could be some other differences that could cause this.
Would anybody has any suggestion.
Thanks
Frank