주요 콘텐츠로 건너뛰기

MacBook Pro 15" Retina Display Mid 2012 Battery Replacement

필요한 것

  1. MacBook Pro 15" Retina Display Mid 2012 Battery Replacement, Lower Case: 1 단계, 이미지 1/1
    • Remove the following P5 pentalobe screws securing the lower case to the MacBook Pro:

    • Eight 3.0 mm

    • Two 2.3 mm

  2. MacBook Pro 15" Retina Display Mid 2012 Battery Replacement: 2 단계, 이미지 1/1
    • Lifting from the edge nearest the clutch cover, lift the lower case off the MacBook Pro.

    • Set the lower case aside.

  3. MacBook Pro 15" Retina Display Mid 2012 Battery Replacement, Battery Connector: 3 단계, 이미지 1/1
    • Peel back the warning label covering the battery connector.

  4. MacBook Pro 15" Retina Display Mid 2012 Battery Replacement: 4 단계, 이미지 1/2 MacBook Pro 15" Retina Display Mid 2012 Battery Replacement: 4 단계, 이미지 2/2
    • Using the flat end of a spudger, gently pry the battery connector straight up out of its socket on the logic board.

    • Bend the battery cables back and out of the way, ensuring that the battery connector doesn't accidentally make contact with the logic board.

  5. MacBook Pro 15" Retina Display Mid 2012 Battery Replacement, AirPort/Camera Cable: 5 단계, 이미지 1/1
    • Use a spudger or tweezers to pry the three AirPort antenna cables straight up off of their sockets on the AirPort board.

    • The cable connection points are fragile. Be careful to lift only on the connector, and not on the socket or cable.

    • To reconnect, align the connector carefully into position over the socket, and press it down firmly with the flat of your spudger.

  6. MacBook Pro 15" Retina Display Mid 2012 Battery Replacement: 6 단계, 이미지 1/1
    • Use the tip of a spudger to push the camera cable's plug toward the fan and out of its socket on the logic board.

    • The plug in the photo has six connections, but some models have twelve connections. The process of removing the plug from its socket is the same for both.

    • If the camera cable's plug won't come easily out of its socket on the logic board, fold back the rubber cover over the fan to gain access to the cable, then gently pull on the cable while using the spudger to gently push the plug out of its socket.

    • Be sure to push parallel to the board, first on one side, then the other, to slowly "walk" the plug out of its socket. Do not pry up, or you will damage the socket.

  7. MacBook Pro 15" Retina Display Mid 2012 Battery Replacement: 7 단계, 이미지 1/3 MacBook Pro 15" Retina Display Mid 2012 Battery Replacement: 7 단계, 이미지 2/3 MacBook Pro 15" Retina Display Mid 2012 Battery Replacement: 7 단계, 이미지 3/3
    • Insert the flat end of a spudger underneath the rubber heat sink cover on the right fan.

    • Slide the spudger underneath the length of the cover, releasing the adhesive.

    • Lift the cover and flip it back so that you can access the cables underneath.

  8. MacBook Pro 15" Retina Display Mid 2012 Battery Replacement: 8 단계, 이미지 1/3 MacBook Pro 15" Retina Display Mid 2012 Battery Replacement: 8 단계, 이미지 2/3 MacBook Pro 15" Retina Display Mid 2012 Battery Replacement: 8 단계, 이미지 3/3
    • Use your fingers to pull the AirPort/Camera cables up off the fan.

    • The cables are adhered to the fan, so peel them up carefully to avoid damaging them.

    • Carefully de-route the cables from the plastic cable guide.

  9. MacBook Pro 15" Retina Display Mid 2012 Battery Replacement, I/O Board Cable: 9 단계, 이미지 1/3 MacBook Pro 15" Retina Display Mid 2012 Battery Replacement, I/O Board Cable: 9 단계, 이미지 2/3 MacBook Pro 15" Retina Display Mid 2012 Battery Replacement, I/O Board Cable: 9 단계, 이미지 3/3
    • If your I/O Board cable's connectors have notches in the padding, you will need to release a locking lever underneath the notch in order to remove the cable. If this is the case, don't pry up on the connector until the levers are unlatched.

    • Using the flat end of a spudger, pry the I/O Board connector straight up out of its socket on the logic board.

    • During reassembly, connect this end first, as it does not flex.

    • In a similar fashion, remove the I/O Board cable connector from its socket on the I/O Board.

    • Remove the I/O Board cable from the MacBook Pro.

  10. MacBook Pro 15" Retina Display Mid 2012 Battery Replacement, Airport Card: 10 단계, 이미지 1/1
    • Remove the single 2.9 mm T5 Torx screw securing the AirPort card to the logic board.

  11. MacBook Pro 15" Retina Display Mid 2012 Battery Replacement: 11 단계, 이미지 1/2 MacBook Pro 15" Retina Display Mid 2012 Battery Replacement: 11 단계, 이미지 2/2
    • Grasp the sides of the AirPort card and lift it up to a shallow angle (5-10˚) to separate the light adhesive adhering it to the logic board.

    • Pull the AirPort card parallel out of its connector on the logic board to remove it.

  12. MacBook Pro 15" Retina Display Mid 2012 Battery Replacement: 12 단계, 이미지 1/2 MacBook Pro 15" Retina Display Mid 2012 Battery Replacement: 12 단계, 이미지 2/2
    • Use the tip of a spudger to flip up the retaining flap on the right fan ribbon cable ZIF socket.

    • Be sure you are prying up on the hinged retaining flap, not the socket itself.

    • Starting at the top of the cable, slide a plastic opening tool under the right fan cable to free it from the logic board.

    • Use caution when freeing the cable, as it is strongly adhered to the logic board.

  13. MacBook Pro 15" Retina Display Mid 2012 Battery Replacement: 13 단계, 이미지 1/1
    • Remove the following three screws securing the right fan to the logic board:

    • One 4.4 mm T5 Torx screw

    • One 3.9 mm T5 Wide Head Torx screw

    • One 5.0 mm T5 Torx screw with 2 mm collar

  14. MacBook Pro 15" Retina Display Mid 2012 Battery Replacement: 14 단계, 이미지 1/1
    • Lift and remove the right fan out from the MacBook Pro.

    • When reinstalling the fan, it's easiest connect the fan ribbon cable as you drop the fan in place, rather than after you've installed the three fan screws.

  15. MacBook Pro 15" Retina Display Mid 2012 Battery Replacement, Left Fan: 15 단계, 이미지 1/1
    • Use the flat end of a spudger to lift the rubber heat sink cover up off the left fan.

  16. MacBook Pro 15" Retina Display Mid 2012 Battery Replacement: 16 단계, 이미지 1/1
    • Remove the following three screws securing the left fan to the logic board:

    • One 4.4 mm T5 Torx screw with 2 mm collar

    • One 5.0 mm T5 Torx screw with 2 mm collar

    • One 3.9 mm T5 Wide Head Torx screw

    • When reinstalling the fan and its screws, don't fully torque the screws until you've first installed all of them loosely, so that the fan can move a little and position itself properly as you insert the screws into their threaded standoffs.

  17. MacBook Pro 15" Retina Display Mid 2012 Battery Replacement: 17 단계, 이미지 1/3 MacBook Pro 15" Retina Display Mid 2012 Battery Replacement: 17 단계, 이미지 2/3 MacBook Pro 15" Retina Display Mid 2012 Battery Replacement: 17 단계, 이미지 3/3
    • Use the tip of a spudger to flip up the retaining flap on the left fan ribbon cable ZIF socket.

    • Be sure you are prying up on the hinged retaining flap, not the socket itself.

    • Starting at the top of the cable, slide a plastic opening tool under the left fan cable to free it from the logic board.

    • Use caution when freeing the cable, as it is strongly adhered to the logic board. If necessary, use an iOpener or hair dryer to heat the cable in order to soften the adhesive and make it easier to remove.

    • Lift the left fan out of the device.

    • When reinstalling the fan, it's easier to connect the fan ribbon cable as you drop the fan in place, rather than after you've installed the three fan screws.

  18. MacBook Pro 15" Retina Display Mid 2012 Battery Replacement, SSD: 18 단계, 이미지 1/1
    • Remove the single 3.1 mm T5 Torx screw securing the SSD to the logic board.

  19. MacBook Pro 15" Retina Display Mid 2012 Battery Replacement: 19 단계, 이미지 1/2 MacBook Pro 15" Retina Display Mid 2012 Battery Replacement: 19 단계, 이미지 2/2
    • Slightly lift the rightmost side of the SSD and firmly slide it straight away out of its socket on the logic board.

  20. MacBook Pro 15" Retina Display Mid 2012 Battery Replacement, I/O Board: 20 단계, 이미지 1/2 MacBook Pro 15" Retina Display Mid 2012 Battery Replacement, I/O Board: 20 단계, 이미지 2/2
    • Use the tip of a spudger to flip up the I/O board data cable lock and rotate it toward the battery side of the computer.

    • Use the flat end of a spudger to slide the I/O board data cable straight out of its socket on the logic board.

    • Do not lift up on the I/O board data cable, as its socket is very fragile. Pull the cable parallel to the face of the logic board.

  21. MacBook Pro 15" Retina Display Mid 2012 Battery Replacement: 21 단계, 이미지 1/3 MacBook Pro 15" Retina Display Mid 2012 Battery Replacement: 21 단계, 이미지 2/3 MacBook Pro 15" Retina Display Mid 2012 Battery Replacement: 21 단계, 이미지 3/3
    • Remove the two 3.1 mm T5 Torx screws securing the I/O board to the logic board.

    • On some models, also removing the silver 3.5 mm T5 Torx screw from the heatsink can aid in I/O board removal.

    • Carefully lift the I/O board and remove it from the lower case.

  22. MacBook Pro 15" Retina Display Mid 2012 Battery Replacement, Logic Board Assembly: 22 단계, 이미지 1/1
    • Use the flat end of a spudger to pry the headphone jack connector up from its socket on the logic board.

  23. MacBook Pro 15" Retina Display Mid 2012 Battery Replacement: 23 단계, 이미지 1/2 MacBook Pro 15" Retina Display Mid 2012 Battery Replacement: 23 단계, 이미지 2/2
    • Use the flat end of a spudger to pry the left speaker connector up and out of its socket on the logic board.

    • Use the tip of a spudger to pry the right speaker connector up and out of its socket on the logic board

    • Be sure to pry on the cable head, and not on the socket itself. Prying on the socket may cause it to separate from the logic board.

  24. MacBook Pro 15" Retina Display Mid 2012 Battery Replacement: 24 단계, 이미지 1/1
    • Peel back any tape covering the keyboard ribbon cable connector.

  25. MacBook Pro 15" Retina Display Mid 2012 Battery Replacement: 25 단계, 이미지 1/3 MacBook Pro 15" Retina Display Mid 2012 Battery Replacement: 25 단계, 이미지 2/3 MacBook Pro 15" Retina Display Mid 2012 Battery Replacement: 25 단계, 이미지 3/3
    • Use the flat end of a spudger to flip up the retaining flap on the keyboard ribbon cable ZIF socket.

    • Pry only under the hinged retaining flap, not the socket itself, or you may break it off the board.

    • Use the flat end of a spudger to gently back the keyboard ribbon cable out of its socket by pushing first at one side, then the other.

  26. MacBook Pro 15" Retina Display Mid 2012 Battery Replacement: 26 단계, 이미지 1/1
    • Use the flat end of a spudger to pry the trackpad ribbon cable connector up from its socket on the logic board.

  27. MacBook Pro 15" Retina Display Mid 2012 Battery Replacement: 27 단계, 이미지 1/1
    • Use the flat end of a spudger to pry the keyboard backlight connector up from its socket on the logic board.

  28. MacBook Pro 15" Retina Display Mid 2012 Battery Replacement: 28 단계, 이미지 1/1
    • Use the tip of a spudger or your fingernail to flip up the retaining flap on the microphone ribbon cable ZIF socket.

    • Be sure you are prying up on the hinged retaining flap, not the socket itself.

    • Pull the microphone ribbon cable out of its socket.

  29. MacBook Pro 15" Retina Display Mid 2012 Battery Replacement: 29 단계, 이미지 1/2 MacBook Pro 15" Retina Display Mid 2012 Battery Replacement: 29 단계, 이미지 2/2
    • Use the tip of a spudger to pry the display data cable lock and rotate it toward the DC-In side of the computer.

    • Pull the display data cable straight out of its socket on the logic board.

    • Do not lift up on the display data cable, as its socket is very fragile. Pull the cable parallel to the face of the logic board.

  30. MacBook Pro 15" Retina Display Mid 2012 Battery Replacement: 30 단계, 이미지 1/1
    • Use the flat end of a spudger to carefully pry off the rubber screw cap on the raised screw head near to the MagSafe 2 connector.

  31. MacBook Pro 15" Retina Display Mid 2012 Battery Replacement: 31 단계, 이미지 1/1
    • Remove the following six screws securing the logic board to to the upper case:

    • One 2.6 mm T5 Torx screw

    • Two 5.8 mm T5 Torx screws

    • One 3.8 mm T5 Torx screw

    • One 5.2 mm Raised Head T5 Torx screw

    • One 3.5 mm Silver T5 Torx screw

  32. MacBook Pro 15" Retina Display Mid 2012 Battery Replacement: 32 단계, 이미지 1/3 MacBook Pro 15" Retina Display Mid 2012 Battery Replacement: 32 단계, 이미지 2/3 MacBook Pro 15" Retina Display Mid 2012 Battery Replacement: 32 단계, 이미지 3/3
    • Lifting from the side nearest the battery, rotate the logic board toward the top of the MacBook Pro.

    • Using the flat end of a spudger, carefully push the MagSafe 2 connector out of its socket on the bottom of the logic board.

    • When reinstalling the logic board, check the cables at the marked locations to make sure they don't get pinned underneath the logic board.

    • Clockwise from top: keyboard, trackpad, battery, right speaker, keyboard backlight, display, microphone, headphone jack, left speaker.

  33. MacBook Pro 15" Retina Display Mid 2012 Battery Replacement: 33 단계, 이미지 1/1
    • Remove the logic board assembly from the MacBook Pro.

  34. MacBook Pro 15" Retina Display Mid 2012 Battery Replacement, Speakers: 34 단계, 이미지 1/2 MacBook Pro 15" Retina Display Mid 2012 Battery Replacement, Speakers: 34 단계, 이미지 2/2
    • Remove the following three screws securing the left speaker to the upper case:

    • One 5.6 mm T5 Torx screw

    • One 6.9 mm T5 Torx screw

    • One 2.6 mm T5 Torx screw

    • Lift the left speaker out of the upper case and set it aside.

    • The speaker is secured to the case with some light adhesive.

  35. MacBook Pro 15" Retina Display Mid 2012 Battery Replacement: 35 단계, 이미지 1/2 MacBook Pro 15" Retina Display Mid 2012 Battery Replacement: 35 단계, 이미지 2/2
    • Remove the following three screws securing the right speaker to the upper case:

    • One 5.6 mm T5 Torx screw

    • One 6.9 mm T5 Torx screw

    • One 2.6 mm T5 Torx screw

    • Remove the right speaker from the MacBook Pro.

    • The speaker is secured to the case with some light adhesive.

  36. MacBook Pro 15" Retina Display Mid 2012 Battery Replacement, Battery: 36 단계, 이미지 1/1
    • Remove the two 3.9 mm T5 Torx screws securing the battery board.

  37. MacBook Pro 15" Retina Display Mid 2012 Battery Replacement: 37 단계, 이미지 1/1
    • The liquid adhesive remover provided in your kit can affect the antireflective coating on your MacBook Pro's display.

    • To protect your display, place a sheet of aluminum foil between the display and keyboard and leave it there while you work.

  38. MacBook Pro 15" Retina Display Mid 2012 Battery Replacement: 38 단계, 이미지 1/2 MacBook Pro 15" Retina Display Mid 2012 Battery Replacement: 38 단계, 이미지 2/2
    • With the front edge of the MacBook Pro facing you, lift the right side and prop it up at a slight angle, using a sturdy foam block or book.

    • In the following steps, you'll apply liquid adhesive remover to the right (outer) edge of the battery. Keeping this side of the MacBook Pro elevated will help the adhesive remover flow underneath the battery.

  39. MacBook Pro 15" Retina Display Mid 2012 Battery Replacement: 39 단계, 이미지 1/2 MacBook Pro 15" Retina Display Mid 2012 Battery Replacement: 39 단계, 이미지 2/2
    • Now that your MacBook Pro is fully prepped, it's time to prep yourself.

    • iFixit adhesive remover contains acetone, a mild skin and eye irritant.

    • Wear eye protection when handling and applying the adhesive remover. (Eye protection is included in your kit.)

    • Do not wear contact lenses without eye protection.

    • Protective gloves are also included in your kit. If you are concerned about possible skin irritation, put your gloves on now.

  40. MacBook Pro 15" Retina Display Mid 2012 Battery Replacement: 40 단계, 이미지 1/3 MacBook Pro 15" Retina Display Mid 2012 Battery Replacement: 40 단계, 이미지 2/3 MacBook Pro 15" Retina Display Mid 2012 Battery Replacement: 40 단계, 이미지 3/3
    • Pull off the black rubber stopper from your bottle of adhesive remover.

    • Twist to loosen or remove the bottle cap before you cut the applicator tip.

    • This unseals the bottle and allows the pressure to equalize before you cut the applicator tip. If you skip this step, the adhesive remover may spray out unexpectedly when the tip is cut.

    • Use scissors to cut off the sealed tip of the applicator.

    • Cutting close to the narrow tip will give you better control so you can apply the adhesive remover in small amounts.

    • Twist and close the bottle cap securely before you proceed further.

  41. MacBook Pro 15" Retina Display Mid 2012 Battery Replacement: 41 단계, 이미지 1/2 MacBook Pro 15" Retina Display Mid 2012 Battery Replacement: 41 단계, 이미지 2/2
    • Apply a few drops of adhesive remover evenly along the elevated edge of the outer right battery cell.

    • You don't need to use very much. The small bottle contains more than twice the amount of solvent needed to remove all the battery cells.

    • Wait 2-3 minutes for the liquid adhesive remover to penetrate underneath the battery cell before you proceed to the next step.

  42. MacBook Pro 15" Retina Display Mid 2012 Battery Replacement: 42 단계, 이미지 1/3 MacBook Pro 15" Retina Display Mid 2012 Battery Replacement: 42 단계, 이미지 2/3 MacBook Pro 15" Retina Display Mid 2012 Battery Replacement: 42 단계, 이미지 3/3
    이 단계에 사용된 도구:
    Plastic Cards
    $2.99
    구매
    • Slide one corner of a plastic card under the outer edge of the battery cell.

    • It may help to gently twist the card to open up a slight gap between the battery cell and the MacBook Pro's case.

    • Slide the card farther underneath the battery cell to separate it from the adhesive securing it to the MacBook Pro's upper case.

  43. MacBook Pro 15" Retina Display Mid 2012 Battery Replacement: 43 단계, 이미지 1/2 MacBook Pro 15" Retina Display Mid 2012 Battery Replacement: 43 단계, 이미지 2/2
    • Lift the battery cell to separate it from the MacBook Pro's upper case, but don't try to remove it.

    • Leave the plastic card underneath the battery cell to prevent it from re-adhering as you proceed to the next step.

  44. MacBook Pro 15" Retina Display Mid 2012 Battery Replacement: 44 단계, 이미지 1/2 MacBook Pro 15" Retina Display Mid 2012 Battery Replacement: 44 단계, 이미지 2/2
    • Apply a few drops of adhesive remover evenly along the elevated edge of the next battery cell.

    • Wait 2-3 minutes for the liquid adhesive remover to penetrate underneath the battery cell before you proceed to the next step.

  45. MacBook Pro 15" Retina Display Mid 2012 Battery Replacement: 45 단계, 이미지 1/3 MacBook Pro 15" Retina Display Mid 2012 Battery Replacement: 45 단계, 이미지 2/3 MacBook Pro 15" Retina Display Mid 2012 Battery Replacement: 45 단계, 이미지 3/3
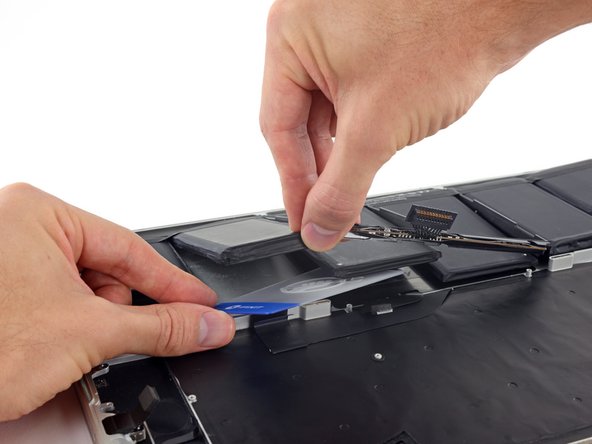
    • Slide one corner of your plastic card underneath the second battery cell.

    • Push the card underneath the second battery cell, and slide it side to side to separate the adhesive underneath.

    • Leave the plastic card underneath both battery cells (or flip them over) to prevent them from re-adhering as you proceed to the next step.

  46. MacBook Pro 15" Retina Display Mid 2012 Battery Replacement: 46 단계, 이미지 1/3 MacBook Pro 15" Retina Display Mid 2012 Battery Replacement: 46 단계, 이미지 2/3 MacBook Pro 15" Retina Display Mid 2012 Battery Replacement: 46 단계, 이미지 3/3
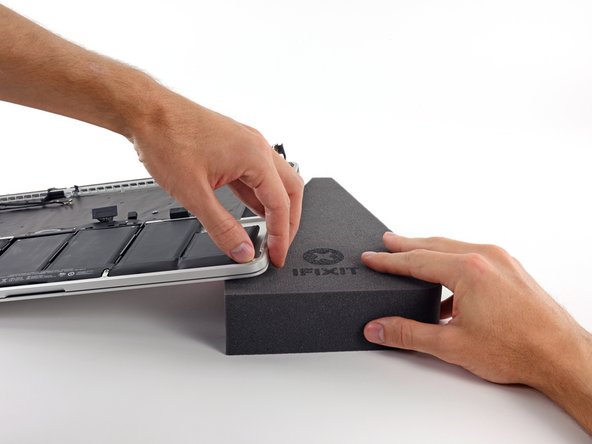
    • It's time to switch sides. Remove your book or foam block and place it under the opposite side of your MacBook Pro.

    • Repeat the procedure from the prior steps to separate the two battery cells on this side:

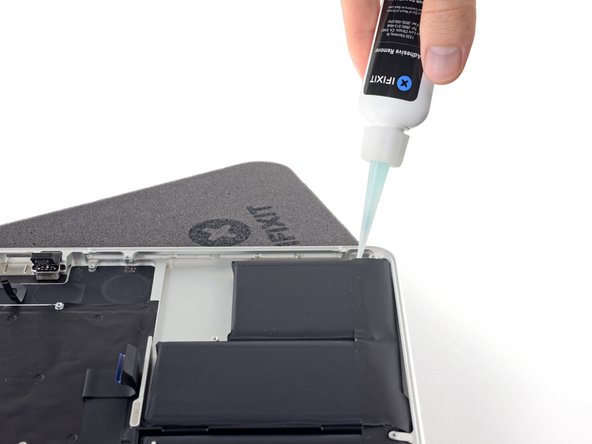
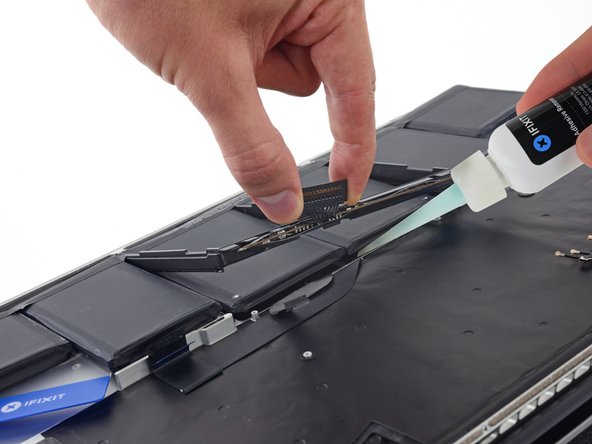
    • Apply your adhesive remover to the elevated edge of the outer battery cell, and wait 2-3 minutes for it to penetrate.

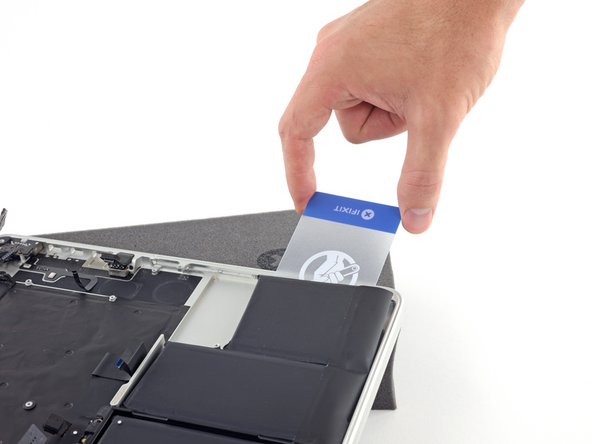
    • Work one corner of a plastic card underneath the battery cell, and slide the card fully underneath the battery cell to separate it.

    • Do the same for the adjacent cell.

    • Leave your plastic card in place or flip the battery cells over to prevent them from re-adhering during the following steps.

  47. MacBook Pro 15" Retina Display Mid 2012 Battery Replacement: 47 단계, 이미지 1/2 MacBook Pro 15" Retina Display Mid 2012 Battery Replacement: 47 단계, 이미지 2/2
    • Remove your book or foam block and place it under the rear edge of your MacBook Pro, near the display hinges.

  48. MacBook Pro 15" Retina Display Mid 2012 Battery Replacement: 48 단계, 이미지 1/2 MacBook Pro 15" Retina Display Mid 2012 Battery Replacement: 48 단계, 이미지 2/2
    • Grab the battery connector or the top edge of the plastic battery frame and lift it slightly, exposing the top edge of the two center battery cells.

  49. MacBook Pro 15" Retina Display Mid 2012 Battery Replacement: 49 단계, 이미지 1/2 MacBook Pro 15" Retina Display Mid 2012 Battery Replacement: 49 단계, 이미지 2/2
    • While lifting the plastic battery frame out of the way, apply a few drops of adhesive remover underneath the top edge of each of the two remaining battery cells.

    • Wait 2-3 minutes for the adhesive remover to penetrate before you continue.

  50. MacBook Pro 15" Retina Display Mid 2012 Battery Replacement: 50 단계, 이미지 1/3 MacBook Pro 15" Retina Display Mid 2012 Battery Replacement: 50 단계, 이미지 2/3 MacBook Pro 15" Retina Display Mid 2012 Battery Replacement: 50 단계, 이미지 3/3
    • While lifting the plastic frame out of the way, push one corner of your plastic card underneath the outside edge of the first center battery cell.

    • Do not pry along the edge nearest the battery connector, or you risk damaging the keyboard ribbon cable.

    • Underneath the center battery cells, a thin metal plate protects the trackpad. Pry only under the battery cell; leave the metal plate in place.

    • Slide your card all the way under the battery cell, and leave it to prevent the battery cell from re-adhering.

  51. MacBook Pro 15" Retina Display Mid 2012 Battery Replacement: 51 단계, 이미지 1/3 MacBook Pro 15" Retina Display Mid 2012 Battery Replacement: 51 단계, 이미지 2/3 MacBook Pro 15" Retina Display Mid 2012 Battery Replacement: 51 단계, 이미지 3/3
    • Repeat the above procedure to separate the last remaining battery cell from the MacBook Pro's upper case.

  52. MacBook Pro 15" Retina Display Mid 2012 Battery Replacement: 52 단계, 이미지 1/2 MacBook Pro 15" Retina Display Mid 2012 Battery Replacement: 52 단계, 이미지 2/2
    • Lift the battery with the plastic frame and slide it back toward the MacBook Pro’s hinge until it clears the screw posts holding it to the upper case.

  53. MacBook Pro 15" Retina Display Mid 2012 Battery Replacement: 53 단계, 이미지 1/2 MacBook Pro 15" Retina Display Mid 2012 Battery Replacement: 53 단계, 이미지 2/2
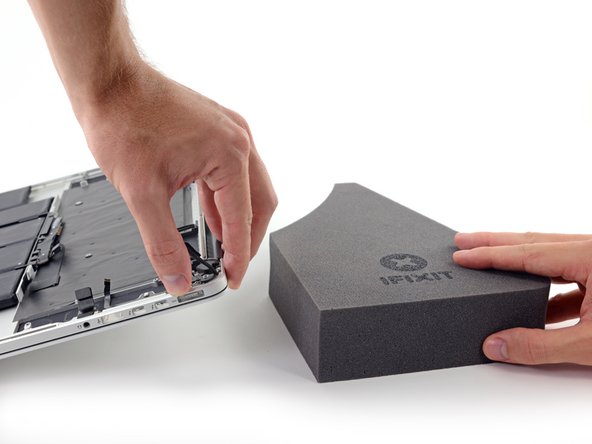
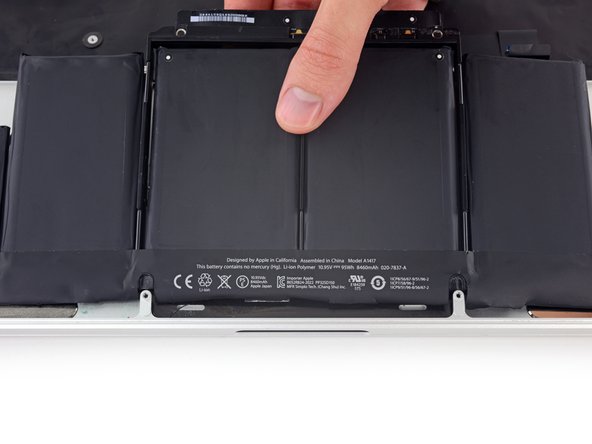
    • Lift and remove the battery.

    • Before installing your new battery, remove all the old adhesive from the MacBook Pro's case.

    • With a little luck, you can slowly pull out each strip of adhesive with your fingers.

    • Otherwise, soak each strip of adhesive with a bit of adhesive remover for 2-3 minutes, and then scrape it out with a plastic tool. This can take quite a bit of work, so be patient.

    • Mop up any remaining adhesive remover and give your MacBook Pro a few minutes to air dry.

    • The replacement battery included in your iFixit kit comes with adhesive pre-installed. Test the battery's fit and alignment carefully before peeling off the film covering the adhesive, and then press each cell firmly into place. If any additional films/liners are present that weren't on your original battery, remove them now.

    • Calibrate your newly installed battery: charge it to 100%, and keep charging it for at least 2 more hours. Unplug and use it normally to drain the battery. When you see the low battery warning, save your work, and keep your laptop on until it goes to sleep due to low battery. Wait at least 5 hours, then charge your laptop uninterrupted to 100%.

    • If you notice any unusual behavior or problems after installing your new battery, you may need to reset your MacBook Pro's SMC.

결론

To reassemble your device, follow these instructions in reverse order.

다른 403명이 해당 안내서를 완성하였습니다.

Jeff Suovanen

회원 가입일: 08/06/13

426,551 평판

안내서 259개 작성하였습니다

iFixit iFixit 회원

Staff

135 회원들

안내서 16,476개 작성하였습니다

댓글 172개

finally something more complicated than replacing the fan in a ps4. Great guide but I'm not going to attempt this even with lots of experience taking MacBook pro's apart to replace the disc drives with second hard drives.

nicholaskessler - 답글

I went ahead and did changed the battery to only find out the battery I bought was defected : (

Edward - 답글

Hi there, Edward. Sorry to hear about the battery trouble. I've reached out to you via email to see how I can help!

Kadan Sharpe -

Thanks for the guide! I used a light duty heat gun to soften the battery adhesive. Use great caution if you try this method, you can easily damage anything plastic so I used the MBP bottom to shield the keyboard bits. I heated one cell at a time until it was slightly uncomfortable to the touch, then waited a few moments until the heat softened the adhesive underneath, then carefully use a plastic card to slide under and pry free. It took about an hour to remove the battery and all remaining adhesive. For the remaining adhesive I used "GooGone", being very careful.

Brian R. - 답글

You can also set your battery on fire, which can have pretty catastrophic consequences. I'm glad it worked out for you, but I would urge everyone to avoid using a heat gun on or near any lithium-ion battery.

Jeff Suovanen -

댓글 쓰기

조회 통계:

24 시간 전: 19

7일 전: 142

30일 전: 895

전체 시간: 214,065