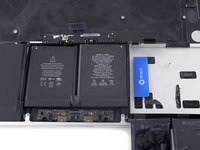
소개
iFixit 배터리 교체 키트와 이 안내서를 사용하여 MacBook Pro의 접착된 배터리를 안전하게 분리하세요. 키트의 접착제 제거제는 배터리를 고정하는 접착제를 녹여서 배터리를 수월하게 분리할 수 있습니다.
참고: 이 안내서는 배터리로 이동하기 전에 스피커, 로직 보드 및 기타 여러 부품을 분리하도록 안내합니다. 이렇게 하면 접착제 제거제에 의해 부품이 손상될 수 있는 가능성을 방지할 수 있습니다. 이소프로필 알코올과 같은 순한 용제만 사용하여 배터리를 분리하는 경우에는 이런 부품을 그대로 두고 6~45단계를 건너뛸 수 있습니다.
2019년 6월에 Apple은 이 모델에 대해 배터리 리콜을 실시했습니다. 따라서 배터리를 교체하기 전에 무료 교체 대상인지 Apple에서 확인하세요.
iFixit 접착제 제거제는 가연성이 매우 높습니다. 통풍이 잘되는 곳에서 이 절차를 수행하세요. 이 과정에서 담배를 피우거나 불 근처에서 작업하지 마세요.
손상 위험을 최소화하려면 이 절차를 시작하기 전에 MacBook을 켜고 배터리를 완전히 방전하세요. 충전된 리튬-이온 배터리에 실수로 구멍이 나면 위험하고 통제할 수 없는 화재를 일으킬 수 있습니다. 배터리가 부풀어 올랐다면, 추가 예방 조치를 취하세요.
필요한 것
-
-
하단 케이스를 MacBook Pro에 고정하는 다음 P5 펜타로브 나사를 풀어주세요:
-
3.1mm 나사 여덟 개
-
2.3mm 나사 두 개
 FixBot에 문의하기
-
-
-
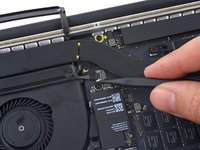
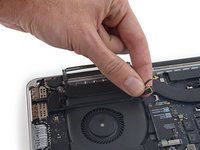
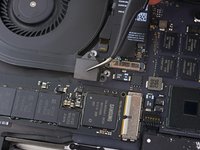
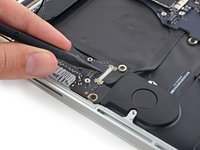
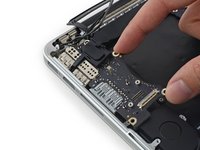
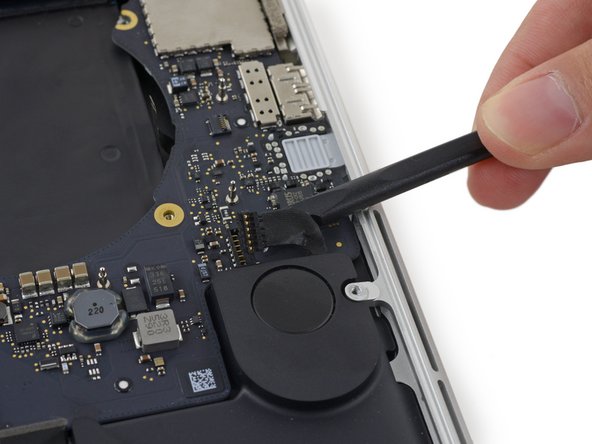
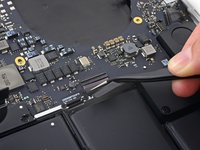
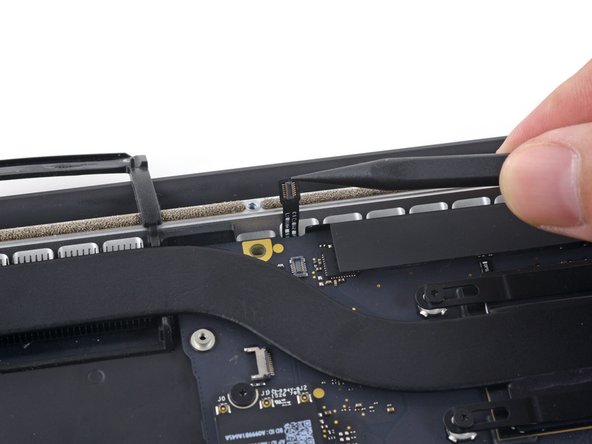
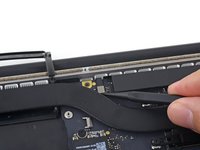
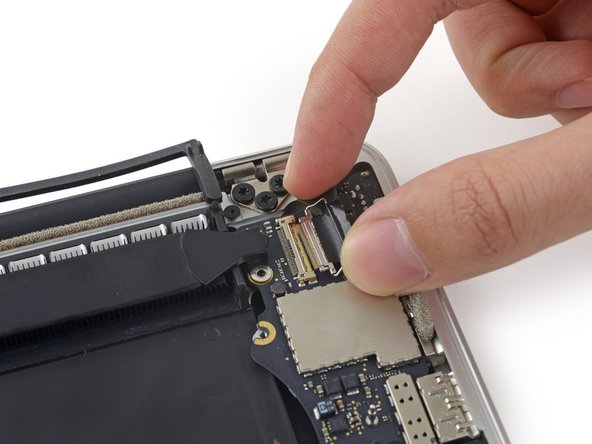
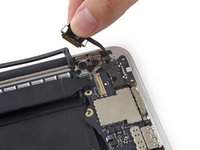
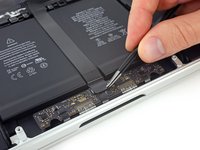
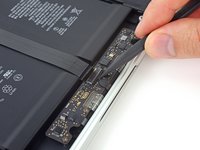
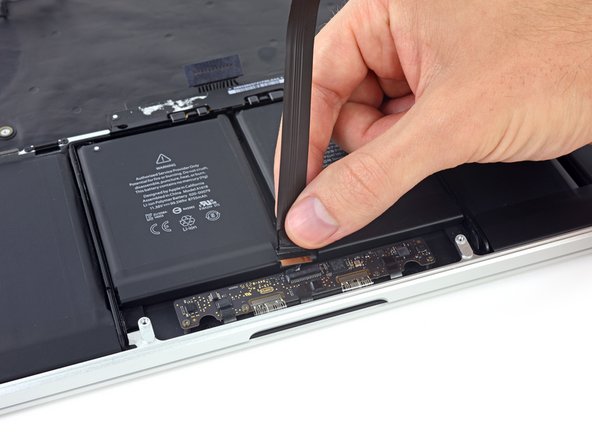
배터리 커넥터의 양쪽을 조심히 들어 올려 로직 보드의 소켓에서 커넥터를 들어 올려 빼세요.
-
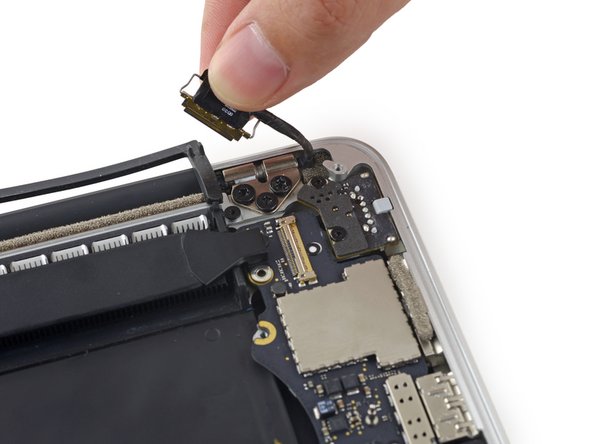
커넥터를 배터리 쪽으로 다시 구부려 배터리 커넥터가 실수로 로직 보드에 닿지 않도록 주의하세요.
-
-
이 단계에 사용된 도구:Tweezers$4.99
-
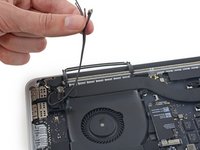
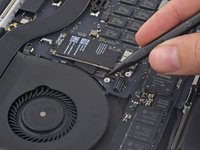
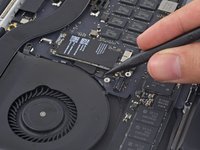
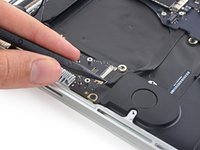
스퍼저 또는 핀셋을 사용하여 AirPort 안테나 케이블 세 개를 AirPort 보드의 소켓에서 똑바로 들어 올려 구부려서 방해가 되지 않도록 하세요.
-
-
-
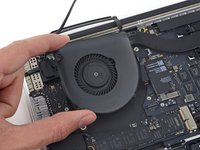
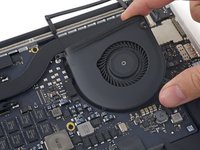
T5 Torx 드라이버를 사용하여 오른쪽 팬을 로직 보드에 고정하는 다음 나사 세 개를 풀어주세요:
-
숄더 길이가 2.0mm인 5.0mm 나사 한 개
-
머리가 넓은 4.0mm 나사 한 개
-
4.4mm 나사 한 개
-
-
-
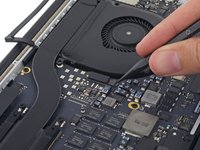
왼쪽 팬을 로직 보드에 고정하는 다음 나사 세 개를 풀어주세요:
-
넓은 머리 3.6mm T5 Torx 나사 한 개
-
숄더 길이가 2.0mm인 5.0mm T5 Torx 나사 한 개
-
4.4mm T5 Torx 나사 한 개
-
-
-
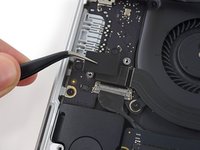
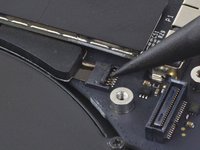
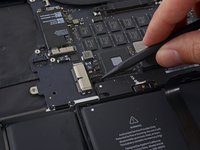
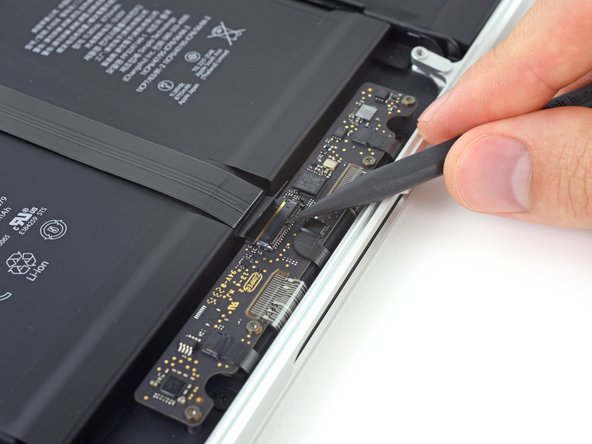
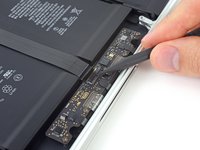
스퍼저의 끝 부분을 사용하여 I/O 보드 커넥터의 잠금 장치를 위로 젖히세요.
-
스퍼저의 평평한 끝을 사용하여 I/O 케이블을 커넥터 밖으로 밀어내세요.
-
-
-
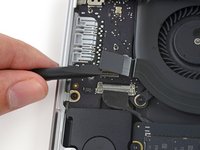
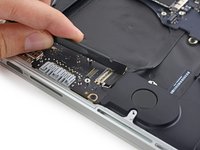
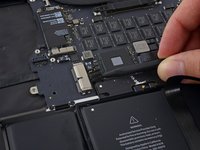
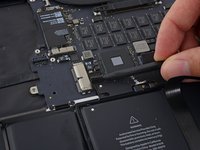
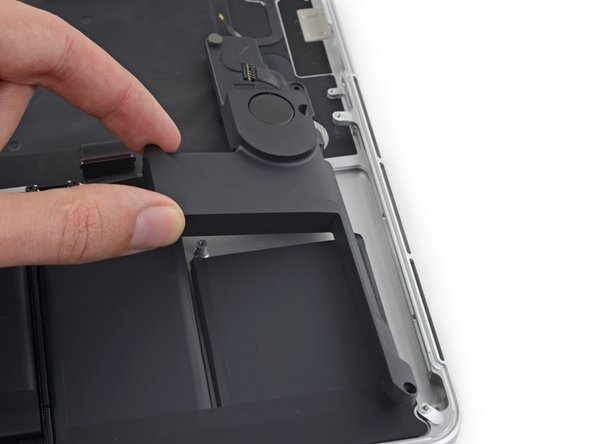
I/O 보드의 안쪽 가장자리를 살짝 들어 올려 케이스 측면에서 멀리 떨어뜨려 MacBook의 중앙으로 당기세요.
-
I/O 보드를 분리하세요.
-
-
-
-
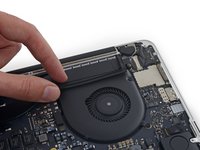
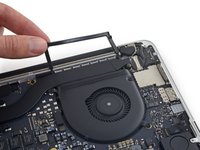
터치 패드 케이블 커넥터 커버를 로직 보드에 고정하는 2.2mm 톡스 T5 나사 두 개를 풀어주세요.
-
커버를 분리하세요.
-
-
-
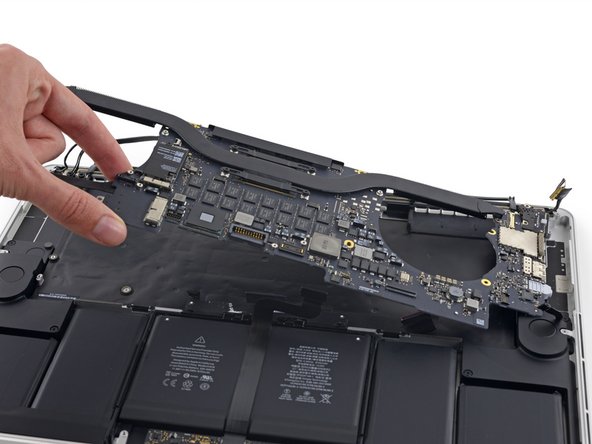
로직 보드 어셈블리를 상단 케이스에 고정하는 다음 나사 여섯 개를 풀어주세요.
-
3.8mm T5 톡스 나사 한 개
-
5.7mm T5 톡스 나사 두 개
-
5.6mm T5 톡스 나사 한 개(이 나사는 은색이며 다른 나사보다 머리가 더 큽니다)
-
2.6mm T5 톡스 나사 한 개
-
3.2mm T5 톡스 나사 한 개
-
-
-
다음 단계에서는 이 여섯 가지 커넥터를 분리하는 방법을 자세히 설명합니다. 커넥터마다 분리하는 방식이 다르므로 각 단계를 꼼꼼히 읽어 보세요.
-
마이크 케이블
-
왼쪽 스피커 케이블
-
키보드 데이터 케이블
-
오른쪽 스피커 케이블
-
키보드 백라이트 케이블
-
디스플레이 데이터 케이블
-
-
-
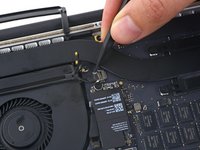
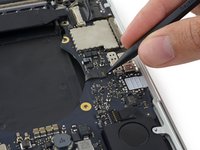
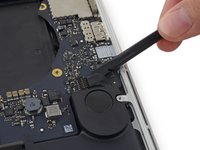
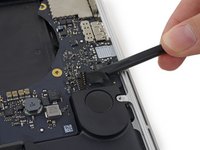
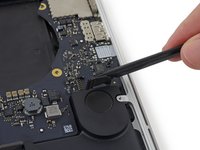
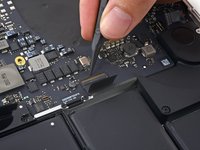
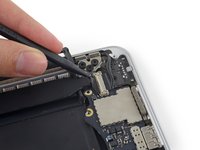
스퍼저의 팁을 사용하여 마이크 리본 케이블 ZIF 소켓의 고정 플랩을 위로 젖히세요.
-
마이크 리본 케이블을 소켓에서 로직 보드와 평행하게 당겨 빼내세요.
-
-
-
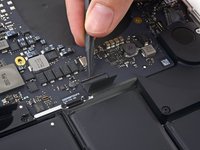
스퍼저의 납작한 끝을 사용하여 왼쪽 스피커 커넥터를 로직 보드의 소켓에서 들어 올려 빼내세요.
-
케이블을 조심히 접어 로직 보드에 방해되지 않도록 하세요.
-
-
-
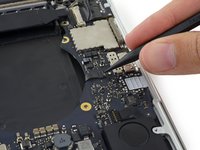
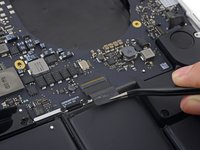
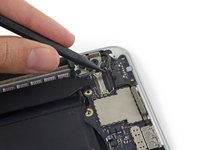
스퍼저 끝을 사용하여 키보드 데이터 케이블 ZIF 소켓의 고정 커버를 위로 젖히세요.
-
키보드 데이터 케이블을 ZIF 소켓에서 당겨 빼내세요. 로직 보드와 평행하게 당겨야 하며, 위로 당기지 않도록 주의하세요.
-
-
-
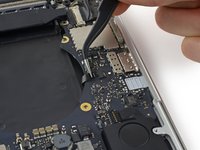
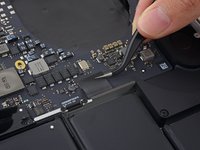
스퍼저의 끝을 사용하여 오른쪽 스피커 커넥터를 로직 보드의 소켓에서 위로 들어 올려 빼내세요.
-
케이블을 조심히 접어 로직 보드에 방해되지 않도록 하세요.
-
-
-
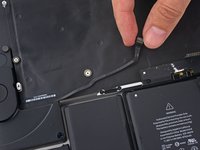
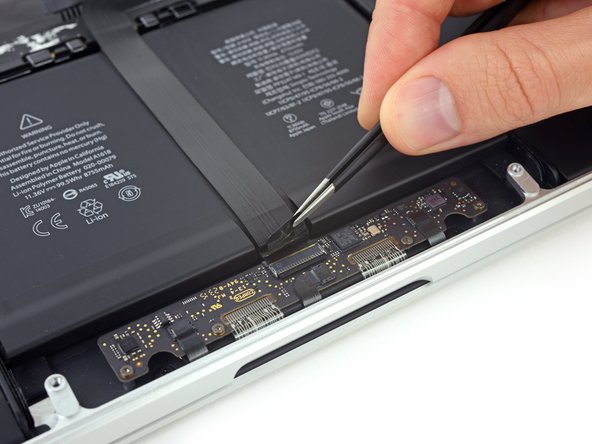
디스플레이 데이터 케이블을 로직 보드의 소켓에서 똑바로 당겨 빼내세요.
-
디스플레이 데이터 케이블을 디스플레이 힌지 쪽으로 살살 구부려 MagSafe 2 보드의 나사를 드러내세요.
-
-
-
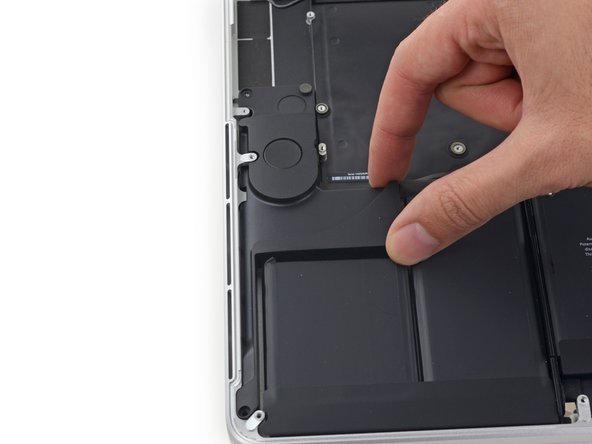
왼쪽 스피커를 상단 케이스에 고정하는 다음 나사를 풀어주세요:
-
2.7mm T5 Torx 나사
-
6.9mm T5 Torx 나사(4.5mm 숄더 포함)
-
5.6mm T5 Torx 나사
-
-
-
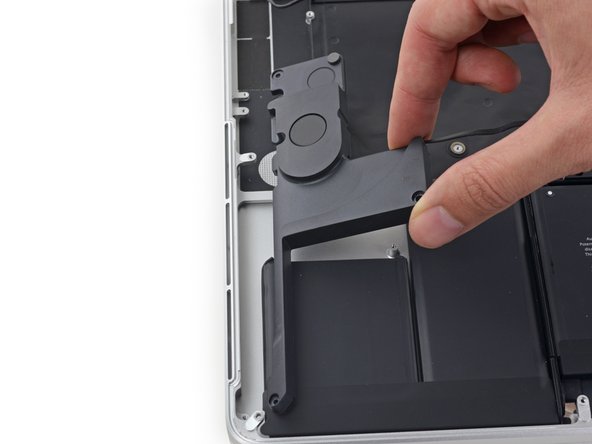
오른쪽 스피커를 상단 케이스에 고정하는 다음 나사를 풀어주세요:
-
2.7mm T5 Torx 나사
-
6.9mm T5 Torx 나사(4.5mm 숄더 포함)
-
5.6mm T5 Torx 나사
-
-
-
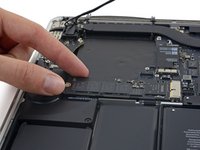
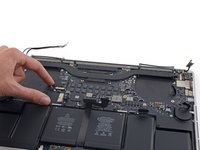
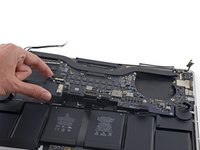
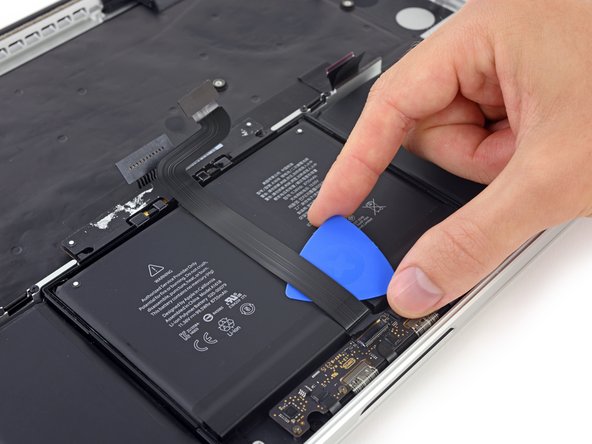
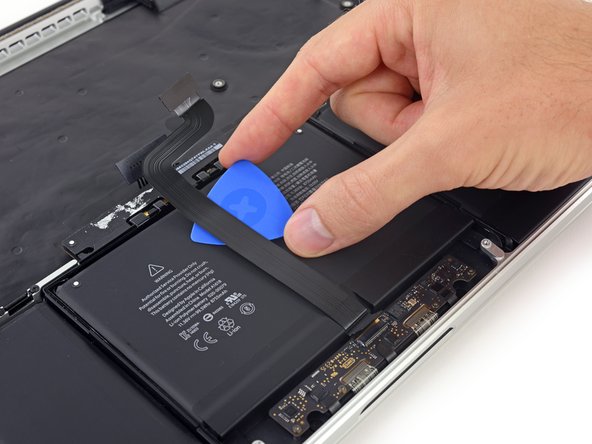
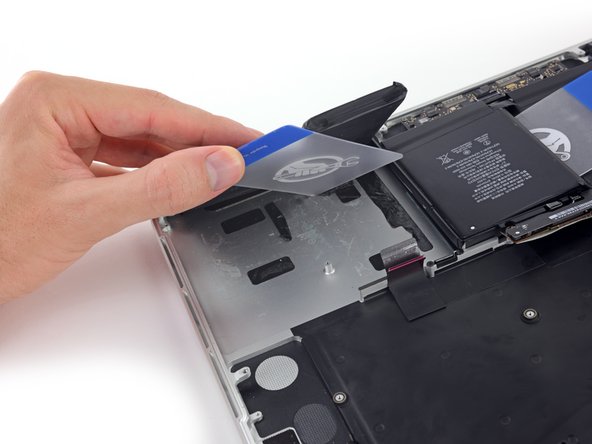
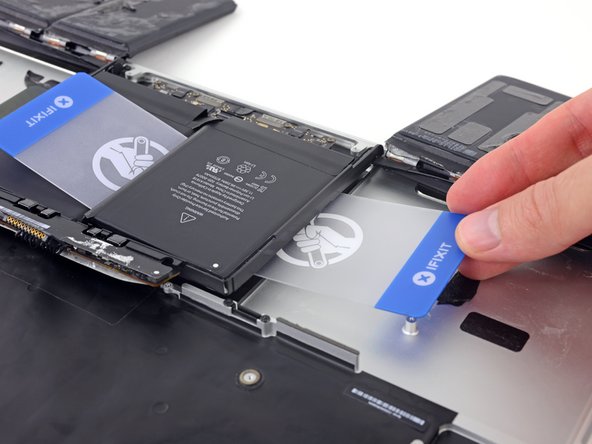
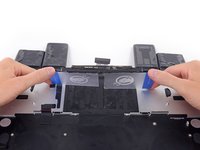
트랙패드 리본 케이블과 배터리 사이에 여는 픽을 끼우세요.
-
픽을 리본 케이블 길이 만큼 아래에서 조심히 밀어 배터리에 고정하는 접착제를 분리하세요.
-
-
-
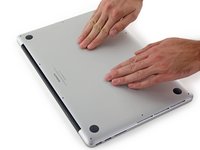
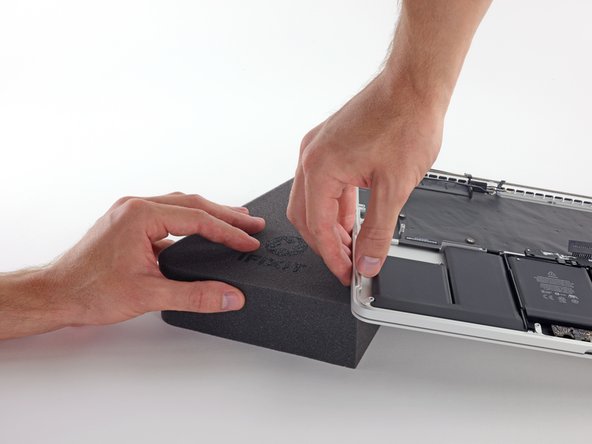
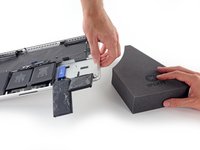
MacBook Pro의 앞쪽 가장자리가 자신을 향하도록 한 상태에서 오른쪽을 들어 올리고 튼튼한 폼 블록이나 책을 사용하여 약간 비스듬히 받치세요.
-
-
-
이제 MacBook Pro가 완전히 준비되었으니 이제 자신을 준비할 차례입니다.
-
접착 제거제를 취급하고 바를 때는 보안경을 착용하세요. (보안경은 키트에 포함되어 있습니다.)
-
보안경 없이 콘택트렌즈를 착용하지 마세요.
-
보호 장갑도 키트에 포함되어 있습니다. 피부 자극이 우려되는 경우 지금 바로 장갑을 착용하세요.
-
-
-
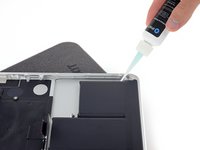
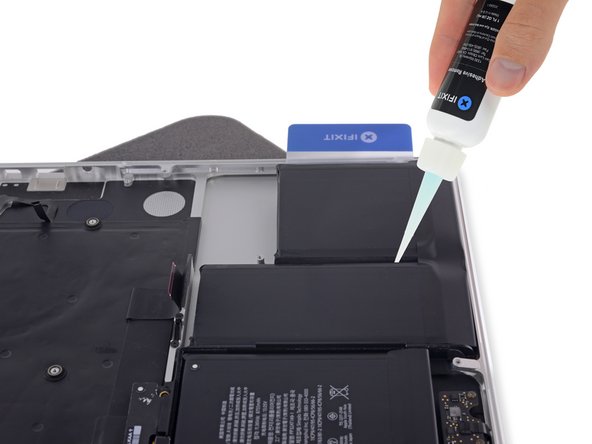
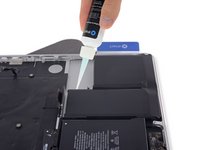
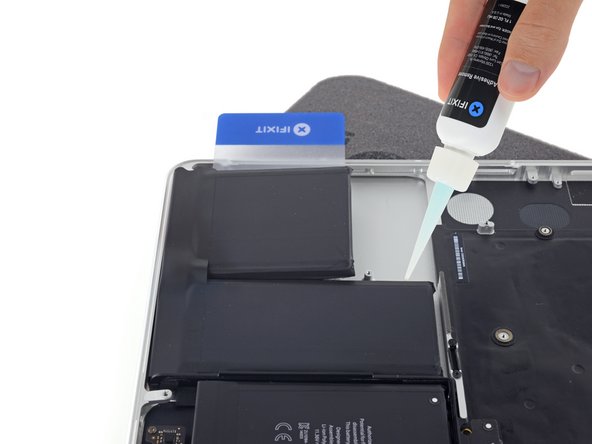
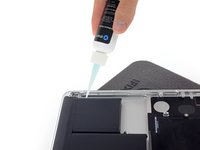
오른쪽 바깥쪽 배터리 셀의 튀어나온 가장자리를 따라 접착제 제거제 몇 방울을 골고루 바르세요.
-
액체형 접착 제거제가 배터리 셀 아래에 스며들 때까지 2~3분 정도 기다린 후 다음 단계를 진행하세요.
-
-
-
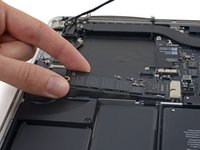
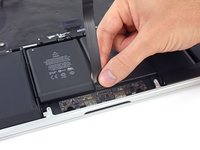
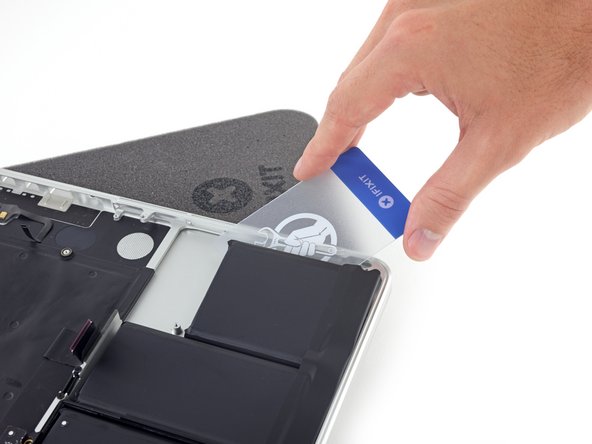
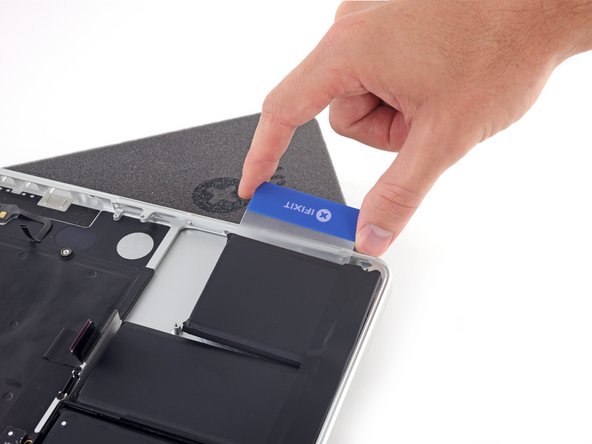
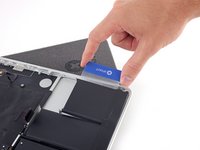
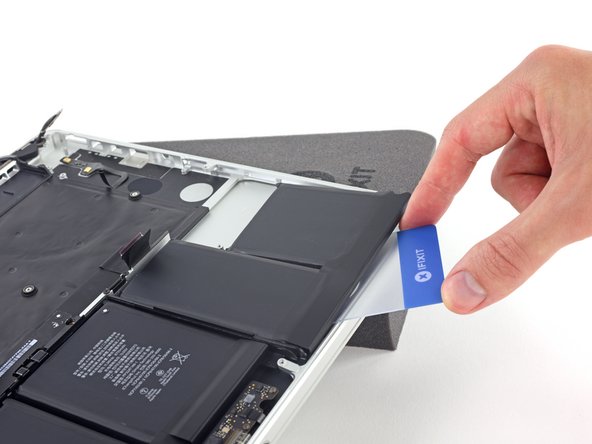
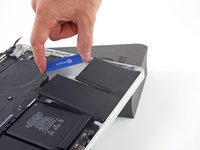
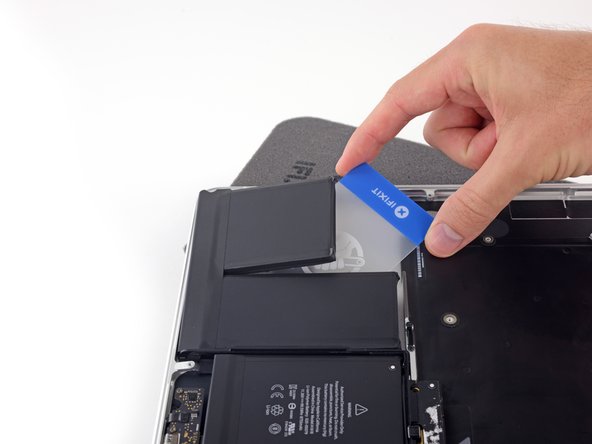
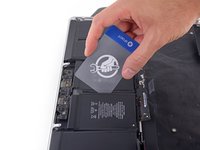
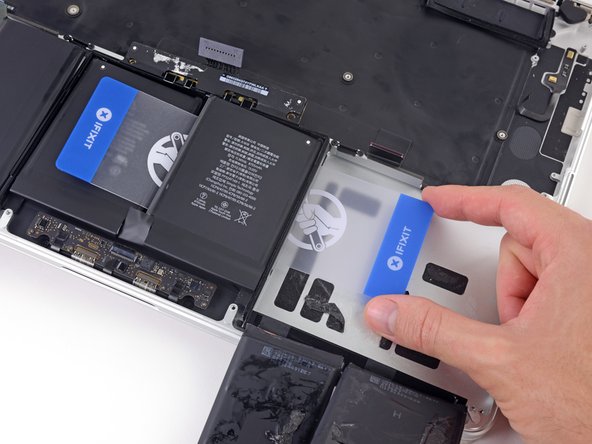
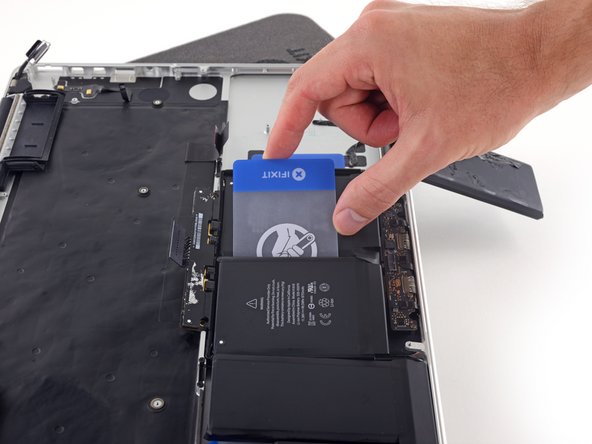
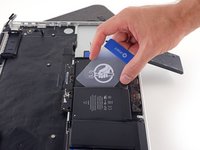
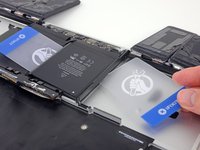
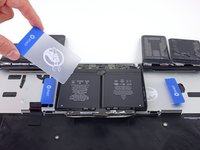
플라스틱 카드의 한쪽 모서리를 배터리 셀의 바깥쪽 가장자리 아래로 밀어 넣으세요.
-
카드를 배터리 셀 아래로 더 밀어 넣어 MacBook Pro의 상단 케이스를 고정하는 접착제를 분리하세요.
-
-
-
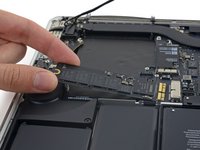
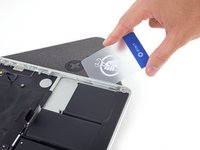
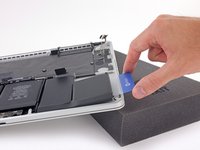
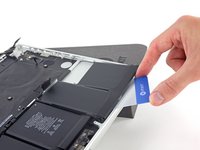
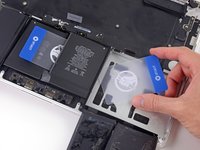
배터리 셀을 들어 올려 MacBook Pro의 상단 케이스에서 떼어내되, 분리하려고 하지 마세요.
-
다음 단계로 진행할 때 배터리 셀이 다시 붙지 않도록 플라스틱 카드를 배터리 셀 아래에 그대로 두세요.
-
-
-
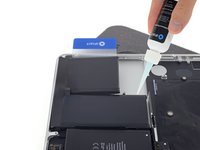
다음 배터리 셀의 돌출된 가장자리를 따라 접착제 제거제 몇 방울을 골고루 발라 주세요.
-
액체 접착 제거제가 배터리 셀 아래에 스며들 때까지 2~3분 정도 기다렸다가 다음 단계를 진행하세요.
-
-
-
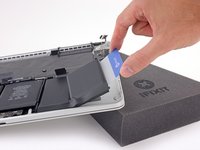
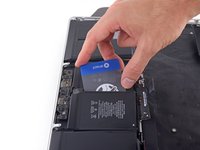
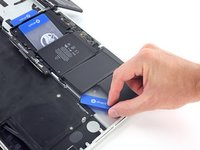
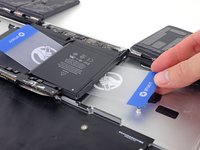
플라스틱 카드의 한쪽 모서리를 두 번째 배터리 셀 아래로 밀어 넣으세요.
-
카드를 두 번째 배터리 셀 아래로 밀어 넣고 좌우로 밀어서 아래쪽의 접착제를 분리하세요.
-
다음 단계로 진행할 때 다시 붙지 않도록 플라스틱 카드를 두 배터리 셀 아래에 그대로 두거나 뒤집어 놓으세요.
-
-
-
이전 단계의 절차를 반복하여 이쪽의 두 배터리 셀을 분리하세요:
-
왼쪽 바깥쪽 배터리 셀의 돌출된 가장자리에 접착 제거제를 바르고 접착제가 스며들 때까지 2~3분간 기다리세요.
-
플라스틱 카드의 한쪽 모서리를 배터리 셀 아래에 끼우고 카드를 배터리 셀 밑으로 완전히 밀어 넣어 분리하세요.
-
옆 셀에도 똑같이 작업하세요.
-
다음 단계에서 플라스틱 카드가 다시 붙지 않도록 플라스틱 카드를 제자리에 두거나 배터리 셀을 뒤집어 놓으세요.
-
-
-
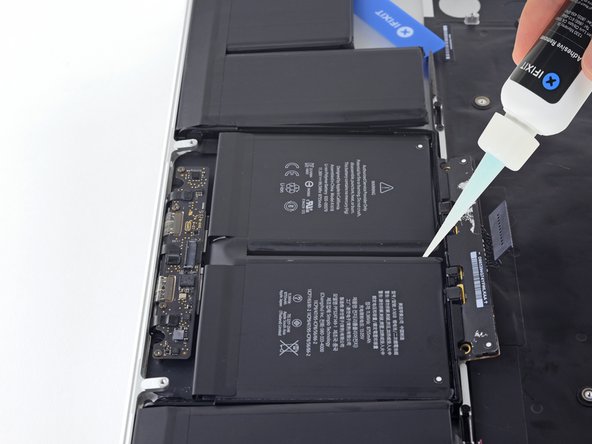
MacBook Pro의 왼쪽 가장자리를 세운 상태에서 두 개의 중간 배터리 셀 사이의 중앙선을 따라 접착 제거제를 몇 방울 떨어뜨리세요.
-
접착 제거제가 스며들 때까지 2~3분 정도 기다렸다가 계속하세요.
-
-
-
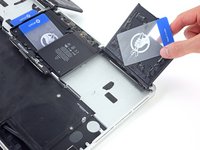
플라스틱 카드의 한쪽 모서리를 중앙 두 셀 사이와 오른쪽 중앙 배터리 셀의 돌출된 가장자리 아래로 밀어 넣으세요.
-
카드를 배터리 셀 아래로 더 밀어 제자리에 고정된 접착제를 자르세요.
-
아직 이 배터리 셀을 완전히 분리하려고 하지 마세요. 접착제가 다시 붙지 않도록 플라스틱 카드를 제자리에 그대로 두세요.
-
-
-
아직 뒤집지 않았다면, 붙지 않은 오른쪽 배터리 셀 두 개를 MacBook Pro의 앞쪽 가장자리 위로 뒤집으세요. 이렇게 하면 중앙 셀의 바깥쪽 가장자리에 접근할 수 있습니다.
-
-
-
플라스틱 카드의 한쪽 모서리를 플라스틱 배터리 프레임 아래쪽과 하단 중앙 셀의 접착된 나머지 가장자리 아래로 밀어 넣으세요.
-
카드를 배터리 셀 아래까지 밀어 넣은 다음 배터리 셀이 다시 붙지 않도록 그대로 두세요.
-
-
-
오른쪽 중앙 배터리 셀 아래에 끼운 첫 번째 플라스틱 카드를 빼세요.
-
다른 카드를 조금 더 밀어넣고 배터리 셀이 다시 붙지 않도록 제자리에 그대로 둔 채로 계속 진행하세요.
-
-
-
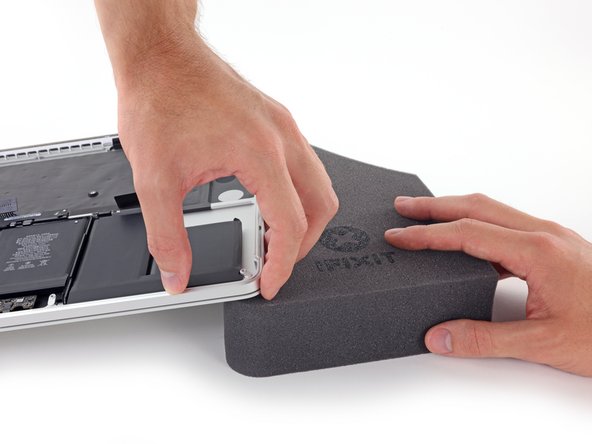
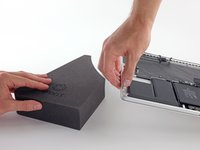
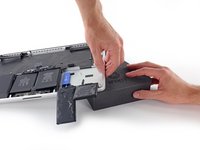
책 또는 폼 블록을 치우세요.
-
MacBook Pro의 앞쪽 가장자리가 자신을 향하게 한 상태에서 오른쪽을 들어 올려 다시 한 번 받쳐줍니다.
-
-
-
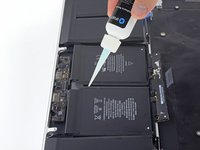
두 개의 중앙 배터리 셀 사이에 접착제 제거제를 몇 방울 떨어뜨려 남은 배터리 셀 아래로 흐르도록 하세요.
-
접착제 제거제가 스며들 때까지 2~3분 정도 기다렸다가 계속하세요.
-
-
-
플라스틱 카드의 한쪽 모서리를 마지막 배터리 셀의 돌출된 가장자리 아래로 밀어 넣으세요.
-
카드를 배터리 셀 아래로 더 밀어 제자리에 고정하는 접착제를 잘라내세요.
-
아직 이 배터리 셀을 완전히 분리하려고 하지 마세요. 플라스틱 카드가 다시 붙지 않도록 제자리에 그대로 두세요.
-
-
-
중앙 오른쪽 배터리 셀에 사용한 과정을 반복하여 중앙 왼쪽 셀의 접착제를 분리하세요:
-
플라스틱 카드의 한쪽 모서리를 플라스틱 배터리 프레임 아래로 밀고 마지막 배터리 셀의 접착제가 남은 가장자리 아래로 밀어 넣으세요.
-
카드를 배터리 셀 아래까지 밀어 넣은 다음 배터리 셀이 다시 붙지 않도록 그대로 두세요.
-
-
-
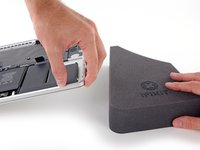
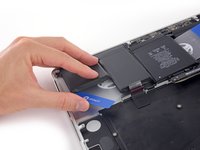
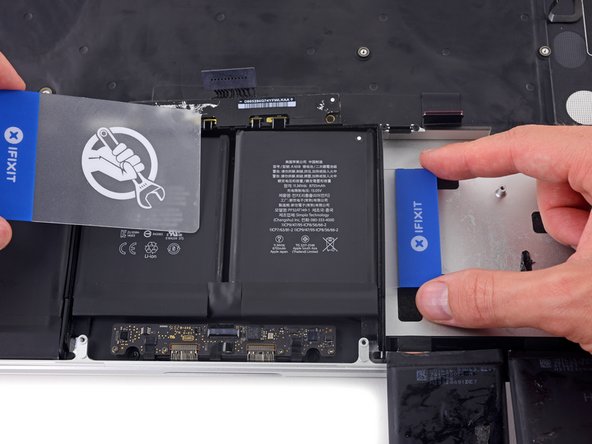
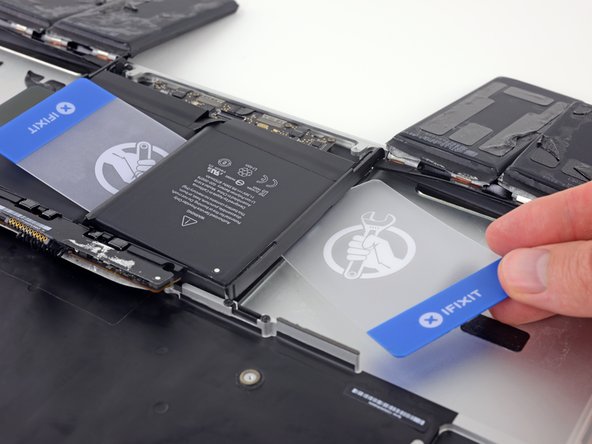
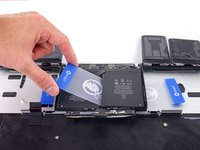
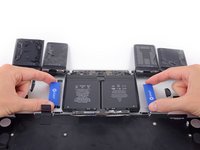
두 개의 중앙 배터리 셀 아래에 각각 하나의 플라스틱 카드가 있는 상태에서 두 카드를 비틀어 들어 올려, 플라스틱 프레임 및 배터리 보드와 함께, 배터리 셀을 MacBook Pro에서 완전히 분리하세요.
-
-
-
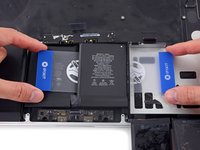
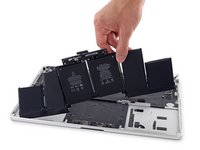
배터리를 들어 올려 분리하세요.
-
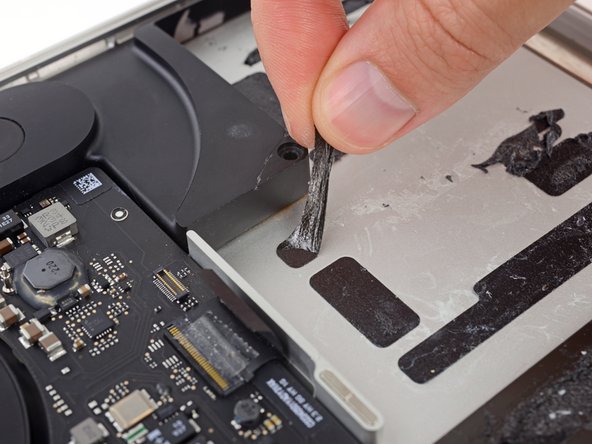
운이 좋으면 손가락으로 각 접착제를 천천히 떼어낼 수 있습니다.
-
그렇지 않은 경우, 각 접착제 스트립을 약간의 접착 제거제에 2~3분간 적셔 두었다가 플라스틱 도구로 긁어내세요. 이 작업은 시간이 꽤 걸릴 수 있으므로 인내심을 가져야 합니다.
-
남은 접착 제거제를 닦아내고 MacBook Pro를 몇 분간 자연 건조시키세요.
-
새로 장착한 배터리를 보정하세요: 100%까지 충전한 후 최소 2시간 이상 더 충전하세요. 플러그를 뽑고 정상적으로 사용하여 배터리를 방전하세요. 배터리 부족 경고가 표시되면 작업을 저장하고 노트북이 배터리 부족으로 절전 모드로 전환될 때까지 노트북을 켜두세요. 5시간 이상 기다린 다음 중단 없이 노트북을 100%까지 충전하세요.
-


기기를 재조립하려면 이 지침을 역순으로 따르세요.
다른 630명이 해당 안내서를 완성하였습니다.
다음 번역가들에게 특별히 감사 드립니다:
100%

Christian Kim님은 저희가 세상을 수리하는데 동참하신 분입니다! 기여하시겠습니까?
번역 시작하기 ›


249가이드 댓글
Do I need to remove all these things just to replace the battery or can I just remove the connectors above the battery than the battery?
I just went through this process yesterday, and today wondered why I needed to take all that crap out, because I don’t remember anything blocking the battery removal, that would require removing the speakers, logic board, etc. I think it’s because of the acetone adhesive solvent. It’s powerful stuff that can easily damage the system. Maybe, if you are able to get the battery out without the solvent, you can skip all the other stuff. I will say, however, that in my system, it seemed like the adhesive is real solid. It felt like I was pressing the card up against aluminum studs in the frame, until the solvent loosened it up. If you try to remove the battery without the solvent, be very careful not to use excessive force and warp your frame.
See the post I just added, it seems that this is all to be able to remove one of the speaker cables, which I don’t think in necessary. I really don’t like messing with delicate connectors and ribbon cables that I don’t have to.
I have done this job before. I remember that it was easy - did it on the kitchen bar.
In hindsight, I didn't have to take out all the crap. I must have used a different guide. Son of a gun, wasted time. I easily got the battery out without "adhesive remover". Hilarious if "adhesive remover" is acetone, a chemical availabe just about anywhere. Note to self, iFixit needs to be second opinioned. I think this guide is written to make it seem like you need a lot of special tools to do this job. Not true - just a few drivers, usually provided with any battery.
Matt Prater - 답글 공유
I thought this too and didn't wanna do all that work with the solvent. All I removed was the battery connector and the trackpad cable before attempting to remove the battery. The adhesive Apple uses is bewilderingly strong. I thought I could pry it off with a strong paperclip and a screwdriver but it bent both. I ended up using the backend of a hammer and that worked surprisingly well. But it was super janky and I ended up puncturing the battery outer plastic. It didn't catch fire or anything but you can definitly smell the battery juices or whatever so i opened up my window. If you somewhat know what you're doing and accept the risk of setting fire to your house you can get away with not using solvent but I highly recommend doing so as the battery I ended up pulling out of my MacBook is all mangled. And if you use the solvent you have to take everything out. Apple will be Apple.
Pip Watson - 답글 공유