주요 콘텐츠로 건너뛰기

Merch Source Projector Entertainment II Speaker Replacement

필요한 것

  1. Merch Source Projector Entertainment II Speaker Replacement, Outer Casing: 1 단계, 이미지 1/2 Merch Source Projector Entertainment II Speaker Replacement, Outer Casing: 1 단계, 이미지 2/2
    • Flip the projector onto its back and unscrew the nine 15mm screws using the Phillips #0 screw driver.

  2. Merch Source Projector Entertainment II Speaker Replacement: 2 단계, 이미지 1/1
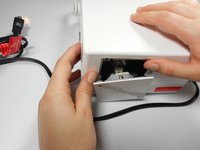
    • Flip the projector right side up and unscrew the two 12mm screws on the light bulb panel located at the rear of the projector with a Phillips #0 screw head.

    • The bottom right panel screw does not come completely out the panel door.

  3. Merch Source Projector Entertainment II Speaker Replacement: 3 단계, 이미지 1/2 Merch Source Projector Entertainment II Speaker Replacement: 3 단계, 이미지 2/2
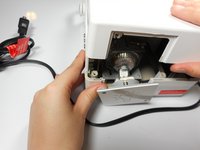
    • Using your hands, gently pry the top and bottom of the projector casing apart.

  4. Merch Source Projector Entertainment II Speaker Replacement, Speaker: 4 단계, 이미지 1/2 Merch Source Projector Entertainment II Speaker Replacement, Speaker: 4 단계, 이미지 2/2
    • Locate the 2 screws on the handle casing. These screws are mirrored on the handle attachment on the other side panel as well.

    • Unscrew the two 16mm screws using the Phillips #0 screw driver. Repeat for the opposite side panel.

    • You do not need to remove the motherboard to reach the screws next to the lens. This is only done to show the screws more clearly.

  5. Merch Source Projector Entertainment II Speaker Replacement: 5 단계, 이미지 1/2 Merch Source Projector Entertainment II Speaker Replacement: 5 단계, 이미지 2/2
    • Lift up on the side panel and speaker attachment to slightly dislodge it.

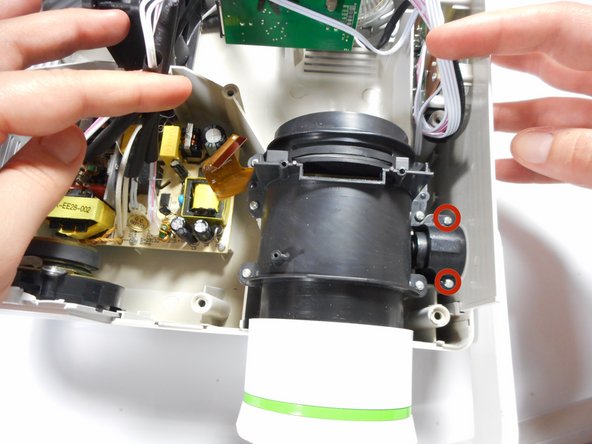
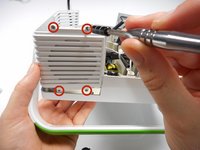
    • Unscrew the four 9mm Phillips screws with a Phillips #0 screw driver, located on the outside of the projector casing.

  6. Merch Source Projector Entertainment II Speaker Replacement: 6 단계, 이미지 1/1
    • Once the side panel door has been lifted out of the bottom casing, it can swing freely.

    • Rotate the side panel door forward so that you can access the screws on the speaker.

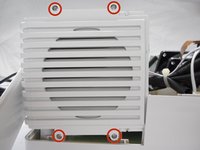
    • Unscrew the two 10mm screws with a Phillips #0 screw driver.

  7. Merch Source Projector Entertainment II Speaker Replacement: 7 단계, 이미지 1/2 Merch Source Projector Entertainment II Speaker Replacement: 7 단계, 이미지 2/2
    • Lift the side panel and speaker out from the projector casing.

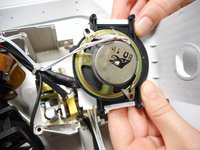
    • Using your hands, slide the speaker outward from the side panel.

    • While detaching the speaker, do not damage the wires.

  8. Merch Source Projector Entertainment II Speaker Replacement: 8 단계, 이미지 1/3 Merch Source Projector Entertainment II Speaker Replacement: 8 단계, 이미지 2/3 Merch Source Projector Entertainment II Speaker Replacement: 8 단계, 이미지 3/3
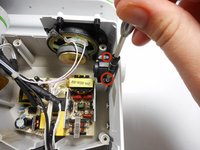
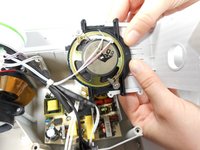
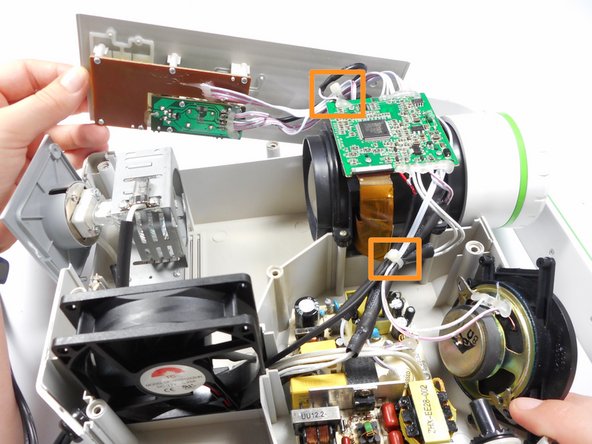
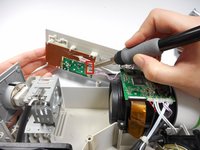
    • Locate the two speaker wires connected to the sound and audio motherboard on the left panel opposite of the speaker. Unsolder these connections with a soldering iron.

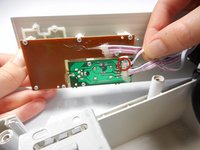
    • Once the wires are disconnected, in order to fully remove the speaker you may need to cut the plastic bands holding the speaker wires in place.

    • Need some help? Follow this guide to learn soldering basics.

    • To get to the connections on the motherboard, you will need to peel off the hot glue covering them.

    • While unsoldering, the metal connections can get very hot. Never touch the iron with your hand. Also, make sure that the projector is fully turned off and not plugged in.

결론

To reassemble your device, follow these instructions in reverse order.

Michael Tan

회원 가입일: 01/08/15

587 평판

안내서 3개 작성하였습니다

Cal Poly, Team 30-3, Green Spring 2015 Cal Poly, Team 30-3, Green Spring 2015 회원

CPSU-GREEN-S15S30G3

4 회원들

안내서 10개 작성하였습니다

댓글 한 개

What's missing is where to get the speaker. Looking for a better one than most projectors come with.

jfgeek - 답글

댓글 쓰기

조회 통계:

24 시간 전: 0

7일 전: 0

30일 전: 1

전체 시간: 1,344