주요 콘텐츠로 건너뛰기

Motorola Moto G 5G (2022) Display Panel Replacement

필요한 것

  1. Motorola Moto G 5G (2022) Display Panel Replacement, Eject the SIM card tray: 1 단계, 이미지 1/2 Motorola Moto G 5G (2022) Display Panel Replacement, Eject the SIM card tray: 1 단계, 이미지 2/2
    • Insert a SIM card eject tool or a straightened paperclip into the hole adjacent to the SIM card tray.

    • Press firmly to eject the tray.

  2. Motorola Moto G 5G (2022) Display Panel Replacement, Remove the SIM card tray: 2 단계, 이미지 1/1
    • Remove the SIM card tray from the phone.

    • When reinserting the SIM card, make sure it's in the proper orientation inside the tray.

  3. Motorola Moto G 5G (2022) Display Panel Replacement, Back cover removal information: 3 단계, 이미지 1/2 Motorola Moto G 5G (2022) Display Panel Replacement, Back cover removal information: 3 단계, 이미지 2/2
    • Discharge your battery to 25% or less and completely power off your phone before you begin.

    • Take note of the following seams along the edge of the phone:

    • Screen seam: This seam separates the display panel from the frame. Don't pry at this seam.

    • Bezel seam: This is where the plastic back cover meets the rest of the phone. It's held in place by plastic clips. This is where you should pry.

  4. Motorola Moto G 5G (2022) Display Panel Replacement, Insert an opening pick: 4 단계, 이미지 1/3 Motorola Moto G 5G (2022) Display Panel Replacement, Insert an opening pick: 4 단계, 이미지 2/3 Motorola Moto G 5G (2022) Display Panel Replacement, Insert an opening pick: 4 단계, 이미지 3/3
    • Insert an opening tool in the bezel seam halfway between the bottom-right corner of the phone and the power button.

    • Insert an opening pick in the gap you just created.

  5. Motorola Moto G 5G (2022) Display Panel Replacement, Release the right clips: 5 단계, 이미지 1/2 Motorola Moto G 5G (2022) Display Panel Replacement, Release the right clips: 5 단계, 이미지 2/2
    • Slide your opening pick toward the bottom-right corner of the back cover and release the clips.

    • As each clip releases, you will hear and feel a pop.

    • Don't slide the opening pick near the power or volume buttons.

  6. Motorola Moto G 5G (2022) Display Panel Replacement, Release the bottom clips: 6 단계, 이미지 1/2 Motorola Moto G 5G (2022) Display Panel Replacement, Release the bottom clips: 6 단계, 이미지 2/2
    • Continue sliding your opening pick towards the bottom left corner to unclip the bottom edge of the back cover.

  7. Motorola Moto G 5G (2022) Display Panel Replacement, Release the left clips: 7 단계, 이미지 1/3 Motorola Moto G 5G (2022) Display Panel Replacement, Release the left clips: 7 단계, 이미지 2/3 Motorola Moto G 5G (2022) Display Panel Replacement, Release the left clips: 7 단계, 이미지 3/3
    • Slide your opening pick toward the top left corner to unclip the left side of the back cover.

  8. Motorola Moto G 5G (2022) Display Panel Replacement, Release the top clips: 8 단계, 이미지 1/2 Motorola Moto G 5G (2022) Display Panel Replacement, Release the top clips: 8 단계, 이미지 2/2
    • Slide your pick around the top left corner and along the top edge to release the clips.

  9. Motorola Moto G 5G (2022) Display Panel Replacement: 9 단계, 이미지 1/2 Motorola Moto G 5G (2022) Display Panel Replacement: 9 단계, 이미지 2/2
    • Slide your pick around the top right corner to release the last clips securing the back cover.

    • Stop before reaching the volume buttons. Your pick may damage their cables.

  10. Motorola Moto G 5G (2022) Display Panel Replacement, Remove the back cover: 10 단계, 이미지 1/3 Motorola Moto G 5G (2022) Display Panel Replacement, Remove the back cover: 10 단계, 이미지 2/3 Motorola Moto G 5G (2022) Display Panel Replacement, Remove the back cover: 10 단계, 이미지 3/3
    • Don't try to remove the back cover all the way yet, as it's still connected to the frame by the power button cable.

    • With SIM card slot facing you, swing the back cover open and away from you like you're opening a book.

    • Rest the cover parallel to the frame.

    • Don't twist the screen or move it too far away from the frame to avoid damaging the power button cable.

  11. Motorola Moto G 5G (2022) Display Panel Replacement, Remove the power button: 11 단계, 이미지 1/2 Motorola Moto G 5G (2022) Display Panel Replacement, Remove the power button: 11 단계, 이미지 2/2
    이 단계에 사용된 도구:
    Tweezers
    $4.99
    구매
    • A small rubber arm connects the power button to its recess. Use caution to avoid tearing this piece.

    • Use tweezers or your fingers to unhook the power button's rubber arm from its recess and remove it.

  12. Motorola Moto G 5G (2022) Display Panel Replacement, Only the back cover remains: 12 단계, 이미지 1/1
    • You're now left with the back cover.

    • This is a good point to test your phone before sealing it up. Follow this guide to perform a hardware test. Be sure to power your phone back down completely before you continue working.

  13. Motorola Moto G 5G (2022) Display Panel Replacement, Unfasten the power button cable bracket: 13 단계, 이미지 1/2 Motorola Moto G 5G (2022) Display Panel Replacement, Unfasten the power button cable bracket: 13 단계, 이미지 2/2
    • Use a PH00 screwdriver to remove the two 3.9 mm-long screws securing the power button cable bracket.

  14. Motorola Moto G 5G (2022) Display Panel Replacement, Remove the power button cable bracket: 14 단계, 이미지 1/2 Motorola Moto G 5G (2022) Display Panel Replacement, Remove the power button cable bracket: 14 단계, 이미지 2/2
    이 단계에 사용된 도구:
    Tweezers
    $4.99
    구매
    • Use your fingers or a pair of blunt nose tweezers to grab and remove the bracket from the power button cable.

  15. Motorola Moto G 5G (2022) Display Panel Replacement, Disconnect the power button: 15 단계, 이미지 1/2 Motorola Moto G 5G (2022) Display Panel Replacement, Disconnect the power button: 15 단계, 이미지 2/2
    • Use the pointed end of a spudger to pry up and disconnect the power button's press connector.

  16. Motorola Moto G 5G (2022) Display Panel Replacement, Remove the power button: 16 단계, 이미지 1/2 Motorola Moto G 5G (2022) Display Panel Replacement, Remove the power button: 16 단계, 이미지 2/2
    • Grab and remove the power button.

    • If you're using tweezers, take care not to puncture the battery—a punctured battery may leak dangerous chemicals or cause a fire.

  17. Motorola Moto G 5G (2022) Display Panel Replacement, Unfasten the motherboard cover: 17 단계, 이미지 1/2 Motorola Moto G 5G (2022) Display Panel Replacement, Unfasten the motherboard cover: 17 단계, 이미지 2/2
    • Use your Phillips screwdriver to remove the eight 3.9 mm-long screws securing the motherboard cover.

  18. Motorola Moto G 5G (2022) Display Panel Replacement, Pry the motherboard cover: 18 단계, 이미지 1/2 Motorola Moto G 5G (2022) Display Panel Replacement, Pry the motherboard cover: 18 단계, 이미지 2/2
    • Insert an opening pick between the bottom-left corner of the cover and the motherboard.

    • Pry up to release the cover's small clips securing it to the frame.

    • Don't pry against the battery. Use protrusions in the frame for leverage.

    • Work your way around the perimeter to free the cover if it feels stuck.

  19. Motorola Moto G 5G (2022) Display Panel Replacement, Remove the motherboard cover: 19 단계, 이미지 1/3 Motorola Moto G 5G (2022) Display Panel Replacement, Remove the motherboard cover: 19 단계, 이미지 2/3 Motorola Moto G 5G (2022) Display Panel Replacement, Remove the motherboard cover: 19 단계, 이미지 3/3
    이 단계에 사용된 도구:
    Tweezers
    $4.99
    구매
    • Grab and remove the motherboard cover from the phone.

    • If you're using tweezers, take care not to puncture the battery—a punctured battery may leak dangerous chemicals or cause a fire.

  20. Motorola Moto G 5G (2022) Display Panel Replacement, Disconnect the battery: 20 단계, 이미지 1/2 Motorola Moto G 5G (2022) Display Panel Replacement, Disconnect the battery: 20 단계, 이미지 2/2
    • Use the pointed end of a spudger to pry and disconnect the battery's press connector.

    • To re-attach press connectors like this one, carefully align and press down on one side until it clicks into place, then repeat on the other side. Don't press down on the middle. If the connector is misaligned, the pins can bend, causing permanent damage.

  21. Motorola Moto G 5G (2022) Display Panel Replacement, Soften the adhesive with heat: 21 단계, 이미지 1/1
    • Heat an iOpener and apply it to the left edge of the screen for about two minutes.

    • A hair dryer, heat gun, or hot plate may also be used, but be careful not to overheat the phone—the display and internal battery are both susceptible to heat damage.

  22. Motorola Moto G 5G (2022) Display Panel Replacement, Soften the adhesive with isopropyl alcohol: 22 단계, 이미지 1/2 Motorola Moto G 5G (2022) Display Panel Replacement, Soften the adhesive with isopropyl alcohol: 22 단계, 이미지 2/2
    • Additionally, you may use highly-concentrated isopropyl alcohol (over 90%) to further loosen the adhesive securing the battery.

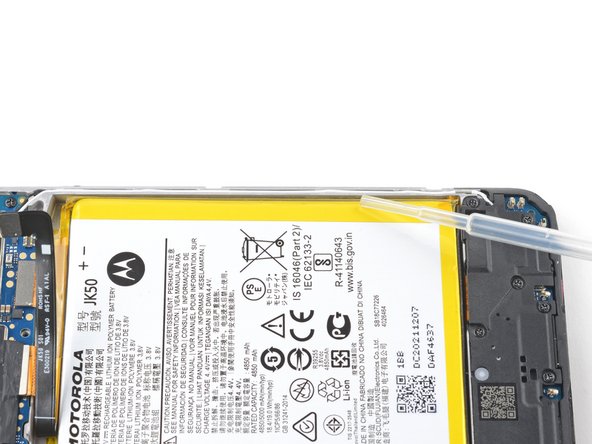
    • Apply the isopropyl alcohol into the gaps between the sides of the battery and the frame.

  23. Motorola Moto G 5G (2022) Display Panel Replacement, Pry the battery: 23 단계, 이미지 1/3 Motorola Moto G 5G (2022) Display Panel Replacement, Pry the battery: 23 단계, 이미지 2/3 Motorola Moto G 5G (2022) Display Panel Replacement, Pry the battery: 23 단계, 이미지 3/3
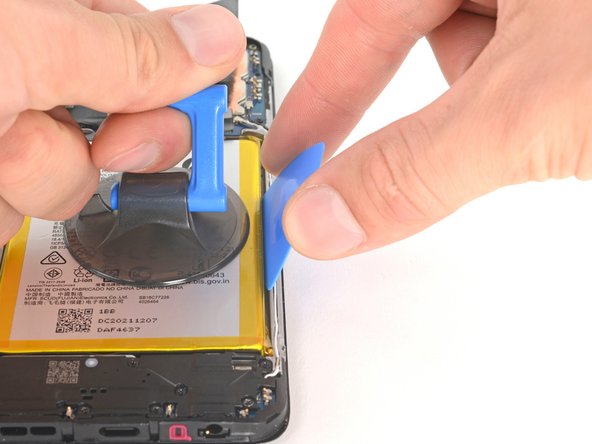
    • Apply a suction cup to the battery, as close to the center of the right edge as possible.

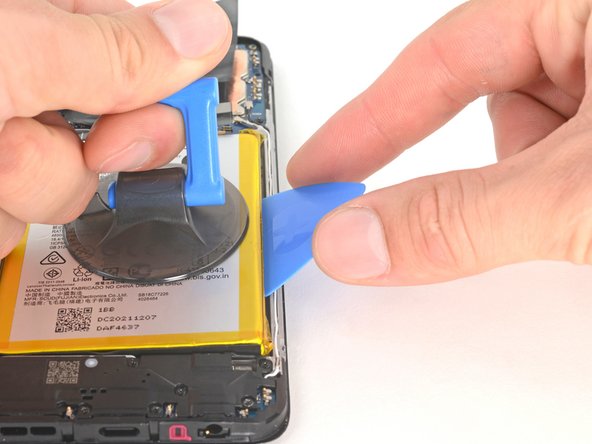
    • Insert an opening pick between the right edge of the battery and the frame.

    • Pull on the suction cup and pry the battery upward.

    • Don't use excessive force on the battery. Slow, consistent pressure is all that is required to free it from the frame.

    • Use two opening picks, side-by-side, if the first pick does not provide enough leverage, like this.

    • Apply more isopropyl alcohol if the battery becomes stuck.

  24. Motorola Moto G 5G (2022) Display Panel Replacement, Remove the battery: 24 단계, 이미지 1/1
    • Lift the battery out of its recess and remove it.

    • Don't reinstall a damaged or deformed battery, as doing so is a potential safety hazard.

    • Use this guide to install a battery with custom-cut adhesives, or use this guide to install a battery with an adhesive sheet.

  25. Motorola Moto G 5G (2022) Display Panel Replacement, Remove the foam strip: 25 단계, 이미지 1/3 Motorola Moto G 5G (2022) Display Panel Replacement, Remove the foam strip: 25 단계, 이미지 2/3 Motorola Moto G 5G (2022) Display Panel Replacement, Remove the foam strip: 25 단계, 이미지 3/3
    • Peel and remove the foam strip from the bottom of the battery.

    • Apply the foam strip onto your new battery.

  26. Motorola Moto G 5G (2022) Display Panel Replacement, Peel the graphite film: 26 단계, 이미지 1/3 Motorola Moto G 5G (2022) Display Panel Replacement, Peel the graphite film: 26 단계, 이미지 2/3 Motorola Moto G 5G (2022) Display Panel Replacement, Peel the graphite film: 26 단계, 이미지 3/3
    이 단계에 사용된 도구:
    Tweezers
    $4.99
    구매
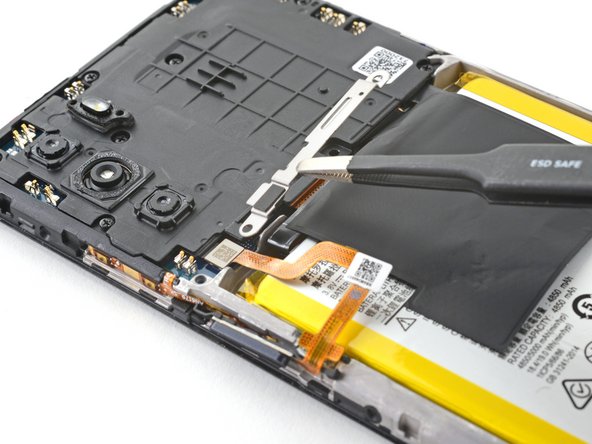
    • Use your tweezers to grab and peel the graphite film off the display cable's press connector.

  27. Motorola Moto G 5G (2022) Display Panel Replacement, Disconnect the display: 27 단계, 이미지 1/2 Motorola Moto G 5G (2022) Display Panel Replacement, Disconnect the display: 27 단계, 이미지 2/2
    • Use the pointed end of your spudger to pry and disconnect the display cable's press connector.

  28. Motorola Moto G 5G (2022) Display Panel Replacement, Soften the display cable's adhesive: 28 단계, 이미지 1/1
    • Heat an iOpener and apply it to the display cable for two minutes.

    • The iOpener may stick to the residue left over from the battery. Clean the surrounding surface to prevent this.

    • A hair dryer, heat gun, or hot plate may also be used, but be careful not to overheat the phone—the display is susceptible to heat damage.

  29. Motorola Moto G 5G (2022) Display Panel Replacement, Loosen the display cable: 29 단계, 이미지 1/2 Motorola Moto G 5G (2022) Display Panel Replacement, Loosen the display cable: 29 단계, 이미지 2/2
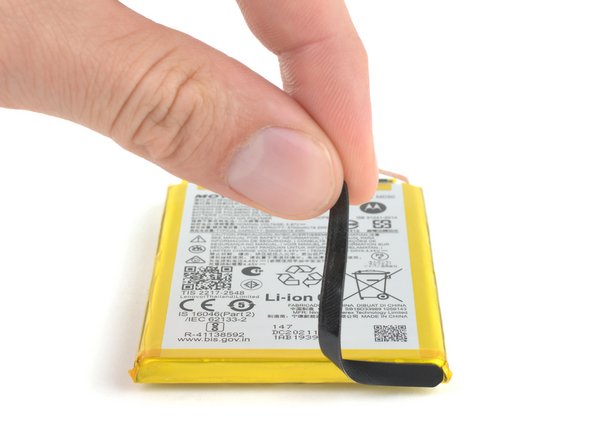
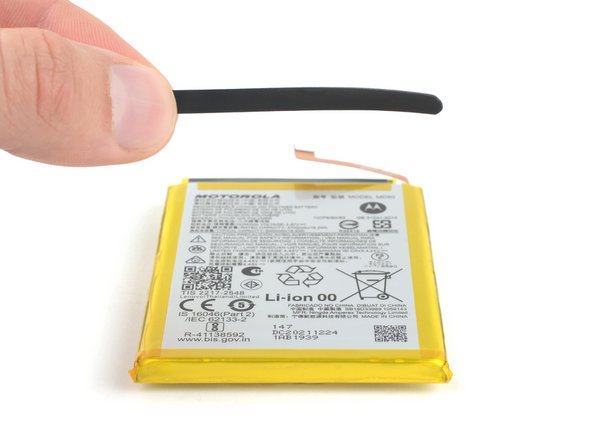
    • Grab the display's ribbon cable near the connector.

    • Peel the cable toward the bottom of the phone until it's completely separated from the frame.

  30. Motorola Moto G 5G (2022) Display Panel Replacement, Reinstall the back cover: 30 단계, 이미지 1/3 Motorola Moto G 5G (2022) Display Panel Replacement, Reinstall the back cover: 30 단계, 이미지 2/3 Motorola Moto G 5G (2022) Display Panel Replacement, Reinstall the back cover: 30 단계, 이미지 3/3
    • The remaining steps risk damaging exposed parts, such as the motherboard and cameras. Temporarily installing the back cover protects these parts from damage.

    • Place the back cover over the frame of the phone

    • Press around the perimeter to re-engage the clips securing the cover.

    • During reassembly, refer to steps 4 through 9 to remove the back cover and continue with the reassembly process.

  31. Motorola Moto G 5G (2022) Display Panel Replacement, Heat the top edge: 31 단계, 이미지 1/1
    • Heat an iOpener and apply it to the top of the screen for two minutes.

    • A hair dryer, heat gun, or hot plate may also be used, but be careful not to overheat the phone—the display is susceptible to heat damage.

  32. Motorola Moto G 5G (2022) Display Panel Replacement, Insert an opening pick: 32 단계, 이미지 1/3 Motorola Moto G 5G (2022) Display Panel Replacement, Insert an opening pick: 32 단계, 이미지 2/3 Motorola Moto G 5G (2022) Display Panel Replacement, Insert an opening pick: 32 단계, 이미지 3/3
    • Apply a suction cup to the screen, as close to the center of the top edge as possible.

    • Insert an opening pick vertically into the shallow cutout in the top of the glass, as far right as possible.

  33. Motorola Moto G 5G (2022) Display Panel Replacement, Separate the top adhesive: 33 단계, 이미지 1/3 Motorola Moto G 5G (2022) Display Panel Replacement, Separate the top adhesive: 33 단계, 이미지 2/3 Motorola Moto G 5G (2022) Display Panel Replacement, Separate the top adhesive: 33 단계, 이미지 3/3
    • Pull up on the suction cup with a strong, steady force.

    • Angle the opening pick to about 30 degrees, firmly slide it toward the right corner of the display, and separate the adhesive.

    • This step requires significant force. Hold the pick securely to avoid breaking it or slipping it out of the display.

    • Be mindful of the angle of your pick. If it's steeper than 30 degrees, it may slip and separate the bezel from the frame.

    • If you're having trouble separating the adhesive, apply more heat and repeat the process.

  34. Motorola Moto G 5G (2022) Display Panel Replacement, Slice the adhesive: 34 단계, 이미지 1/2 Motorola Moto G 5G (2022) Display Panel Replacement, Slice the adhesive: 34 단계, 이미지 2/2
    • Don't insert the pick deeper than 2 mm, as you may de-laminate the display panel.

    • Slide the opening pick toward the bottom right corner to separate the right edge's adhesive.

  35. Motorola Moto G 5G (2022) Display Panel Replacement: 35 단계, 이미지 1/3 Motorola Moto G 5G (2022) Display Panel Replacement: 35 단계, 이미지 2/3 Motorola Moto G 5G (2022) Display Panel Replacement: 35 단계, 이미지 3/3
    • Don't insert the pick deeper than 2 mm, as you may de-laminate the display panel.

    • Slide the opening pick toward the bottom left corner to separate the bottom edge's adhesive.

  36. Motorola Moto G 5G (2022) Display Panel Replacement: 36 단계, 이미지 1/2 Motorola Moto G 5G (2022) Display Panel Replacement: 36 단계, 이미지 2/2
    • Slide the pick along the left edge to completely separate the display panel from the frame.

  37. Motorola Moto G 5G (2022) Display Panel Replacement, Remove the display panel: 37 단계, 이미지 1/3 Motorola Moto G 5G (2022) Display Panel Replacement, Remove the display panel: 37 단계, 이미지 2/3 Motorola Moto G 5G (2022) Display Panel Replacement, Remove the display panel: 37 단계, 이미지 3/3
    • Grab and pull the bottom of the display panel down and away from the frame, making sure to thread the display cable through its slot.

    • Once the display cable is free, remove the panel from the frame.

결론

To reassemble your device, follow these instructions in reverse order. Apply new adhesive where necessary after cleaning the relevant areas with isopropyl alcohol (>90%).

Take your e-waste to an R2 or e-Stewards certified recycler.

Repair didn’t go as planned? Try some basic troubleshooting, or ask our Answers community for help.

다른 2명이 해당 안내서를 완성하였습니다.

Clay Eickemeyer

회원 가입일: 09/19/22

66,989 평판

안내서 453개 작성하였습니다

iFixit iFixit 회원

Staff

135 회원들

안내서 17,277개 작성하였습니다

댓글 2개

How do I replace the edge of my phone just need some help trying to do that

Johnny Boy - 답글

Hi Johnny,

If you're looking to replace the border around the perimeter of your phone, then this would be a back cover replacement. The back cover includes the edge of the case, right up to the screen bezel.

Clay Eickemeyer -

댓글 쓰기

조회 통계:

24 시간 전: 4

7일 전: 35

30일 전: 133

전체 시간: 2,378