주요 콘텐츠로 건너뛰기

Nexus 6P Charging Board Replacement

필요한 것

  1. Nexus 6P Charging Board Replacement, Back Cover: 1 단계, 이미지 1/3 Nexus 6P Charging Board Replacement, Back Cover: 1 단계, 이미지 2/3 Nexus 6P Charging Board Replacement, Back Cover: 1 단계, 이미지 3/3
    • It is possible to remove the back cover with an iOpener as seen in this guide but it's a lengthy and difficult procedure. We recommend a heat gun or something similar. The adhesive in the Nexus 6P is extremely sticky and especially the glass and plastic cover on the backside break or bend most of the time whilst doing this repair.

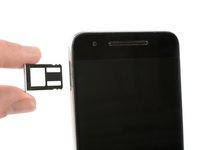
    • Use a SIM card eject tool, to pop out and remove the SIM card tray.

    • Use an iOpener to loosen the adhesive underneath the small plastic cover at the bottom of the phone.

  2. Nexus 6P Charging Board Replacement: 2 단계, 이미지 1/3 Nexus 6P Charging Board Replacement: 2 단계, 이미지 2/3 Nexus 6P Charging Board Replacement: 2 단계, 이미지 3/3
    • The knife is really sharp. Take care, not to cut yourself or your phone.

    • Insert a knife between the phone and the plastic cover. Pry up the plastic cover until you can insert an opening pick.

    • Slide the opening pick underneath the plastic cover to cut the adhesive.

  3. Nexus 6P Charging Board Replacement: 3 단계, 이미지 1/2 Nexus 6P Charging Board Replacement: 3 단계, 이미지 2/2
    • Use an iOpener to loosen the adhesive underneath the glass cover at the top of the phone.

    • Insert a knife between the phone and the glass cover. Pry up the glass cover until you can insert an opening pick.

  4. Nexus 6P Charging Board Replacement: 4 단계, 이미지 1/3 Nexus 6P Charging Board Replacement: 4 단계, 이미지 2/3 Nexus 6P Charging Board Replacement: 4 단계, 이미지 3/3
    • Glass may break. Wear protective glasses and protective gloves.

    • Slide the opening pick underneath the glass cover and use it to cut the adhesive underneath.

    • Pry off the glass cover.

  5. Nexus 6P Charging Board Replacement: 5 단계, 이미지 1/3 Nexus 6P Charging Board Replacement: 5 단계, 이미지 2/3 Nexus 6P Charging Board Replacement: 5 단계, 이미지 3/3
    • Remove the six Phillips #00 screws.

    • Use tweezers to remove any stickers covering the screw to allow better seating for the driver.

  6. Nexus 6P Charging Board Replacement: 6 단계, 이미지 1/3 Nexus 6P Charging Board Replacement: 6 단계, 이미지 2/3 Nexus 6P Charging Board Replacement: 6 단계, 이미지 3/3
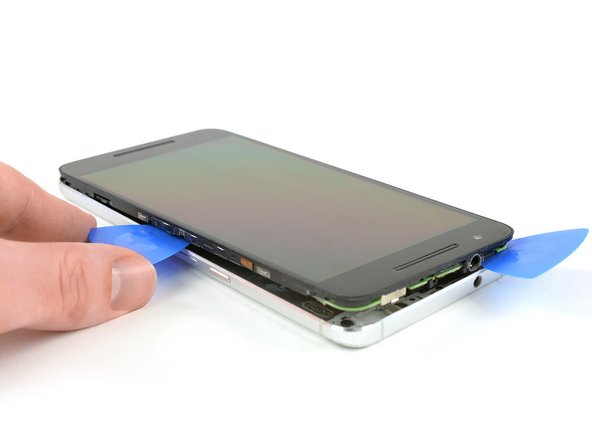
    • Insert a razor knife between the metal back cover and the front glass to create a gap. Insert an opening pick into the gap and slide it to the top right corner.

    • The knife is really sharp, be careful, not to cut yourself or your phone.

    • Insert a second opening pick and slide it to the top left corner.

    • Slide the opening picks along the edges to seperate the plastic clips, holding back cover and midframe together.

    • Remove the rear cover.

  7. Nexus 6P Charging Board Replacement, Battery Disconnection: 7 단계, 이미지 1/3 Nexus 6P Charging Board Replacement, Battery Disconnection: 7 단계, 이미지 2/3 Nexus 6P Charging Board Replacement, Battery Disconnection: 7 단계, 이미지 3/3
    • Remove the Philipps #000 screw.

    • Use tweezers to remove the metal plate.

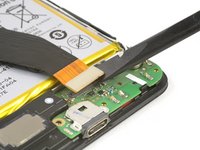
    • Use the flat end of a spudger, to disconnect the battery flex cable.

  8. Nexus 6P Charging Board Replacement, Charging Board: 8 단계, 이미지 1/3 Nexus 6P Charging Board Replacement, Charging Board: 8 단계, 이미지 2/3 Nexus 6P Charging Board Replacement, Charging Board: 8 단계, 이미지 3/3
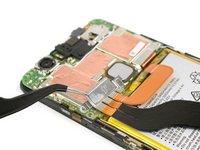
    • Disconnect the main flex cable with a spudger.

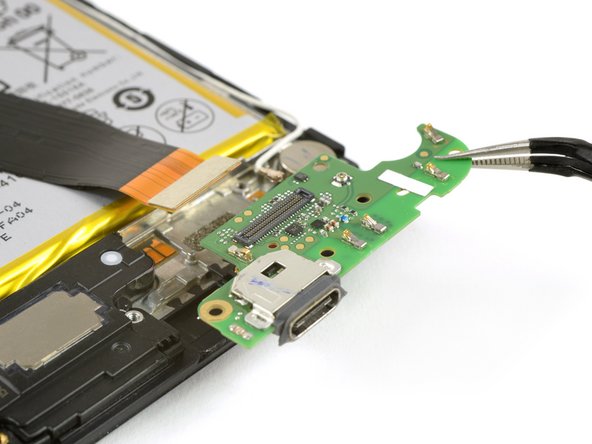
    • Use tweezers to unplug the antenna cable.

    • Remove the Phillips #000 screw.

  9. Nexus 6P Charging Board Replacement: 9 단계, 이미지 1/2 Nexus 6P Charging Board Replacement: 9 단계, 이미지 2/2
    • Pry out the charging board with a spudger.

    • Remove the charging board.

결론

To reassemble your device, follow these instructions in reverse order. When reassembling your phone apply new adhesive where it is necessary.

다른 11명이 해당 안내서를 완성하였습니다.

Dominik Schnabelrauch

회원 가입일: 11/23/16

201,069 평판

안내서 682개 작성하였습니다

iFixit iFixit 회원

Staff

136 회원들

안내서 16,573개 작성하였습니다

댓글 2개

Thanks for this guide. I'm happy that it wasn't as difficult as I imagined. I replaced the battery and the chargingboard. I destroyed only my iopener in the microwave oven. Then switched to a hairdryer for the heat. The phone works fine even with fast charging :-)

SAC-01 - 답글

Hello geniuses, I will be very grateful if anyone could help me out on this, I have a nexus 6p I am having a unique issue, in which when I am connecting my charger it's showing a charging sign but the charging percentage isn't increasing a bit, I have changed chargers, batteries and even the charging port, but the issue is still there and when I am going on the battery section through settings it's showing "charger connected, can't charge right now".

Please help me out.

m_m_wajih - 답글

댓글 쓰기

조회 통계:

24 시간 전: 0

7일 전: 1

30일 전: 7

전체 시간: 1,504