
Nintendo 3DS XL Battery Replacement
Is your battery having issues and need to be replaced? This guide will take you through the steps necessary to have a new battery in your Nintendo 3DS XL in no time!
필요한 것
수리 키트
이 키트는 이 안내서를 완료하는데 필요한 모든 부품과 도구를 포함하고 있습니다.

부품

도구


더보기...
-
-
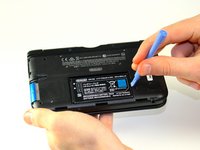
Loosen the two #00 Phillips 4.2 mm-length screws located at the top of the back cover.
-
-
-
-
Hold the device so that the cover is facing up.
-
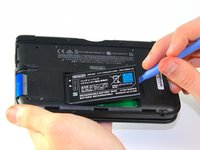
Using a plastic opening tool, pry off the cover starting at the top right corner.
-
Hold the edge of the cover to ensure it does not reattach.
-
Look for the small section below the stylus compartment. Pry off the cover at that point if it is still attached.
-
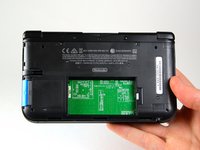
Take off the cover of the device and set it aside.
Note that on the lower side (opposite to the hinges), there are small hooking tabs. These require you to lift the top (screw side) off towards you, then the lower area.
-
-
-
Insert the plastic opening tool into the opening located on the right side of the battery.
-
Pry off the battery from the lower casing.
-
Lift the battery out of the case and set aside.
My 👴 grandpa was helping me 🔧 repair my 3ds xl and ⚡️electrocuted himself with the 🔋battery while we was taking it out with a 🔪 knife. 💀 Rip grandpa 😔
-


To reassemble your device, follow these instructions in reverse order.
To reassemble your device, follow these instructions in reverse order.
다른 52명이 해당 안내서를 완성하였습니다.
팀

Cal Poly, Team 9-13, Regan Spring 2014 Cal Poly, Team 9-13, Regan Spring 2014 회원
CPSU-REGAN-S14S9G13
5 회원들
안내서 44개를 작성함
댓글 6개
Time estimate: 3 - 9 hours Difficulty: Very difficult ??????
More like 30-90 seconds, and that's if you have to search for a screwdriver.
It should be noted that the bottom three clips on the bottom of the backplate can’t just be snapped in, they need to be slipped in, so when removing the backplate, it should be tiled away from the system and then pulled up from the bottom, and those three clips on the bottom should be the first clips in when you’re putting it back together, sliding them in with the backplate at an angle, and then the rest of the clips just snap in.
Nice tip. Ty.
Just did this. For reasmbly I recommend putting the bottom/lower part of the case on first before you screw it back on.
I just bought a 3ds battery for my new 3ds XL and while the battery initially had a charge, it became stuck in red bars unless i kept it plugged in. So I read up on what the issue is, it was mentioned somewhere that to recalibrate it, i had to charge it then let the battery drain, then it should charge properly after. Now the system doesnt even turn on even with it plugged into the charger. I don't know what the issue is now.
tim buffam - 답글
Note: If your top or bottom screen was working before disassembly and doesn't work after reassembly, then it's likely that the connector is loose or dirty or damaged or not clipped or PLACED UPSIDE-DOWN. I had this issue with my Super3DS XL(2015) and it turns out that the reason why my top screen wasn't working after put together, was because I had the top LCD connector upside-down. After I correctly put the connector in, It worked again!
justjustintuber - 답글
what type screwdriver do i use?!? its so small!!!!
Matthew - 답글
I had success using a #00 Phillips head
Jake S -
Can't clip the front of the back cover back in
Macro Man - 답글
I had trouble too, but got past it by slipping the bottom edge into the three indents first then easing the rest of the cover on!
Issu -
I found these were actually #00
Demosthien - 답글
The screws in the 1st picture are stripped. What screwdriver head do I use?
Adric101 - 답글
The official battery replacement guide by Nintendo says the screws should indeed be removed by a Phillips #00 screwdriver, so I've edited the guide to reflect that.
They are actually JIS screws though so they could be stripped by that screwdriver
MightyOak - 답글