주요 콘텐츠로 건너뛰기
Nintendo Wii Motherboard Cover Replacement

Nintendo Wii Motherboard Cover Replacement

Andrew Bookholt

Andrew Bookholt4 다른 기여자

최종 수정일 May 7, 2024

예상시간 없음
조정
단지 전제 조건
이 안내서는 다른 안내서의 선행 작업으로 사용하기 위한 것입니다. 그 자체로는 불완전합니다.
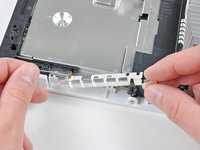
필요한 것

도구

더보기...

  1. Nintendo Wii Motherboard Cover Replacement, Motherboard Cover: 1 단계, 이미지 1개 중 1개
    이 단계에 사용된 도구:
    Tweezers
    $4.99
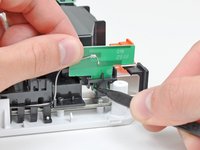
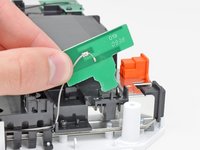
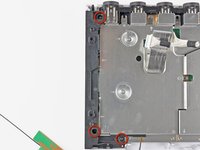
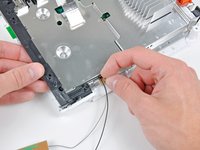
    • Use a pair of tweezers to lift the fan connector up and out of its socket on the logic board.

    • Be sure your tweezers are clamped down on the fan connector, not the socket on the motherboard.

  2. Nintendo Wii Motherboard Cover Replacement: 2 단계, 이미지 2개 중 1개 Nintendo Wii Motherboard Cover Replacement: 2 단계, 이미지 2개 중 2개
    • Remove the two 10 mm Phillips screws securing the fan to the fan shroud.

    • Remove the fan from the Wii.

  3. Nintendo Wii Motherboard Cover Replacement: 3 단계, 이미지 2개 중 1개 Nintendo Wii Motherboard Cover Replacement: 3 단계, 이미지 2개 중 2개
    • Use the tip of a spudger or another fine-pointed tool to carefully pry one of the black plastic retaining fingers attached to the fan shroud away from the Wi-Fi antenna board.

    • Lift the Wi-Fi antenna out of the fan shroud.

  4. Nintendo Wii Motherboard Cover Replacement: 4 단계, 이미지 1개 중 1개
    • Remove the single 10 mm Phillips screw securing the second Wi-Fi antenna to the top of the fan shroud.

  5. Nintendo Wii Motherboard Cover Replacement: 5 단계, 이미지 1개 중 1개
    • Remove the two pieces of tape securing the second Wi-Fi antenna cable to the plastic bracket near the heat sink.

  6. Nintendo Wii Motherboard Cover Replacement: 6 단계, 이미지 1개 중 1개
    • Carefully de-route both antennas from the frame of the Wii and lay them aside.

  7. Nintendo Wii Motherboard Cover Replacement: 7 단계, 이미지 2개 중 1개 Nintendo Wii Motherboard Cover Replacement: 7 단계, 이미지 2개 중 2개
    • Remove the three 10 mm Phillips screws securing the fan shroud to the Wii.

    • Lift the fan shroud off the heat sink and remove it from the Wii.

  8. Nintendo Wii Motherboard Cover Replacement: 8 단계, 이미지 3개 중 1개 Nintendo Wii Motherboard Cover Replacement: 8 단계, 이미지 3개 중 2개 Nintendo Wii Motherboard Cover Replacement: 8 단계, 이미지 3개 중 3개
    • Remove the following six screws securing the EMI fingers to the bottom panel:

    • Four 7 mm Phillips screws

    • Two 11.3 mm Phillips screws

    • Remove both sets of EMI fingers from the Wii.

  9. Nintendo Wii Motherboard Cover Replacement: 9 단계, 이미지 2개 중 1개 Nintendo Wii Motherboard Cover Replacement: 9 단계, 이미지 2개 중 2개
    • Remove the following three screws:

    • One 7 mm Phillips screw

    • Two 10 mm Phillips screws

    • Lift the bracket out of the Wii.

  10. Nintendo Wii Motherboard Cover Replacement: 10 단계, 이미지 3개 중 1개 Nintendo Wii Motherboard Cover Replacement: 10 단계, 이미지 3개 중 2개 Nintendo Wii Motherboard Cover Replacement: 10 단계, 이미지 3개 중 3개
    • Remove the three 10 mm Phillips screws securing the black bracket to the bottom panel near the front of the Wii.

    • Slightly lift the bracket and use your other hand to pull the retaining clip away from where the Wi-Fi antennas enter the motherboard sheild.

    • Remove the bracket from the Wii.

    • Be sure not to lose the small square nut loosely held by the black plastic bracket.

  11. Nintendo Wii Motherboard Cover Replacement: 11 단계, 이미지 1개 중 1개
    • Remove the nine remaining 7 mm Phillips screws securing the motherboard cover to the bottom panel.

  12. Nintendo Wii Motherboard Cover Replacement: 12 단계, 이미지 1개 중 1개
    • Carefully lift the motherboard cover off the motherboard, minding any cables that may get caught.

    • On some models, a thermal pad for the wireless chip is attached to the underside of the motherboard cover. Be sure to replace it when reassembling.

결론

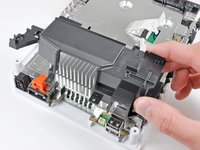
To reassemble your device, follow these instructions in reverse order.

작성자

4다른 기여자 명과 함께

Andrew Bookholt

591,826 평판

안내서 619개를 작성함

댓글 0개

댓글 쓰기

조회 통계:

지난 24시간: 3

지난 7일: 4

지난 30일: 4

전체 시간: 994