주요 콘텐츠로 건너뛰기
수리 커뮤니티 가입 - 계정 만들기

Palm TX Battery Pack Replacement

필요한 것

  1. Palm TX Battery Pack Replacement, Back Panel: 1 단계, 이미지 2개 중 1개 Palm TX Battery Pack Replacement, Back Panel: 1 단계, 이미지 2개 중 2개
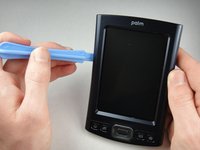
    • Orient the device so that the display faces forward.

    • Remove the stylus from the right side.

    댓글 쓰기

  2. Palm TX Battery Pack Replacement: 2 단계, 이미지 1개 중 1개
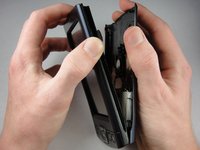
    • Turn over the device so that the back panel faces forward.

    • Use a T5 Torx screwdriver to remove the four 6.35mm corner screws.

    댓글 쓰기

  3. Palm TX Battery Pack Replacement: 3 단계, 이미지 2개 중 1개 Palm TX Battery Pack Replacement: 3 단계, 이미지 2개 중 2개
    • Rotate the device so that the display faces forward.

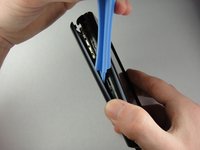
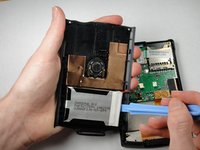
    • Insert a plastic opening tool with the angled tip pointing downward into the crevice on the left side of the device.

    • Pry along the crevice to loosen the back panel.

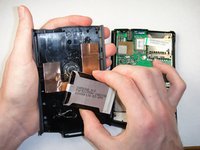
    • Repeat this process for the right side.

    댓글 쓰기

  4. Palm TX Battery Pack Replacement: 4 단계, 이미지 2개 중 1개 Palm TX Battery Pack Replacement: 4 단계, 이미지 2개 중 2개
    • Carefully pry the back panel to open the device.

    • Be careful not to break the wire that connects the battery pack to the motherboard.

    • When reassembling, snap the back panel back into place and then insert the top cover.

    댓글 쓰기

  5. Palm TX Battery Pack Replacement: 5 단계, 이미지 2개 중 1개 Palm TX Battery Pack Replacement: 5 단계, 이미지 2개 중 2개
    • Use a plastic opening tool to peel the battery pack from the back panel.

    • The battery pack is glued to the back panel so removing it may require considerable effort.

    댓글 쓰기

  6. Palm TX Battery Pack Replacement, Battery Pack: 6 단계, 이미지 2개 중 1개 Palm TX Battery Pack Replacement, Battery Pack: 6 단계, 이미지 2개 중 2개
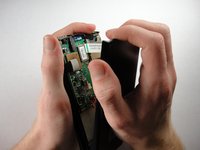
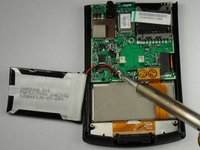
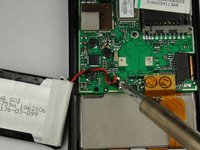
    • Use a soldering iron to disconnect the battery wires from the motherboard.

    • For soldering instructions, you can view the Soldering Guide.

    댓글 쓰기

결론

To reassemble your device, follow these instructions in reverse order.

취소: 해당 안내서를 완성하지 않았습니다.

다른 5명이 해당 안내서를 완성하였습니다.

작성자

5다른 기여자 명과 함께

Spencer Lewson

회원 가입일: 01/19/11

793 평판

안내서 6개를 작성함

Cal Poly, Team 1-15, Amido Winter 2011 Cal Poly, Team 1-15, Amido Winter 2011 회원

CPSU-AMIDO-W11S1G15

4 회원들

안내서 9개를 작성함

1가이드 댓글

In step 1 - Also remove the cover hinge by sliding downwards

In step 3 - there are actually 2 crevices on the left side of the device. Use the larger, which originally held the cover hinge (the smaller crevice seems to remove the facia)

Jack - 답글 공유

댓글 쓰기

조회 통계:

지난 24시간: 4

지난 7일: 20

지난 30일: 75

전체 시간: 8,465