주요 콘텐츠로 건너뛰기
수리 커뮤니티 가입 - 계정 만들기
Philips Norelco BeardTrimmer 3100 Power Switch Replacement

Philips Norelco BeardTrimmer 3100 Power Switch Replacement

Tamara Titus

Tamara Titus3 다른 기여자

최종 수정일 2024년 7월 15일

4 분
조정
더 나은 소개글

필요한 것

도구

  1. Philips Norelco BeardTrimmer 3100 Power Switch Replacement, Front and Back Panels: 1 단계, 이미지 1개 중 1개
    • Remove the comb from the top of the trimmer.

  2. Philips Norelco BeardTrimmer 3100 Power Switch Replacement: 2 단계, 이미지 2개 중 1개 Philips Norelco BeardTrimmer 3100 Power Switch Replacement: 2 단계, 이미지 2개 중 2개
    • Place your thumb underneath the blade and push upward to remove it.

  3. Philips Norelco BeardTrimmer 3100 Power Switch Replacement: 3 단계, 이미지 2개 중 1개 Philips Norelco BeardTrimmer 3100 Power Switch Replacement: 3 단계, 이미지 2개 중 2개
    • Hold trimmer towards you as shown in the diagram.

    • Insert your prying tool/metal spudger into the marked area.

  4. Philips Norelco BeardTrimmer 3100 Power Switch Replacement: 4 단계, 이미지 3개 중 1개 Philips Norelco BeardTrimmer 3100 Power Switch Replacement: 4 단계, 이미지 3개 중 2개 Philips Norelco BeardTrimmer 3100 Power Switch Replacement: 4 단계, 이미지 3개 중 3개
    • Apply gentle pressure and begin prying open the back panel.

    • Separate the panel one notch at a time. Listen carefully as you're prying the panel apart and notice each individual notch release.

  5. Philips Norelco BeardTrimmer 3100 Power Switch Replacement: 5 단계, 이미지 3개 중 1개 Philips Norelco BeardTrimmer 3100 Power Switch Replacement: 5 단계, 이미지 3개 중 2개 Philips Norelco BeardTrimmer 3100 Power Switch Replacement: 5 단계, 이미지 3개 중 3개
    • Pull the trimmer apart using your hands once the panel is at least halfway apart.

    • Pull the wires attached to the battery off of the power connectors before completely removing the back panel.

  6. Philips Norelco BeardTrimmer 3100 Power Switch Replacement: 6 단계, 이미지 2개 중 1개 Philips Norelco BeardTrimmer 3100 Power Switch Replacement: 6 단계, 이미지 2개 중 2개
    • Hold the trimmer towards you.

    • Place the metal spudger tool in the marked area.

  7. Philips Norelco BeardTrimmer 3100 Power Switch Replacement: 7 단계, 이미지 1개 중 1개
    • Apply gentle pressure and begin prying the front panel.

    • Separate the front panel one notch at a time.

  8. Philips Norelco BeardTrimmer 3100 Power Switch Replacement: 8 단계, 이미지 2개 중 1개 Philips Norelco BeardTrimmer 3100 Power Switch Replacement: 8 단계, 이미지 2개 중 2개
    • Pull the trimmer apart using your hands once the panel is at least halfway apart.

  9. Philips Norelco BeardTrimmer 3100 Power Switch Replacement, Power Switch: 9 단계, 이미지 1개 중 1개
    • Remove the front panel completely from the rest of the beard trimmer.

  10. Philips Norelco BeardTrimmer 3100 Power Switch Replacement: 10 단계, 이미지 1개 중 1개
    • Rotate the front panel so that the power switch is facing away from you.

  11. Philips Norelco BeardTrimmer 3100 Power Switch Replacement: 11 단계, 이미지 3개 중 1개 Philips Norelco BeardTrimmer 3100 Power Switch Replacement: 11 단계, 이미지 3개 중 2개 Philips Norelco BeardTrimmer 3100 Power Switch Replacement: 11 단계, 이미지 3개 중 3개
    • Push the white plastic frame upward to remove it from the notch.

    • Pull the white plastic frame off the front panel of the beard trimmer.

  12. Philips Norelco BeardTrimmer 3100 Power Switch Replacement: 12 단계, 이미지 1개 중 1개
    • Remove the power switch from the front panel once the white plastic frame is removed.

결론

To reassemble your device, follow these instructions in reverse order.

다른 한 분이 해당 안내서를 완성하였습니다.
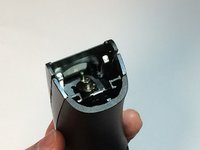
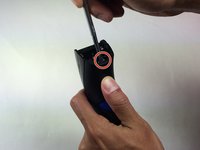
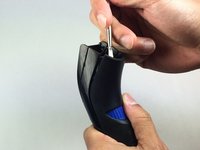
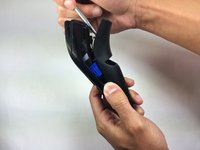
향후 수리를 위한 준비

모두 쇼핑하기

작성자

3다른 기여자 명과 함께

Tamara Titus

회원 가입일: 09/03/15

157 평판

안내서 1개를 작성함

USF Tampa, Team 15-2, Blackwell Fall 2015 USF Tampa, Team 15-2, Blackwell Fall 2015 회원

USFT-BLACKWELL-F15S15G2

4 회원들

안내서 14개를 작성함

0가이드 댓글

댓글 쓰기

조회 통계:

지난 24시간: 0

지난 7일: 5

지난 30일: 20

전체 시간: 6,287