주요 콘텐츠로 건너뛰기
Philips Norelco BeardTrimmer 3100 Zoom Lock Precision Notch Replacement

Philips Norelco BeardTrimmer 3100 Zoom Lock Precision Notch Replacement

ilan

ilan3 다른 기여자

최종 수정일 July 15, 2024

3 분
조정

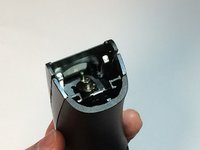
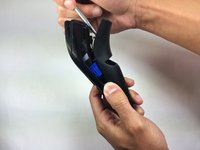
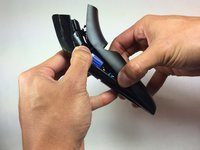
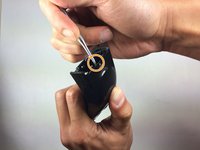
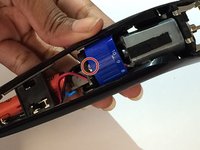
If the beard comb does not move, there may be a problem with the inside of the zoom lock ring, and the zoom lock precision notch may need to be replaced. Follow this guide to replace the zoom lock precision notch.

필요한 것

도구

  1. Philips Norelco BeardTrimmer 3100 Zoom Lock Precision Notch Replacement, Front and Back Panels: 1 단계, 이미지 1개 중 1개
    • Remove the comb from the top of the trimmer.

  2. Philips Norelco BeardTrimmer 3100 Zoom Lock Precision Notch Replacement: 2 단계, 이미지 2개 중 1개 Philips Norelco BeardTrimmer 3100 Zoom Lock Precision Notch Replacement: 2 단계, 이미지 2개 중 2개
    • Place your thumb underneath the blade and push upward to remove it.

  3. Philips Norelco BeardTrimmer 3100 Zoom Lock Precision Notch Replacement: 3 단계, 이미지 2개 중 1개 Philips Norelco BeardTrimmer 3100 Zoom Lock Precision Notch Replacement: 3 단계, 이미지 2개 중 2개
    • Hold trimmer towards you as shown in the diagram.

    • Insert your prying tool/metal spudger into the marked area.

  4. Philips Norelco BeardTrimmer 3100 Zoom Lock Precision Notch Replacement: 4 단계, 이미지 3개 중 1개 Philips Norelco BeardTrimmer 3100 Zoom Lock Precision Notch Replacement: 4 단계, 이미지 3개 중 2개 Philips Norelco BeardTrimmer 3100 Zoom Lock Precision Notch Replacement: 4 단계, 이미지 3개 중 3개
    • Apply gentle pressure and begin prying open the back panel.

    • Separate the panel one notch at a time. Listen carefully as you're prying the panel apart and notice each individual notch release.

  5. Philips Norelco BeardTrimmer 3100 Zoom Lock Precision Notch Replacement: 5 단계, 이미지 3개 중 1개 Philips Norelco BeardTrimmer 3100 Zoom Lock Precision Notch Replacement: 5 단계, 이미지 3개 중 2개 Philips Norelco BeardTrimmer 3100 Zoom Lock Precision Notch Replacement: 5 단계, 이미지 3개 중 3개
    • Pull the trimmer apart using your hands once the panel is at least halfway apart.

    • Pull the wires attached to the battery off of the power connectors before completely removing the back panel.

  6. Philips Norelco BeardTrimmer 3100 Zoom Lock Precision Notch Replacement: 6 단계, 이미지 2개 중 1개 Philips Norelco BeardTrimmer 3100 Zoom Lock Precision Notch Replacement: 6 단계, 이미지 2개 중 2개
    • Hold the trimmer towards you.

    • Place the metal spudger tool in the marked area.

  7. Philips Norelco BeardTrimmer 3100 Zoom Lock Precision Notch Replacement: 7 단계, 이미지 1개 중 1개
    • Apply gentle pressure and begin prying the front panel.

    • Separate the front panel one notch at a time.

  8. Philips Norelco BeardTrimmer 3100 Zoom Lock Precision Notch Replacement: 8 단계, 이미지 2개 중 1개 Philips Norelco BeardTrimmer 3100 Zoom Lock Precision Notch Replacement: 8 단계, 이미지 2개 중 2개
    • Pull the trimmer apart using your hands once the panel is at least halfway apart.

  9. Philips Norelco BeardTrimmer 3100 Zoom Lock Precision Notch Replacement, Zoom Lock Precision Notch: 9 단계, 이미지 1개 중 1개
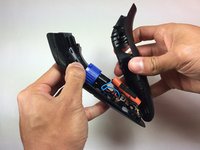
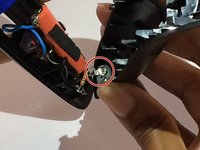
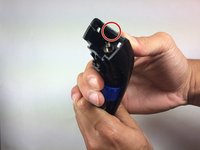
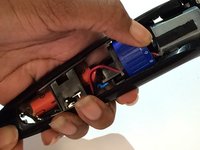
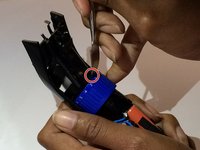
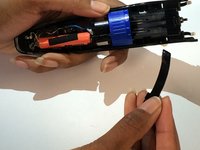
    • Locate the zoom lock precision notch in the back panel of the Beardtrimmer

  10. Philips Norelco BeardTrimmer 3100 Zoom Lock Precision Notch Replacement: 10 단계, 이미지 1개 중 1개
    • Set the zoom lock wheel to the lowest setting

  11. Philips Norelco BeardTrimmer 3100 Zoom Lock Precision Notch Replacement: 11 단계, 이미지 2개 중 1개 Philips Norelco BeardTrimmer 3100 Zoom Lock Precision Notch Replacement: 11 단계, 이미지 2개 중 2개
    • Rotate the trimmer so that the motor is facing you.

    • Now gently push down the zoom lock wheel until the white button is not showing.

  12. Philips Norelco BeardTrimmer 3100 Zoom Lock Precision Notch Replacement: 12 단계, 이미지 3개 중 1개 Philips Norelco BeardTrimmer 3100 Zoom Lock Precision Notch Replacement: 12 단계, 이미지 3개 중 2개 Philips Norelco BeardTrimmer 3100 Zoom Lock Precision Notch Replacement: 12 단계, 이미지 3개 중 3개
    • Rotate the beardtrimmer again so that the battery is facing you.

    • With the help of the metal spudger, apply gentle pressure on top of the wheel to remove the zoom lock precision notch .

결론

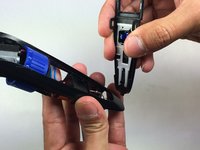
To reassemble your device, follow these instructions in reverse order.

작성자

3다른 기여자 명과 함께

ilan

회원 가입일: 09/03/15

173 평판

안내서 1개를 작성함

USF Tampa, Team 15-2, Blackwell Fall 2015 USF Tampa, Team 15-2, Blackwell Fall 2015 회원

USFT-BLACKWELL-F15S15G2

4 회원들

안내서 14개를 작성함

댓글 한 개

How to fix charging wire to the plate?

Kartik Gusain - 답글

댓글 쓰기

조회 통계:

지난 24시간: 0

지난 7일: 1

지난 30일: 5

전체 시간: 4,602