주요 콘텐츠로 건너뛰기
PlayStation 2 Slimline SCPH-7500x IR Sensor Replacement

PlayStation 2 Slimline SCPH-7500x IR Sensor Replacement

Jared Hirata

Jared Hirata11 다른 기여자

최종 수정일 August 2, 2024

10 분
쉬움
누락된 단계

This guide will walk you through step-by-step on how to properly remove and install the IR sensor in the PlayStation 2 Slimline.

필요한 것

도구

더보기...

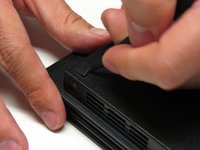
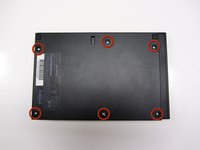
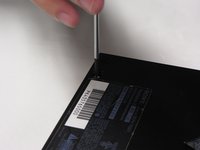
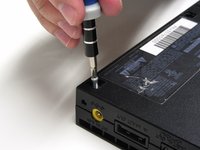
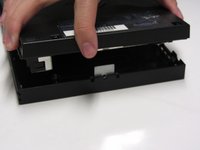
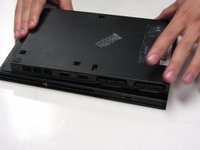
    • Turn off the PlayStation 2 and carefully unplug it from the power source. Also, it is important to eject the CD from the console before flipping the it upside down.

  1. PlayStation 2 Slimline SCPH-7500x IR Sensor Replacement: 2 단계, 이미지 1개 중 1개
    • Locate the six feet on the bottom of the PS2.

    • Five of these feet are in plain sight while the last foot is located under the black void sticker on the back of the device.

    • Some versions of the console, such as the PAL Version, may not have this sticker. In this case, the foot or the screw should be in plain sight.

  2. PlayStation 2 Slimline SCPH-7500x IR Sensor Replacement: 3 단계, 이미지 3개 중 1개 PlayStation 2 Slimline SCPH-7500x IR Sensor Replacement: 3 단계, 이미지 3개 중 2개 PlayStation 2 Slimline SCPH-7500x IR Sensor Replacement: 3 단계, 이미지 3개 중 3개
    • Remove the five visible feet from the bottom of the device using a spudger.

  3. PlayStation 2 Slimline SCPH-7500x IR Sensor Replacement: 4 단계, 이미지 2개 중 1개 PlayStation 2 Slimline SCPH-7500x IR Sensor Replacement: 4 단계, 이미지 2개 중 2개
    • Remove the sticker and then remove the 6th foot.

  4. PlayStation 2 Slimline SCPH-7500x IR Sensor Replacement: 5 단계, 이미지 3개 중 1개 PlayStation 2 Slimline SCPH-7500x IR Sensor Replacement: 5 단계, 이미지 3개 중 2개 PlayStation 2 Slimline SCPH-7500x IR Sensor Replacement: 5 단계, 이미지 3개 중 3개
    • After all of the feet have been removed, Use a Phillips #1 screwdriver to remove the six 4.0mm screws from the base of the PS2.

  5. PlayStation 2 Slimline SCPH-7500x IR Sensor Replacement: 6 단계, 이미지 3개 중 1개 PlayStation 2 Slimline SCPH-7500x IR Sensor Replacement: 6 단계, 이미지 3개 중 2개 PlayStation 2 Slimline SCPH-7500x IR Sensor Replacement: 6 단계, 이미지 3개 중 3개
    • Once all of the screws have been removed, pry apart the plastic covers. Start by lifting the side containing the power cable and Ethernet port. Then, lift the opposite side to fully separate the two sides.

    • You may need to apply some gentle force to detach the covers. Be careful not to break the plastic screw pins.

  6. PlayStation 2 Slimline SCPH-7500x IR Sensor Replacement: 7 단계, 이미지 1개 중 1개
    • If done correctly, you should have a fully detached plastic backing, revealing the electronic components of the PlayStation 2.

  7. PlayStation 2 Slimline SCPH-7500x IR Sensor Replacement, IR Sensor: 8 단계, 이미지 3개 중 1개 PlayStation 2 Slimline SCPH-7500x IR Sensor Replacement, IR Sensor: 8 단계, 이미지 3개 중 2개 PlayStation 2 Slimline SCPH-7500x IR Sensor Replacement, IR Sensor: 8 단계, 이미지 3개 중 3개
    이 단계에 사용된 도구:
    Tweezers
    $4.99
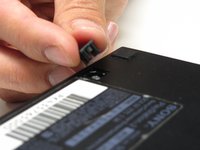
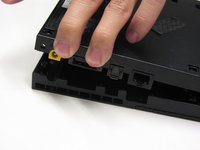
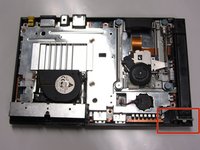
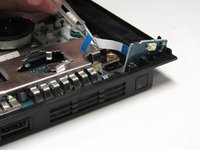
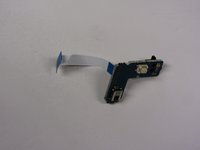
    • Locate the IR sensor on the motherboard. Then, use tweezers to gently detach the blue/white ribbon that attaches the IR sensor to the motherboard.

결론

To reassemble your device, follow these instructions in reverse order.

다른 5명이 해당 안내서를 완성하였습니다.

작성자

11다른 기여자 명과 함께

Jared Hirata

회원 가입일: 04/09/13

908 평판

안내서 7개를 작성함

Cal Poly, Team 17-4, Regan Spring 2013 Cal Poly, Team 17-4, Regan Spring 2013 회원

CPSU-REGAN-S13S17G4

3 회원들

안내서 28개를 작성함

댓글 0개

댓글 쓰기

조회 통계:

지난 24시간: 3

지난 7일: 27

지난 30일: 42

전체 시간: 2,089