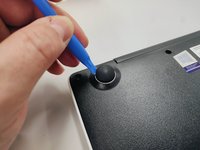
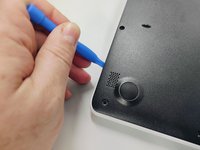
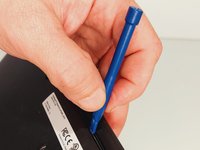
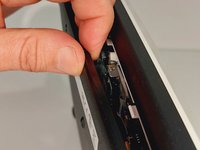
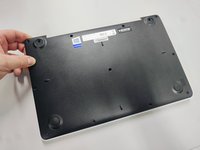
주요 콘텐츠로 건너뛰기

Rear Cover Removal

필요한 것

  1. Rear Cover Removal, Rear Cover: 1 단계, 이미지 1/1
    • First ensure your laptop is turned off and check if you have the necessary tools

  2. Rear Cover Removal: 2 단계, 이미지 1/2 Rear Cover Removal: 2 단계, 이미지 2/2
    • All screws are identified by circles. Pay special attention to the yellow circles, as the rubber feet hide screws.

  3. Rear Cover Removal: 3 단계, 이미지 1/3 Rear Cover Removal: 3 단계, 이미지 2/3 Rear Cover Removal: 3 단계, 이미지 3/3
    • With the opening tool, remove a rubber foot.

    • For this action you will have to exert some force, because the foot is glued with a resistant glue.

  4. Rear Cover Removal: 4 단계, 이미지 1/1
    • Remove all screws with a Philips screwdriver PH1

    • All screws are the same so don't worry about identifying them.

  5. Rear Cover Removal: 5 단계, 이미지 1/3 Rear Cover Removal: 5 단계, 이미지 2/3 Rear Cover Removal: 5 단계, 이미지 3/3
    • With the plastic tool, insert between the plastics and gently pry open.

    • With your fingers continue to force open the bottom cover on the side indicated in the figure.

    • You will feel and hear several clicks, perfectly normal, nothing is breaking. Remove the cover completely.

  6. Rear Cover Removal: 6 단계, 이미지 1/1
    • Finally, we have the laptop open and ready to replace most of its components. Look elsewhere on how to replace a component.

    • To close the laptop just follow this guide in reverse.

결승점

다른 한 분이 해당 안내서를 완성하였습니다.

Nelson Oliveira

회원 가입일: 02/03/23

741 평판

안내서 4개 작성하였습니다

jp.ik jp.ik 회원

Business

2 회원들

안내서 14개 작성하였습니다

댓글 2개

HI, nice job, to remove the keyboard is it necessary remove the motherboard?


Pedro - 답글

No, do not need. Just need to remove battery. Very soon I will post a new instruction how to do it. Be insure to don't perfurate or blend the battery. It is fixed with a double tape.

Nelson Oliveira - 답글

댓글 쓰기

조회 통계:

24 시간 전: 0

7일 전: 3

30일 전: 10

전체 시간: 222