이 버전에는 잘못된 편집 사항이 있을 수 있습니다. 최신 확인된 스냅샷으로 전환하십시오.
필요한 것
-
이 단계는 번역되지 않았습니다. 번역을 도와주십시오
-
Grasp the hard drive assembly and press the release button while lifting its front edge.
-
Remove the hard drive assembly from the top vent.
-
-
이 단계는 번역되지 않았습니다. 번역을 도와주십시오
-
Insert the flat end of a spudger or the edge of an Xbox 360 opening tool into the small gap at the front edge of the bottom vent.
-
Pry the front edge of the bottom vent away from the faceplate.
-
-
이 단계는 번역되지 않았습니다. 번역을 도와주십시오
-
To release the clips, work from the front edge of the bottom vent.
-
While slightly lifting the front edge of the bottom vent, use the tip of a spudger to push the clips closest to the front of the bottom vent towards the inside of the console.
-
-
이 단계는 번역되지 않았습니다. 번역을 도와주십시오
-
Repeat the same process to release the two center clips on the bottom vent.
-
-
이 단계는 번역되지 않았습니다. 번역을 도와주십시오
-
Use the tip of your spudger to release the clips on the bottom vent nearest the back of the Xbox.
-
-
이 단계는 번역되지 않았습니다. 번역을 도와주십시오
-
Insert the flat edge of a spudger between the faceplate and the outer casing near the power button.
-
Run your spudger along the edge of the faceplate to release the clips securing it to the front of the console.
-
-
이 단계는 번역되지 않았습니다. 번역을 도와주십시오
-
Repeat the same motions as previously mentioned to release the left side of the faceplate.
-
-
이 단계는 번역되지 않았습니다. 번역을 도와주십시오
-
The top vent is secured to the console via clips. The first two clips are located underneath the top vent closest to the faceplate, as shown in the pictures.
-
-
이 단계는 번역되지 않았습니다. 번역을 도와주십시오
-
Insert the flat end of a spudger into the small gaps previously mentioned to release the clips.
-
-
이 단계는 번역되지 않았습니다. 번역을 도와주십시오
-
To release the clips, work from the middle of the top vent.
-
While slightly lifting the front edge of the top vent, use the tip of a spudger to push the clips closest to the center of the top vent towards the inside of the console.
-
-
이 단계는 번역되지 않았습니다. 번역을 도와주십시오
-
Use the tip of your spudger to release the clip on the top vent nearest the back of the Xbox's upper case.
-
-
이 단계는 번역되지 않았습니다. 번역을 도와주십시오
-
Use the tip of your spudger to release the clip on the top vent nearest the back of the Xbox.
-
Remove the top vent from the 360.
-
-
이 단계는 번역되지 않았습니다. 번역을 도와주십시오
-
Stand the console vertically with the top edge facing down.
-
Carefully peel the warranty sticker off the console.
-
-
-
이 단계는 번역되지 않았습니다. 번역을 도와주십시오
-
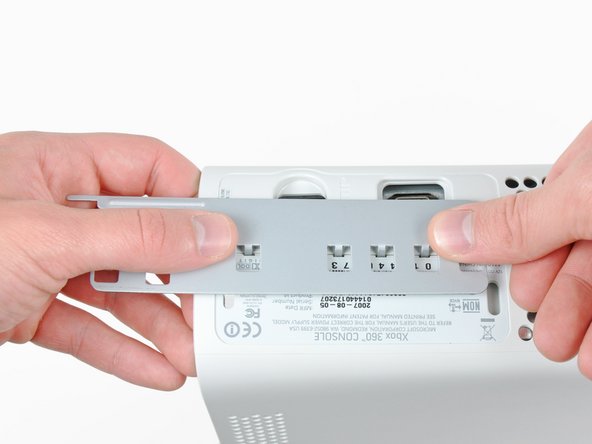
Use the flat end of a spudger to release the following latches:
-
Above the front-facing USB ports.
-
Beneath the front-facing USB ports.
-
Above the Memory Unit slots.
-
-
이 단계는 번역되지 않았습니다. 번역을 도와주십시오
-
Insert the flat end of a spudger and pry upwards to release the last remaining latch located above the eject button.
-
-
이 단계는 번역되지 않았습니다. 번역을 도와주십시오
-
Slightly lift the front portion of the lower case to ensure that the latches in the front have been completely released.
-
-
이 단계는 번역되지 않았습니다. 번역을 도와주십시오
-
Press the Xbox 360 opening tool down into the clips securing the lower case to the upper case near the I/O ports.
-
While pressing down on the tool, push the lower and upper cases apart to separate the retaining clips.
-
-
이 단계는 번역되지 않았습니다. 번역을 도와주십시오
-
While pushing the upper and lower cases apart, use the tip of a spudger or the finger of an Xbox 360 opening tool to push the long clip highlighted in red toward the center of the 360.
-
The clip should release, leaving the clips near the power connector as the only thing holding the upper and lower cases together.
-
-
이 단계는 번역되지 않았습니다. 번역을 도와주십시오
-
Press the Xbox 360 opening tool down into the two remaining clips near the power connector.
-
Push the upper and lower cases apart to fully release the retaining clips.
-
-
이 단계는 번역되지 않았습니다. 번역을 도와주십시오
-
Grasp the back portion of the lower case and lift it upwards to separate it from the console.
-
-
이 단계는 번역되지 않았습니다. 번역을 도와주십시오
-
Use the tip of a spudger to release the clip securing the eject button to the metal casing.
-
Insert the flat end of a spudger between the eject button and the optical drive.
-
Pry the eject button off its retaining posts and remove it from the 360.
-
-
이 단계는 번역되지 않았습니다. 번역을 도와주십시오
-
Remove the six silver 64 mm T10 Torx screws securing the upper case to the metal casing.
-
-
이 단계는 번역되지 않았습니다. 번역을 도와주십시오
-
Slightly lift the optical drive upwards to gain clearance to disconnect the SATA and power connectors located on the backside of the optical drive.
-
-
이 단계는 번역되지 않았습니다. 번역을 도와주십시오
-
Grab the power connector by its cables and pull it straight out of its socket on the optical drive.
-
Disconnect the SATA data connector from its socket on the optical drive by pulling it straight away.
-
-
이 단계는 번역되지 않았습니다. 번역을 도와주십시오
-
Insert the flat end of a spudger into the small rectangular opening on the top of the cooling fan duct.
-
Carefully release the fan duct retaining clip and remove the fan duct from the Xbox.
-
The clip can alternatively be released using the metal finger of an Xbox 360 opening tool.
-
-
이 단계는 번역되지 않았습니다. 번역을 도와주십시오
-
While lifting the metal chassis strip above the dual fans, pull the fans toward the center of the motherboard.
-
-
이 단계는 번역되지 않았습니다. 번역을 도와주십시오
-
Lift the dual fan connector straight up from its socket on the motherboard.
-
Remove the dual fan assembly from the console.
-
-
이 단계는 번역되지 않았습니다. 번역을 도와주십시오
-
Use the flat end of a spudger to release the clips securing the RF module shield along the top and the left edge of the RF module.
-
Remove the RF module shield from the console.
-
-
이 단계는 번역되지 않았습니다. 번역을 도와주십시오
-
Remove three 5.6 mm T8 Torx screws securing the RF module to the metal chassis.
-
-
이 단계는 번역되지 않았습니다. 번역을 도와주십시오
-
Grasp the RF module and lift it straight up to disconnect it from its socket on the motherboard.
-
Remove the RF module from the console.
-
-
이 단계는 번역되지 않았습니다. 번역을 도와주십시오
-
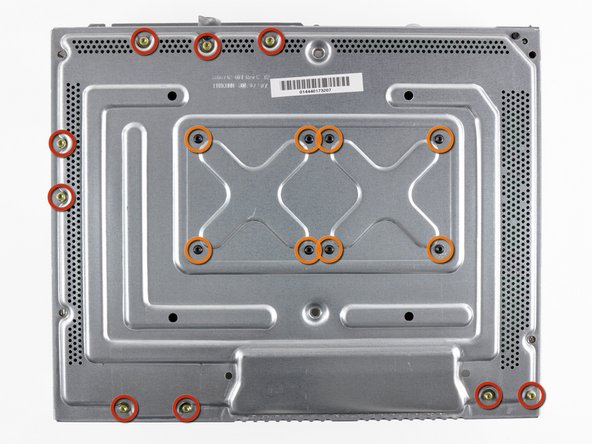
Remove the following screws securing the motherboard to the metal casing:
-
Nine gold 11 mm T10 Torx screws.
-
Eight black 5.6 mm T8 Torx screws.
-
-
이 단계는 번역되지 않았습니다. 번역을 도와주십시오
-
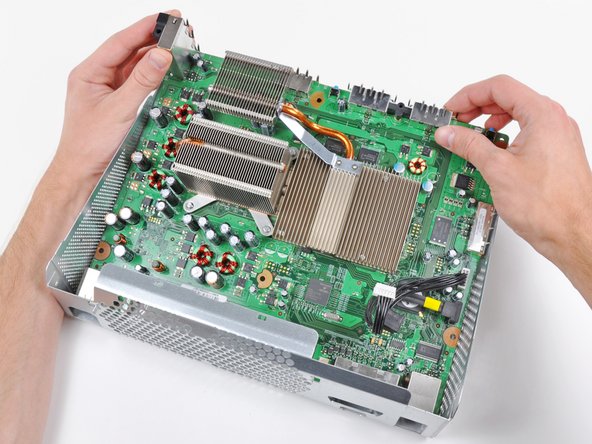
Lift the motherboard assembly from its front edge.
-
Remove the motherboard assembly from the metal casing.
-
-
이 단계는 번역되지 않았습니다. 번역을 도와주십시오
-
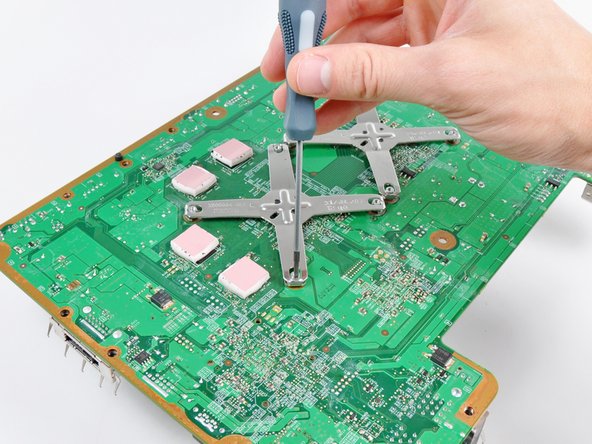
Insert the tip of a small flathead screwdriver between the X clamp and its retaining post on the heat sink.
-
Pry the X clamp away from its retaining post until it is lifted above the small groove cut into the retaining post.
-
-
이 단계는 번역되지 않았습니다. 번역을 도와주십시오
-
Insert your screwdriver parallel to the motherboard between the X clamp and its retaining post.
-
Twist the screwdriver to fully release the X clamp from its retaining post.
-
-
이 단계는 번역되지 않았습니다. 번역을 도와주십시오
-
Insert the tip of a small flathead screwdriver between the X clamp and its retaining post on the heat sink.
-
Pry the X clamp away from its retaining post until it is lifted above the small groove cut into the retaining post.
-
Remove the CPU heat sink from the motherboard. When reinstalling the CPU heat sink, be sure to apply a new layer of thermal paste.
-
-
이 단계는 번역되지 않았습니다. 번역을 도와주십시오
-
Disconnect the optical drive power and SATA cables from the motherboard.
-
-
이 단계는 번역되지 않았습니다. 번역을 도와주십시오
-
If replacing the motherboard transfer the four thermal pads on the underside of the motherboard to your new motherboard.
-
Motherboard remains.
-
-
이 단계는 번역되지 않았습니다. 번역을 도와주십시오
-
Lay the motherboard with the processor side facing down on the flat metal bottom of the the bare chassis (with its open side facing down) as seen in the second picture. Allow the tall USB socket to hang over the edge of the chassis so the board sits flat.
-
Use a heat gun on the LOW setting to heat the entire back of the motherboard for one minute. Be sure to continually sweep the heat gun back and forth across the face of the motherboard to evenly heat it.
-
-
이 단계는 번역되지 않았습니다. 번역을 도와주십시오
-
After heating the back of the motherboard for one minute, flip the motherboard over and lay it on the chassis as shown.
-
-
이 단계는 번역되지 않았습니다. 번역을 도와주십시오
-
With your heat gun set to HIGH, evenly heat the area boxed in red for four minutes.
-
After heating the area boxed in red for four minutes, turn off your heat gun and allow the motherboard to cool down to room temperature without moving or disturbing it in any way.
-


다른 207명이 해당 안내서를 완성하였습니다.

댓글 21개
Is there a similar guide for XBOX 360s?
Yes, there is - and It worked for me!
Dave -
What temperature ranges should I be aiming for? I have a variable temp head gun and no idea of what temperatures are best for both stages.
The heat gun they are using has a 570 F low-setting. While that doesn't give you an EXACT temperature, it should give you some idea of what they're using.