

This guide shows how to remove the laptop HDD
필요한 것
수리 키트
이 키트는 이 안내서를 완료하는데 필요한 모든 부품과 도구를 포함하고 있습니다.


부품


도구

더보기...
-
-
Flip laptop over and locate the battery release button
-
Push release button to the left to release battery and gently pull battery from the laptop
-
-
-
-
With the bottom of the laptop facing up and the front toward you locate and loosen the two M2.0×5.0 captive screws holding the hard drive bay cover closed.
-
Lift the left side of the bay cover and swing it up and to the right to remove it.
-
Loosen the M2.5×10.0 captive screw that holds the hard drive in.
-
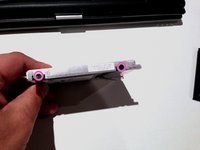
Grasp the plastic tab and slide the hard drive to the right to disconnect it from the motherboard.
-
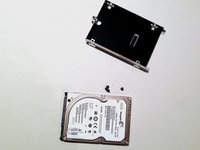
Lift the hard drive straight up and out of the laptop.
-


To reassemble your device, follow these instructions in reverse order.
To reassemble your device, follow these instructions in reverse order.
다른 17명이 해당 안내서를 완성하였습니다.

팀
