주요 콘텐츠로 건너뛰기

Samsung Galaxy S21 Vibrator Replacement

필요한 것

  1. Samsung Galaxy S21 Vibrator Replacement, Heat the bottom edge: 1 단계, 이미지 1/1
    • Completely power off your phone before you begin.

    • Heat an iOpener and apply it to the back cover's bottom edge for two minutes.

    • A hair dryer, heat gun, or hot plate may also be used, but be careful not to overheat the phone—the display, internal battery, and plastic back cover are both susceptible to heat damage.

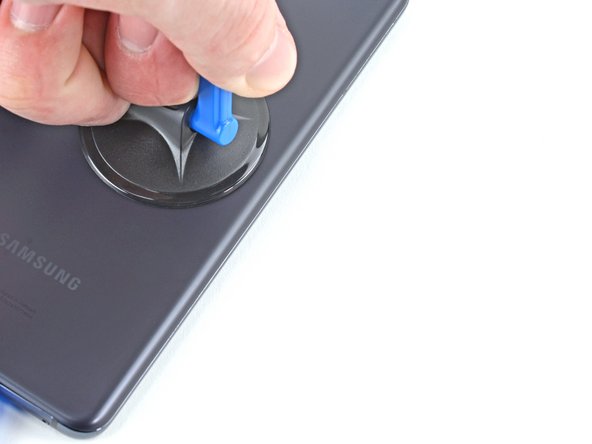
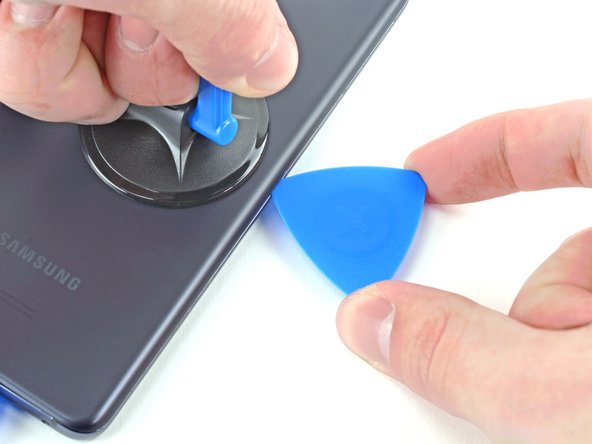
  2. Samsung Galaxy S21 Vibrator Replacement, Separate the bottom adhesive: 2 단계, 이미지 1/3 Samsung Galaxy S21 Vibrator Replacement, Separate the bottom adhesive: 2 단계, 이미지 2/3 Samsung Galaxy S21 Vibrator Replacement, Separate the bottom adhesive: 2 단계, 이미지 3/3
    • Apply a suction cup to the back of the phone, as close to the center of the bottom edge as possible.

    • Pull up on the suction cup with strong, steady force to create a gap between the back cover and the frame.

    • Depending on the age of your phone, this may be difficult. If you're having trouble, apply more heat to the edge and try again.

    • Insert an opening pick into the gap.

    • Only insert the pick up to 5 mm, as you may damage internal components if you go further.

  3. Samsung Galaxy S21 Vibrator Replacement, Slice the bottom adhesive: 3 단계, 이미지 1/3 Samsung Galaxy S21 Vibrator Replacement, Slice the bottom adhesive: 3 단계, 이미지 2/3 Samsung Galaxy S21 Vibrator Replacement, Slice the bottom adhesive: 3 단계, 이미지 3/3
    • Slide the pick back and forth along the bottom edge to slice through the adhesive.

    • Leave the pick in to prevent the adhesive from resealing.

  4. Samsung Galaxy S21 Vibrator Replacement, Heat the left edge: 4 단계, 이미지 1/1
    • Apply a heated iOpener to the back cover's left edge for two minutes.

  5. Samsung Galaxy S21 Vibrator Replacement, Separate the left adhesive: 5 단계, 이미지 1/3 Samsung Galaxy S21 Vibrator Replacement, Separate the left adhesive: 5 단계, 이미지 2/3 Samsung Galaxy S21 Vibrator Replacement, Separate the left adhesive: 5 단계, 이미지 3/3
    • Apply a suction cup to the back of the phone, as close to the center of the left edge as possible.

    • Pull up on the suction cup with strong, steady force to create a gap between the back cover and the frame.

    • Insert an opening pick into the gap.

    • Only insert the pick up to 5 mm, as you may damage internal components if you go further.

  6. Samsung Galaxy S21 Vibrator Replacement: 6 단계, 이미지 1/3 Samsung Galaxy S21 Vibrator Replacement: 6 단계, 이미지 2/3 Samsung Galaxy S21 Vibrator Replacement: 6 단계, 이미지 3/3
    • Slide an opening pick along the left edge towards the bottom left corner to cut the adhesive.

    • Don't cut past where the camera shell meets the back cover, as you risk cracking the plastic.

    • Leave the pick in to prevent the adhesive from resealing.

  7. Samsung Galaxy S21 Vibrator Replacement, Heat the right edge: 7 단계, 이미지 1/1
    • Apply a heated iOpener to the back cover's right edge for two minutes.

  8. Samsung Galaxy S21 Vibrator Replacement, Separate the right adhesive: 8 단계, 이미지 1/3 Samsung Galaxy S21 Vibrator Replacement, Separate the right adhesive: 8 단계, 이미지 2/3 Samsung Galaxy S21 Vibrator Replacement, Separate the right adhesive: 8 단계, 이미지 3/3
    • Apply a suction cup to the back of the phone, as close to the center of the right edge as possible.

    • Pull up on the suction cup with strong, steady force to create a gap between the back cover and the frame.

    • Insert an opening pick into the gap.

    • Only insert the pick up to 3 mm, as you may damage the secondary interconnect cable, which runs parallel to the right edge.

  9. Samsung Galaxy S21 Vibrator Replacement: 9 단계, 이미지 1/3 Samsung Galaxy S21 Vibrator Replacement: 9 단계, 이미지 2/3 Samsung Galaxy S21 Vibrator Replacement: 9 단계, 이미지 3/3
    • Slide an opening pick back and forth along the back cover's right edge to cut the adhesive.

    • Leave the pick in to prevent the adhesive from resealing.

  10. Samsung Galaxy S21 Vibrator Replacement, Separate the corner adhesive: 10 단계, 이미지 1/3 Samsung Galaxy S21 Vibrator Replacement, Separate the corner adhesive: 10 단계, 이미지 2/3 Samsung Galaxy S21 Vibrator Replacement, Separate the corner adhesive: 10 단계, 이미지 3/3
    • Rotate the right-edge opening pick around the top-right corner of the phone.

    • Only insert the pick up to 5 mm, as you may damage internal components if you go further.

    • This procedure can be applied to each corner, except the top-left where the rear-facing camera is located.

  11. Samsung Galaxy S21 Vibrator Replacement, Reposition the opening picks: 11 단계, 이미지 1/3 Samsung Galaxy S21 Vibrator Replacement, Reposition the opening picks: 11 단계, 이미지 2/3 Samsung Galaxy S21 Vibrator Replacement, Reposition the opening picks: 11 단계, 이미지 3/3
    • Slide the top-most opening pick as close to the camera shell as possible.

    • Repeat for the left-edge pick.

  12. Samsung Galaxy S21 Vibrator Replacement, Heat the camera shell: 12 단계, 이미지 1/1
    • Heat an iOpener and apply it to the camera shell for two minutes.

  13. Samsung Galaxy S21 Vibrator Replacement, Separate the camera shell adhesive: 13 단계, 이미지 1/3 Samsung Galaxy S21 Vibrator Replacement, Separate the camera shell adhesive: 13 단계, 이미지 2/3 Samsung Galaxy S21 Vibrator Replacement, Separate the camera shell adhesive: 13 단계, 이미지 3/3
    • Rotate the back cover counterclockwise to create a gap between the camera shell and the frame.

    • Only insert the pick up to 5 mm to avoid scratching the camera.

    • Insert an opening pick in the gap.

    • If this method doesn't work, move to the next step for an alternative method; otherwise, skip the next step.

  14. Samsung Galaxy S21 Vibrator Replacement, Separate the camera shell adhesive (alternate method): 14 단계, 이미지 1/3 Samsung Galaxy S21 Vibrator Replacement, Separate the camera shell adhesive (alternate method): 14 단계, 이미지 2/3 Samsung Galaxy S21 Vibrator Replacement, Separate the camera shell adhesive (alternate method): 14 단계, 이미지 3/3
    • Gently slide the two picks toward the camera shell so they are under the corners of the back cover adjacent to the camera shell.

    • Move the picks back and forth along the bridge between the back cover and the camera shell until you create a gap between the camera shell and the frame.

    • Be careful with this method, as you risk cracking the plastic back cover.

  15. Samsung Galaxy S21 Vibrator Replacement: 15 단계, 이미지 1/3 Samsung Galaxy S21 Vibrator Replacement: 15 단계, 이미지 2/3 Samsung Galaxy S21 Vibrator Replacement: 15 단계, 이미지 3/3
    • Slide an opening pick between the camera shell and the frame to cut the adhesive.

    • There's a significant amount of adhesive securing the frame to the camera shell, so multiple rounds of heating may be needed.

  16. Samsung Galaxy S21 Vibrator Replacement: 16 단계, 이미지 1/2 Samsung Galaxy S21 Vibrator Replacement: 16 단계, 이미지 2/2
    • There's additional adhesive to the right of the camera that you need to cut through.

    • There's a plate on the back cover surrounding the phone's flash that the pick can get stuck on:

    • Angle the pick downward to avoid any damage.

  17. Samsung Galaxy S21 Vibrator Replacement: 17 단계, 이미지 1/3 Samsung Galaxy S21 Vibrator Replacement: 17 단계, 이미지 2/3 Samsung Galaxy S21 Vibrator Replacement: 17 단계, 이미지 3/3
    • Line up the opening pick's tip with your phone's flash

    • Insert the pick slowly, making sure to avoid the flash's plate.

    • The plate's resistance can feel similar to adhesive. Angle the pick downward to keep the pick from sliding into the plate.

    • Slice the adhesive to the right of the camera.

  18. Samsung Galaxy S21 Vibrator Replacement, Remove the back cover: 18 단계, 이미지 1/2 Samsung Galaxy S21 Vibrator Replacement, Remove the back cover: 18 단계, 이미지 2/2
    • Remove the back cover.

    • If your back cover is still sticking to the frame, slide the pick around the edges of the phone until the back cover completely separates.

    • During reassembly:

    • This is a good point to power on your phone and test all functions before sealing it up. Be sure to power your phone back down completely before you continue working.

    • Remove any adhesive chunks with a pair of tweezers or your fingers. Use some high concentration (over 90%) isopropyl alcohol to wipe away any adhesive residue.

    • If you're using Samsung custom-cut adhesives, follow this guide.

    • If you're using double-sided tape, follow this guide.

  19. Samsung Galaxy S21 Vibrator Replacement, Unfasten the motherboard bracket: 19 단계, 이미지 1/1
    이 단계에 사용된 도구:
    Magnetic Project Mat
    $19.95
    구매
    • Use a Phillips screwdriver to remove the five 4 mm-long screws securing the motherboard bracket to the frame.

    • Throughout this repair, keep track of each screw, and make sure it goes back exactly where it came from.

  20. Samsung Galaxy S21 Vibrator Replacement, Unclip the motherboard bracket: 20 단계, 이미지 1/2 Samsung Galaxy S21 Vibrator Replacement, Unclip the motherboard bracket: 20 단계, 이미지 2/2
    • Use a pair of tweezers to gently pull up and unclip the motherboard bracket from the frame.

    • Do not completely remove the bracket yet, as it's still attached to the wireless charging coil.

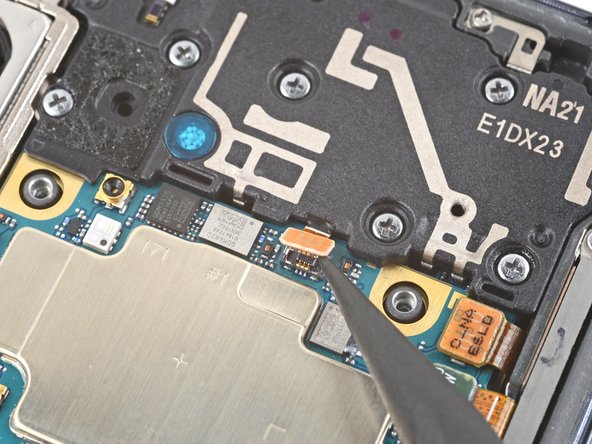
  21. Samsung Galaxy S21 Vibrator Replacement, Disconnect the battery: 21 단계, 이미지 1/2 Samsung Galaxy S21 Vibrator Replacement, Disconnect the battery: 21 단계, 이미지 2/2
    • While using tweezers, or your fingers, to hold the motherboard bracket out of the way, use a spudger to pry up the battery press connector.

    • Take care to pry only under the edge of the connector to prevent damaging the socket itself and surrounding components.

    • To re-attach press connectors like this one, carefully align and press down on one side until it clicks into place, then repeat on the other side. Do not press down on the middle. If the connector is misaligned, the pins can bend, causing permanent damage.

  22. Samsung Galaxy S21 Vibrator Replacement, Disconnect the wireless charging coil: 22 단계, 이미지 1/2 Samsung Galaxy S21 Vibrator Replacement, Disconnect the wireless charging coil: 22 단계, 이미지 2/2
    • While still holding the motherboard bracket out of the way, use a spudger to pry up and disconnect the wireless charging coil's press connector.

  23. Samsung Galaxy S21 Vibrator Replacement, Remove the wireless charging coil: 23 단계, 이미지 1/3 Samsung Galaxy S21 Vibrator Replacement, Remove the wireless charging coil: 23 단계, 이미지 2/3 Samsung Galaxy S21 Vibrator Replacement, Remove the wireless charging coil: 23 단계, 이미지 3/3
    • The wireless charging coil is secured to the phone with light adhesive.

    • Use your fingers to gently peel the wireless charging coil away from the phone.

    • During reassembly, refasten the motherboard bracket screws first to properly align the charging coil into place, then firmly press the rest of the coil down to adhere it.

  24. Samsung Galaxy S21 Vibrator Replacement, Disconnect the earpiece speaker cable: 24 단계, 이미지 1/2 Samsung Galaxy S21 Vibrator Replacement, Disconnect the earpiece speaker cable: 24 단계, 이미지 2/2
    • Use the point of a spudger to pry up and disconnect the earpiece speaker cable's press connector.

  25. Samsung Galaxy S21 Vibrator Replacement, Unfasten the earpiece speaker: 25 단계, 이미지 1/1
    • Use a Phillips screwdriver to remove the seven 4 mm screws securing the earpiece speaker to the motherboard.

  26. Samsung Galaxy S21 Vibrator Replacement, Remove the earpiece speaker: 26 단계, 이미지 1/3 Samsung Galaxy S21 Vibrator Replacement, Remove the earpiece speaker: 26 단계, 이미지 2/3 Samsung Galaxy S21 Vibrator Replacement, Remove the earpiece speaker: 26 단계, 이미지 3/3
    • Insert the point of a spudger into the gap between the right-most edge of the earpiece speaker and the phone.

    • Use the spudger to pry up and release the clips holding the earpiece speaker in place.

    • Use tweezers, or your fingers, to remove the earpiece speaker.

  27. Samsung Galaxy S21 Vibrator Replacement, Disconnect the front camera: 27 단계, 이미지 1/2 Samsung Galaxy S21 Vibrator Replacement, Disconnect the front camera: 27 단계, 이미지 2/2
    • Use the flat end of a spudger to pry up and disconnect the front camera's press connector.

  28. Samsung Galaxy S21 Vibrator Replacement, Disconnect the right-edge cables: 28 단계, 이미지 1/3 Samsung Galaxy S21 Vibrator Replacement, Disconnect the right-edge cables: 28 단계, 이미지 2/3 Samsung Galaxy S21 Vibrator Replacement, Disconnect the right-edge cables: 28 단계, 이미지 3/3
    • Use a spudger to pry up and disconnect the orange press connector adjacent to the 5G antenna cable's press connector.

    • Repeat for the green 5G antenna cable's press connector.

  29. Samsung Galaxy S21 Vibrator Replacement, Disconnect the left-edge 5G antenna: 29 단계, 이미지 1/2 Samsung Galaxy S21 Vibrator Replacement, Disconnect the left-edge 5G antenna: 29 단계, 이미지 2/2
    • Use a spudger to pry up and disconnect the 5G antenna cable's press connector.

  30. Samsung Galaxy S21 Vibrator Replacement, Disconnect the power button cable: 30 단계, 이미지 1/2 Samsung Galaxy S21 Vibrator Replacement, Disconnect the power button cable: 30 단계, 이미지 2/2
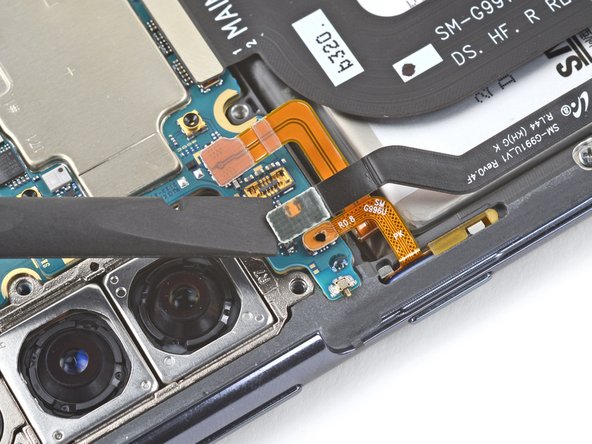
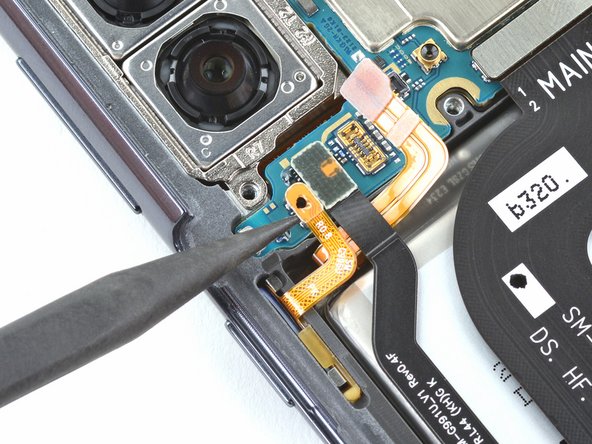
    • Use the point of a spudger to pry up and disconnect the power button cable's press connector.

  31. Samsung Galaxy S21 Vibrator Replacement, Disconnect the display cable: 31 단계, 이미지 1/2 Samsung Galaxy S21 Vibrator Replacement, Disconnect the display cable: 31 단계, 이미지 2/2
    • Use the flat end of a spudger to pry up and disconnect the display cable's press connector.

  32. Samsung Galaxy S21 Vibrator Replacement, Disconnect the interconnect cables: 32 단계, 이미지 1/3 Samsung Galaxy S21 Vibrator Replacement, Disconnect the interconnect cables: 32 단계, 이미지 2/3 Samsung Galaxy S21 Vibrator Replacement, Disconnect the interconnect cables: 32 단계, 이미지 3/3
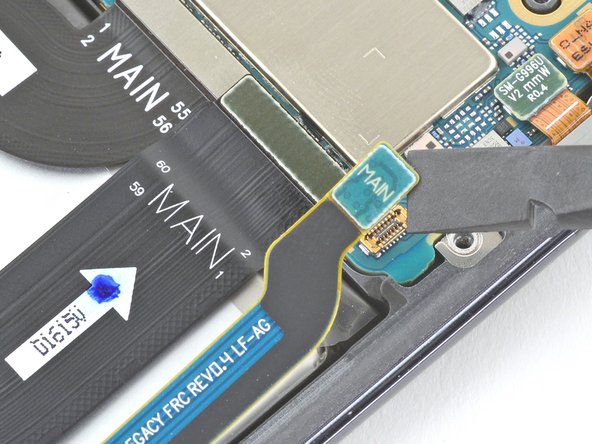
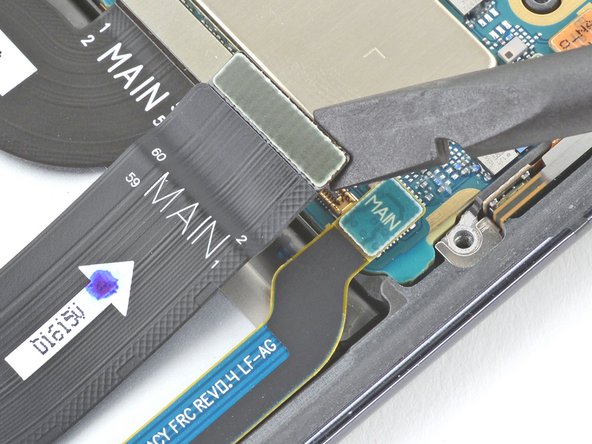
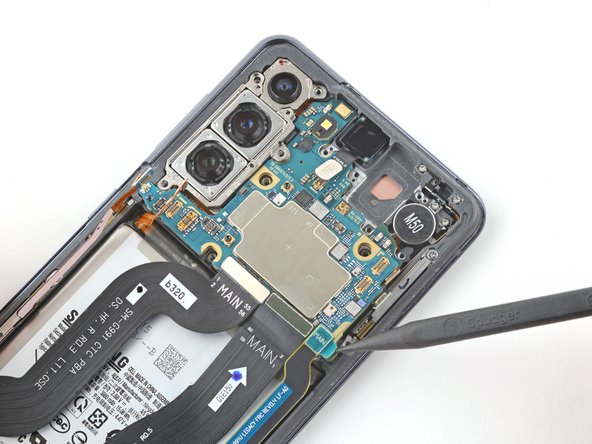
    • Use a spudger to pry up and disconnect the secondary interconnect cable's press connector.

    • Repeat for the main interconnect cable's press connector.

  33. Samsung Galaxy S21 Vibrator Replacement, Reposition the left-edge cables: 33 단계, 이미지 1/1
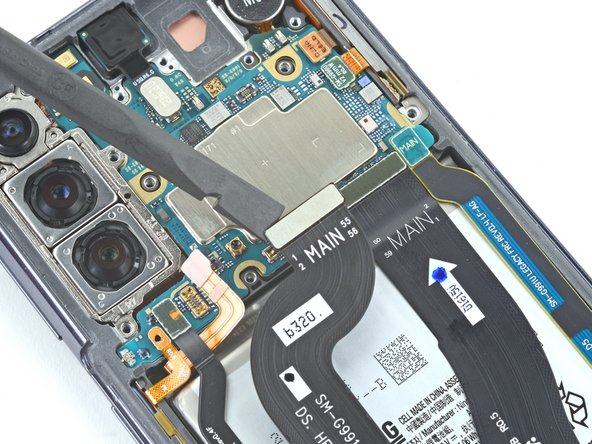
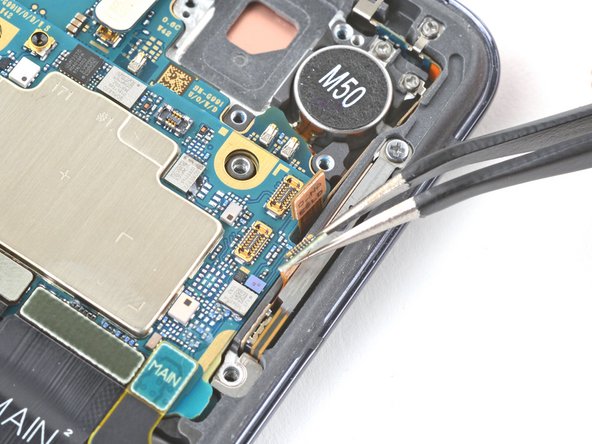
    • Use a spudger, or your fingers, to bend the power button cable away from the phone.

    • Repeat for the left-edge 5G antenna cable.

    • Avoid folding or sharply bending the cables while repositioning them; doing so could tear the cables.

  34. Samsung Galaxy S21 Vibrator Replacement, Reposition the right-edge cables: 34 단계, 이미지 1/3 Samsung Galaxy S21 Vibrator Replacement, Reposition the right-edge cables: 34 단계, 이미지 2/3 Samsung Galaxy S21 Vibrator Replacement, Reposition the right-edge cables: 34 단계, 이미지 3/3
    • Use tweezers, or your fingers, to bend the orange 5G antenna cable away from the phone.

    • Repeat for the green 5G antenna cable.

    • Avoid folding or sharply bending the cables while repositioning them; doing so could tear the cables.

  35. Samsung Galaxy S21 Vibrator Replacement, Unfasten the motherboard/camera bracket: 35 단계, 이미지 1/1
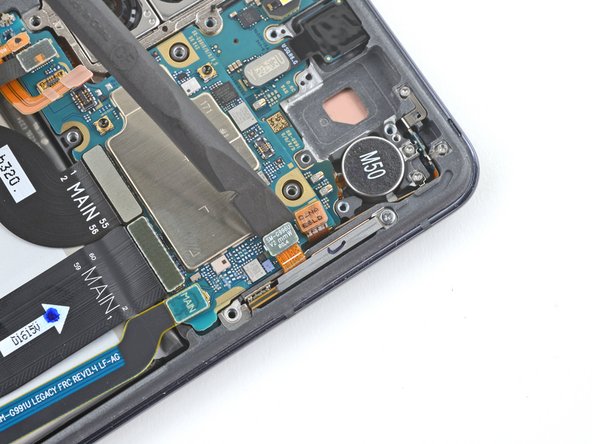
    • Use a Phillips screwdriver to remove the 4 mm screw securing the camera bracket and the motherboard to the frame.

  36. Samsung Galaxy S21 Vibrator Replacement, Remove the motherboard assembly: 36 단계, 이미지 1/3 Samsung Galaxy S21 Vibrator Replacement, Remove the motherboard assembly: 36 단계, 이미지 2/3 Samsung Galaxy S21 Vibrator Replacement, Remove the motherboard assembly: 36 단계, 이미지 3/3
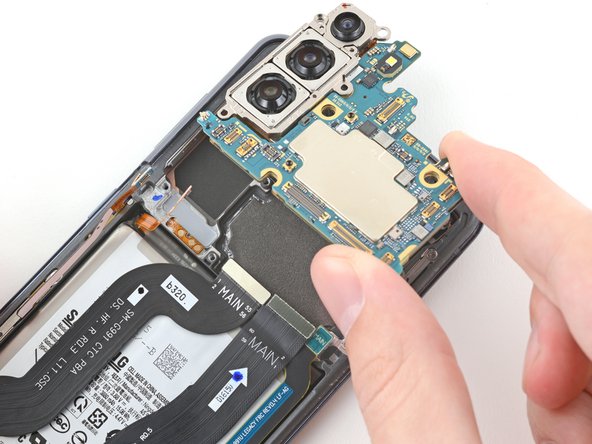
    • Insert a spudger between the bottom-right edge of the motherboard assembly and the frame.

    • Pry up with the spudger to release the clips securing the motherboard assembly.

    • Use your fingers to remove the motherboard assembly.

  37. Samsung Galaxy S21 Vibrator Replacement, Apply isopropyl alcohol: 37 단계, 이미지 1/1
    • There's light adhesive underneath the vibrator securing it to the frame.

    • Apply a few drops of high concentration (over 90%) isopropyl alcohol to the gaps surrounding the perimeter of the vibrator.

    • Only apply a few drops initially and apply more if necessary. Too much isopropyl alcohol may damage the vibrator's copper pads.

    • Let the isopropyl alcohol penetrate the vibrator's adhesive for at least one to two minutes.

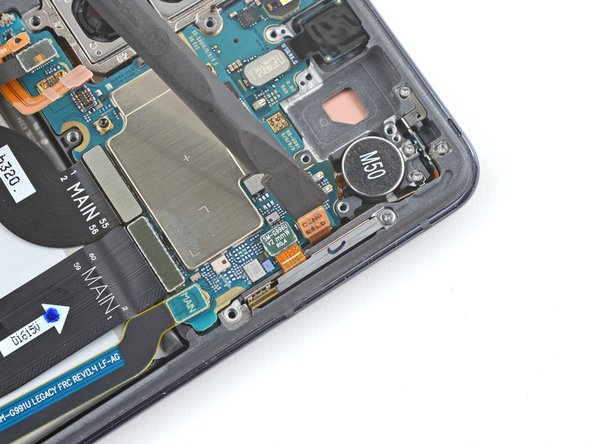
  38. Samsung Galaxy S21 Vibrator Replacement, Remove the vibrator: 38 단계, 이미지 1/3 Samsung Galaxy S21 Vibrator Replacement, Remove the vibrator: 38 단계, 이미지 2/3 Samsung Galaxy S21 Vibrator Replacement, Remove the vibrator: 38 단계, 이미지 3/3
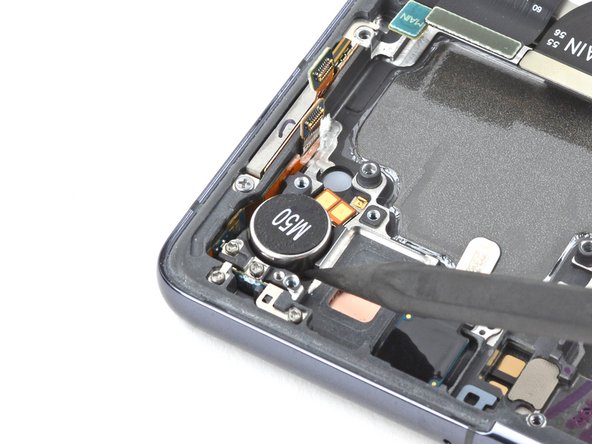
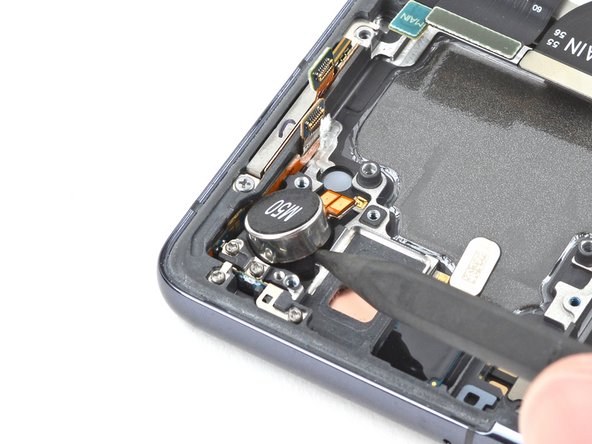
    • Insert the point of a spudger in the gap between the vibrator and the frame.

    • Pry up with the spudger to disconnect the vibrator.

    • If you're having trouble separating the vibrator from the frame, apply more isopropyl alcohol; it may take a while for the adhesive to loosen.

    • Use tweezers, or your fingers, to remove the vibrator.

    • If there's any alcohol remaining, use a lint-free cloth or allow it to dry off before installing a new vibrator.

결론

Compare your new replacement part to the original part—you may need to transfer remaining components or remove adhesive backings from the new part before installing.

To reassemble your device, follow the above steps in reverse order.

After you've completed the repair, follow this guide to test your repair.

Take your e-waste to an R2 or e-Stewards certified recycler.

Repair didn’t go as planned? Check out our Answers community for troubleshooting help.

Alex Diaz-Kokaisl

회원 가입일: 01/16/22

119,541 평판

안내서 549개 작성하였습니다

iFixit iFixit 회원

Staff

135 회원들

안내서 16,820개 작성하였습니다

댓글 0개

댓글 쓰기

조회 통계:

24 시간 전: 1

7일 전: 14

30일 전: 65

전체 시간: 1,312