주요 콘텐츠로 건너뛰기
Sony Cyber-shot DSC-H200 Motherboard Replacement

Sony Cyber-shot DSC-H200 Motherboard Replacement

Faith Masiello

Faith Masiello7 다른 기여자

최종 수정일 May 7, 2024

25 분
어려움
잘게 썰기

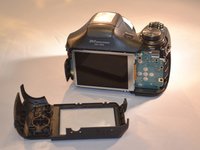
To replace the motherboard correctly, users must get to the motherboard by first removing the LCD screen and metal plate behind it. To begin, please refer to the LCD Screen prerequisite guide to find the proper steps for the LCD removal process.

필요한 것

도구

더보기...

  1. Sony Cyber-shot DSC-H200 Motherboard Replacement, LCD Screen: 1 단계, 이미지 3개 중 1개 Sony Cyber-shot DSC-H200 Motherboard Replacement, LCD Screen: 1 단계, 이미지 3개 중 2개 Sony Cyber-shot DSC-H200 Motherboard Replacement, LCD Screen: 1 단계, 이미지 3개 중 3개
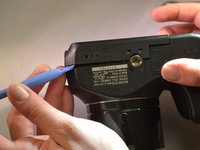
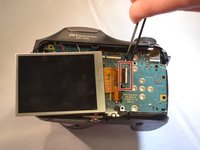
    • Using a screwdriver, remove the five 6mm screws located on the back panel.

    • Using a screwdriver, remove the two 3mm screws located on the back panel.
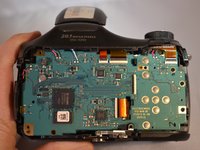
  2. Sony Cyber-shot DSC-H200 Motherboard Replacement: 2 단계, 이미지 1개 중 1개
    • Using a screwdriver, remove one 6mm screw on the front panel.

    • Using a screwdriver, remove two 3mm screws on the front panel.

  3. Sony Cyber-shot DSC-H200 Motherboard Replacement: 3 단계, 이미지 1개 중 1개
    • Open the SD Door, unscrew and remove the single 6mm screw closest to "PUSH IN/OUT" under the SD card slot.

  4. Sony Cyber-shot DSC-H200 Motherboard Replacement: 4 단계, 이미지 2개 중 1개 Sony Cyber-shot DSC-H200 Motherboard Replacement: 4 단계, 이미지 2개 중 2개
    • Remove the back panel (the LCD and motherboard are exposed).

  5. Sony Cyber-shot DSC-H200 Motherboard Replacement: 5 단계, 이미지 1개 중 1개
    • Using a screwdriver, remove the three 4mm screws that attach the LCD to the camera motherboard. (The LCD is contained in a holding plate, attached to the motherboard with a ribbon cable.)

  6. Sony Cyber-shot DSC-H200 Motherboard Replacement: 6 단계, 이미지 1개 중 1개
    • Using a screwdriver, remove the single 4mm screw at the bottom of the holding plate.

  7. Sony Cyber-shot DSC-H200 Motherboard Replacement: 7 단계, 이미지 2개 중 1개 Sony Cyber-shot DSC-H200 Motherboard Replacement: 7 단계, 이미지 2개 중 2개
    • Lift the holding plate away from the motherboard and set aside.

  8. Sony Cyber-shot DSC-H200 Motherboard Replacement: 8 단계, 이미지 1개 중 1개
    이 단계에 사용된 도구:
    Tweezers
    $4.99
    • Using tweezers, open the LCD ribbon port by lifting the black hinge. (The LCD ribbon cable will detach.)

  9. Sony Cyber-shot DSC-H200 Motherboard Replacement: 9 단계, 이미지 3개 중 1개 Sony Cyber-shot DSC-H200 Motherboard Replacement: 9 단계, 이미지 3개 중 2개 Sony Cyber-shot DSC-H200 Motherboard Replacement: 9 단계, 이미지 3개 중 3개
    • Using tweezers, remove the LCD with the ribbon cable and set aside.

  10. Sony Cyber-shot DSC-H200 Motherboard Replacement, Motherboard: 10 단계, 이미지 1개 중 1개
    이 단계에 사용된 도구:
    Tweezers
    $4.99
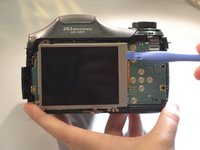
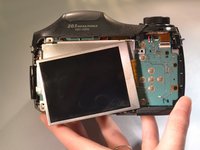
    • Disconnect the four amber-colored ribbon cables from the motherboard using tweezers.

  11. Sony Cyber-shot DSC-H200 Motherboard Replacement: 11 단계, 이미지 1개 중 1개
    • Disconnect all wires from the motherboard by using a soldering iron.

    • Users unfamiliar with a soldering iron should be extremely careful as the device can get very hot.

  12. Sony Cyber-shot DSC-H200 Motherboard Replacement: 12 단계, 이미지 1개 중 1개
    • Gently lift the motherboard away from the camera body.

결론

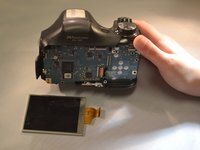
To reassemble your device, follow these instructions in reverse order.

다른 3명이 해당 안내서를 완성하였습니다.

작성자

7다른 기여자 명과 함께

Faith Masiello

회원 가입일: 04/08/15

165 평판

안내서 1개를 작성함

댓글 0개

댓글 쓰기

조회 통계:

지난 24시간: 3

지난 7일: 10

지난 30일: 28

전체 시간: 3,048