
Sony Xperia M4 Aqua LCD Screen
Follows these steps to replace the LCD Screen on the Sony Xperia M4 Aqua. This can be challenging, be sure to be gentle or you may break something.


-
-
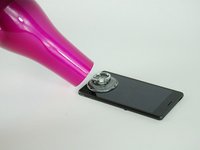
Place the phone face-down, and use a heat gun or hair dryer to evenly heat the back surface until to soften the adhesive.
-
-
-
-
Near the bottom of the phone, unscrew the two phillips head screws, one 3 millimeters and the other 4 millimeters,
-
Remove the black plastic strip to reveal the speaker assembly. It is hooked underneath the circuit board beneath, force will be required to pry it out. Carefully unplug the microphone connector as you do this, ensuring not to snap it.
-
-
-
Remove the Metal LCD assembly cover by lifting up and pulling it out away from the edge of the phone, towards the middle. Disconnect the LCD connector. The assembly cover is flexible and can be bent, be careful when applying force. Carefully unstick the connector from underneath the LCD cover
-
-
-
Removing the screen is similar to how the back cover is removed.
-
Apply heat evenly to the screen
-
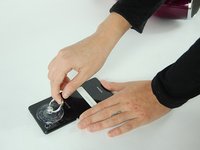
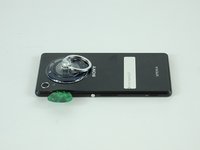
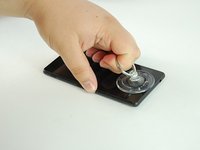
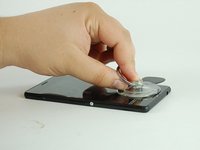
attach a suction cup near the top of the phone, and use a plastic spacer to break the adhesive seal between the screen and the phone housing. Twisting the spacer can help to separate the back plate from the chassis.
-
Remove the screen by pulling it away from the chassis
-


To reassemble your device, follow these instructions in reverse order.
To reassemble your device, follow these instructions in reverse order.
다른 33명이 해당 안내서를 완성하였습니다.
팀

USF Tampa, Team 4-5, Lacy Spring 2016 USF Tampa, Team 4-5, Lacy Spring 2016 회원
USFT-LACY-S16S4G5
3 회원들
안내서 8개를 작성함
댓글 10개
Stick a layer of parcel tape on the screen and you're good to go :D
Once the screen is removed, how do you glue the new one back on? What kind of glue to use so it doesn't melt, or leave the phone non-waterproof? How best to clean the surfaces for gluing, what tools do you need? How do you ensure the edges stay clean and good looking? This guide leaves the job half done :/
I think nobody here can say for sure if it is waterproof after a manual repair ..... An the most covers (Front and back cover) comes with "glue-tape" ( not sure if it is the correct word for that)
There is this very clever (safe) trick to test: https://techjeep.com/2015/03/08/how-to-t...
Rene -