주요 콘텐츠로 건너뛰기

Texas Instruments TI-5130 Power Cord Replacement

필요한 것

  1. Texas Instruments TI-5130 Power Cord Replacement, Power Cord: 1 단계, 이미지 1/2 Texas Instruments TI-5130 Power Cord Replacement, Power Cord: 1 단계, 이미지 2/2
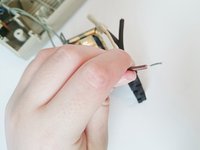
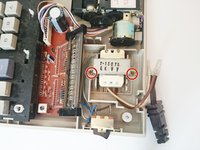
    • Flip the calculator over and remove the 4 main 10mm screws with a PH1 screwdriver.
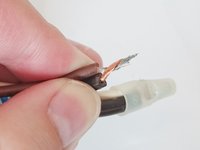
  2. Texas Instruments TI-5130 Power Cord Replacement: 2 단계, 이미지 1/2 Texas Instruments TI-5130 Power Cord Replacement: 2 단계, 이미지 2/2
    • Remove the top cover.

    • Gently pull up on the power cord to remove it from the back cover.

  3. Texas Instruments TI-5130 Power Cord Replacement: 3 단계, 이미지 1/2 Texas Instruments TI-5130 Power Cord Replacement: 3 단계, 이미지 2/2
    • This step is optional; however it makes it easier to work.

    • Using a PH1 screwdriver remove the two 10mm screws that hold down the transformer.

    • Gently remove the transformer.

    • Make sure that the calculator is not plugged in.

  4. Texas Instruments TI-5130 Power Cord Replacement: 4 단계, 이미지 1/2 Texas Instruments TI-5130 Power Cord Replacement: 4 단계, 이미지 2/2
    • Use a wire cutter to cut off the white cap and expose the wires. Try to cut close to the tip of the white cap - to leave as much wire as possible.

    • Note that there are 2 sets of wires connected to the power cord. Do each set of wires separately.

  5. Texas Instruments TI-5130 Power Cord Replacement: 5 단계, 이미지 1/2 Texas Instruments TI-5130 Power Cord Replacement: 5 단계, 이미지 2/2
    • Use a wire stripper to remove 1/2” of the protective covering on each of the wires.

  6. Texas Instruments TI-5130 Power Cord Replacement: 6 단계, 이미지 1/2 Texas Instruments TI-5130 Power Cord Replacement: 6 단계, 이미지 2/2
    • Twist the exposed section of the 2 wires together.

    • Twist a new cap over the exposed wires. Make sure that the cap covers all of the exposed wire.

    • Repeat steps 4-6 for the second set of wires.

  7. Texas Instruments TI-5130 Power Cord Replacement: 7 단계, 이미지 1/1
    • Replace the transformer and ensure that the new wire caps fit in the space shown.

    • Plug in the new power cord and test the calculator before replacing the top cover.

결론

To reassemble your device, follow these instructions in reverse order.

다른 한 분이 해당 안내서를 완성하였습니다.

Shannon Perkins

회원 가입일: 09/17/15

652 평판

안내서 3개 작성하였습니다

USF Sarasota-Manatee, Team 1-2, Stewart Fall 2015 USF Sarasota-Manatee, Team 1-2, Stewart Fall 2015 회원

USFSM-STEWART-F15S1G2

5 회원들

안내서 17개 작성하였습니다

댓글 0개

댓글 쓰기

조회 통계:

24 시간 전: 0

7일 전: 4

30일 전: 10

전체 시간: 494