주요 콘텐츠로 건너뛰기

Toilet Tree TTP-TRIM-1 Power button Replacement

필요한 것

  1. Toilet Tree TTP-TRIM-1 Power button Replacement, Battery: 1 단계, 이미지 2개 중 1개 Toilet Tree TTP-TRIM-1 Power button Replacement, Battery: 1 단계, 이미지 2개 중 2개
    • Twist the battery cap found on the bottom of the device counterclockwise.

  2. Toilet Tree TTP-TRIM-1 Power button Replacement: 2 단계, 이미지 1개 중 1개
    • Remove the battery

  3. Toilet Tree TTP-TRIM-1 Power button Replacement, Power button: 3 단계, 이미지 2개 중 1개 Toilet Tree TTP-TRIM-1 Power button Replacement, Power button: 3 단계, 이미지 2개 중 2개
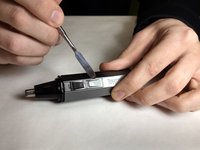
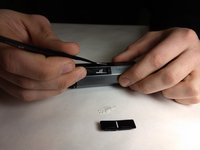
    • Using the metal spudger, wedge underneath the button and gently pry it out.

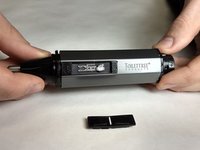
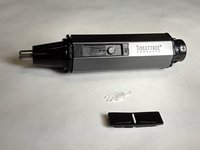
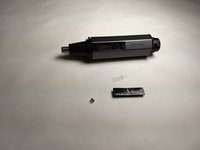
    • Note orientation of the switch, so that it can be replaced properly.

  4. Toilet Tree TTP-TRIM-1 Power button Replacement: 4 단계, 이미지 3개 중 1개 Toilet Tree TTP-TRIM-1 Power button Replacement: 4 단계, 이미지 3개 중 2개 Toilet Tree TTP-TRIM-1 Power button Replacement: 4 단계, 이미지 3개 중 3개
    • Underneath the button lies two small components. We will reference them as the o-ring assembly and clear tab. Take note of their orientation.

    • Continue disassembly by prying the clear tab upwards.

  5. Toilet Tree TTP-TRIM-1 Power button Replacement: 5 단계, 이미지 3개 중 1개 Toilet Tree TTP-TRIM-1 Power button Replacement: 5 단계, 이미지 3개 중 2개 Toilet Tree TTP-TRIM-1 Power button Replacement: 5 단계, 이미지 3개 중 3개
    이 단계에 사용된 도구:
    Tweezers
    $4.99
    • Using the tweezers, take the o-ring switch assembly out of the trimmer.

결론

To reassemble your device, follow these instructions in reverse order.

작성자

2다른 기여자 명과 함께

samuel fontanez

회원 가입일: 11/06/17

301 평판

안내서 3개를 작성함

IUPUI, Team S1-G5, Harley Fall 2017 IUPUI, Team S1-G5, Harley Fall 2017 회원

IUPUI-HARLEY-F17S1G5

4 회원들

안내서 6개를 작성함

댓글 0개

댓글 쓰기

조회 통계:

지난 24시간: 0

지난 7일: 1

지난 30일: 2

전체 시간: 250