주요 콘텐츠로 건너뛰기
Toshiba Chromebook 2 Battery Replacement

Toshiba Chromebook 2 Battery Replacement

Foster Chaney

Foster Chaney8 다른 기여자

최종 수정일 June 22, 2020

5 분
조정

In this guide, we will be replacing the battery of the Toshiba Chromebook 2. Many power issues on the Chromebook come from complications with the laptop’s battery. Removing the broken battery and replacing it with a functioning battery will ensure the laptop will keep on running.

필요한 것

수리 키트

이 키트는 이 안내서를 완료하는데 필요한 모든 부품과 도구를 포함하고 있습니다.

부품

도구

  • Phillips #0 Screwdriver
    Phillips #0 Screwdriver
  • Spudger
    Spudger

더보기...

  1. Toshiba Chromebook 2 Battery Replacement, Back Cover: 1 단계, 이미지 1개 중 1개
    • Remove all external devices from the Toshiba Chromebook 2.

  2. Toshiba Chromebook 2 Battery Replacement: 2 단계, 이미지 1개 중 1개
    • Close the Toshiba Chromebook 2 and turn it over so that the bottom of the laptop is facing upwards toward you with the lettering on the bottom facing right side up.

  3. Toshiba Chromebook 2 Battery Replacement: 3 단계, 이미지 2개 중 1개 Toshiba Chromebook 2 Battery Replacement: 3 단계, 이미지 2개 중 2개
    • Remove the 8 visible Phillips 8.25 mm screws using the Phillips #0 screwdriver.

  4. Toshiba Chromebook 2 Battery Replacement: 4 단계, 이미지 2개 중 1개 Toshiba Chromebook 2 Battery Replacement: 4 단계, 이미지 2개 중 2개
    • Remove 2 hidden Phillips 8.25 mm screws located underneath the rubber grips at the back (opposite the hinges) with the Phillips #0 screwdriver.

    • The rubber grips are glued in place, so you'll need to peel them up with a spudger or other pry tool.

  5. Toshiba Chromebook 2 Battery Replacement: 5 단계, 이미지 1개 중 1개
    • Remove the back panel by pulling up on 2 adjacent corners.

  6. Toshiba Chromebook 2 Battery Replacement, Battery: 6 단계, 이미지 2개 중 1개 Toshiba Chromebook 2 Battery Replacement, Battery: 6 단계, 이미지 2개 중 2개
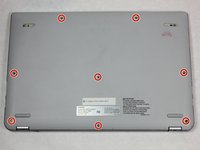
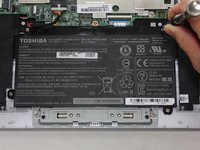
    • Remove the 4 Phillips 2 mm screws holding the battery in place with the Phillips #0 screwdriver.

  7. Toshiba Chromebook 2 Battery Replacement: 7 단계, 이미지 2개 중 1개 Toshiba Chromebook 2 Battery Replacement: 7 단계, 이미지 2개 중 2개
    • Press down on the white clip and softly pull the wires out of the port to disconnect battery from the motherboard.

  8. Toshiba Chromebook 2 Battery Replacement: 8 단계, 이미지 1개 중 1개
    • Remove the battery by gently pulling up on the bottom corners.

결론

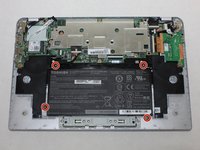
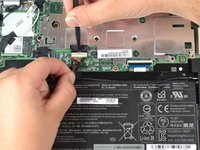
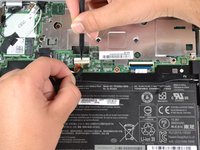
To reassemble your device, follow these instructions in reverse order.

다른 50명이 해당 안내서를 완성하였습니다.

작성자

8다른 기여자 명과 함께

Foster Chaney

회원 가입일: 10/08/15

762 평판

안내서 1개를 작성함

IUPUI, Team 1-3, Hagerty Fall 2015 IUPUI, Team 1-3, Hagerty Fall 2015 회원

IUPUI-HAGERTY-F15S1G3

5 회원들

안내서 7개를 작성함

댓글 7개

does the cb30-b-103 battery also work with the cb30-b-104 series?

henrikahlberg94 - 답글

I had four screws holding down battery.

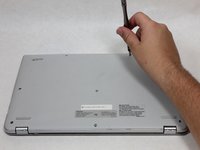
When re-installing cover, don’t get confused. There are two holes under rubber feet on side CLOSEST TO HINGES. These do not accept the two screws - put them on side AWAY FROM HINGES.

Bill Brasier - 답글

Good instructions, my chrome is back to normal again .

Alexander Slaven - 답글

Many thanks but now there’s no curser! What do I do?

Chris in UK

Chris Tighe - 답글

Thank you, easy to follow, works like a dream

steve smith - 답글

댓글 쓰기

조회 통계:

지난 24시간: 12

지난 7일: 16

지난 30일: 52

전체 시간: 28,963