주요 콘텐츠로 건너뛰기
Toshiba Qosmio X505-Q860 Hard Disk Drive Replacement

Toshiba Qosmio X505-Q860 Hard Disk Drive Replacement

Danielle Lapensee-Rankine

Danielle Lapensee-Rankine4 다른 기여자

최종 수정일 March 3, 2023

30 초
쉬움

If the computer is booting directly to the BIOS screen and there is enough RAM, then use this guide to replace the Hard Disk Drive.

필요한 것

수리 키트

이 키트는 이 안내서를 완료하는데 필요한 모든 부품과 도구를 포함하고 있습니다.

부품

도구

더보기...

  1. Toshiba Qosmio X505-Q860 Hard Disk Drive Replacement, Battery: 1 단계, 이미지 3개 중 1개 Toshiba Qosmio X505-Q860 Hard Disk Drive Replacement, Battery: 1 단계, 이미지 3개 중 2개 Toshiba Qosmio X505-Q860 Hard Disk Drive Replacement, Battery: 1 단계, 이미지 3개 중 3개
    • Turn off laptop before starting.

    • Flip the switch on the right to the unlocked position.

  2. Toshiba Qosmio X505-Q860 Hard Disk Drive Replacement: 2 단계, 이미지 3개 중 1개 Toshiba Qosmio X505-Q860 Hard Disk Drive Replacement: 2 단계, 이미지 3개 중 2개 Toshiba Qosmio X505-Q860 Hard Disk Drive Replacement: 2 단계, 이미지 3개 중 3개
    • Hold the switch on the left and pull the battery up towards you, using the marked tab, to take it out.

  3. Toshiba Qosmio X505-Q860 Hard Disk Drive Replacement, Hard Disk Drive Cover Panel: 3 단계, 이미지 2개 중 1개 Toshiba Qosmio X505-Q860 Hard Disk Drive Replacement, Hard Disk Drive Cover Panel: 3 단계, 이미지 2개 중 2개
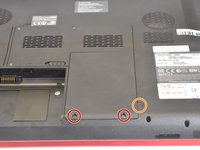
    • Use a JIS #0 screwdriver to unscrew the two 4.6 mm screws at the base of the casing.

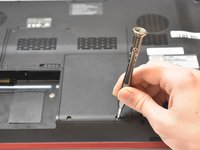
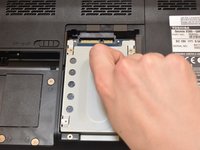
    • Pull off the part of the case that's now loose by the indicated tab.

  4. Toshiba Qosmio X505-Q860 Hard Disk Drive Replacement, Hard Disk Drive: 4 단계, 이미지 2개 중 1개 Toshiba Qosmio X505-Q860 Hard Disk Drive Replacement, Hard Disk Drive: 4 단계, 이미지 2개 중 2개
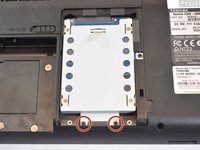
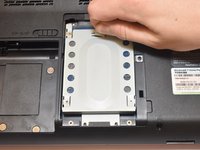
    • Use the JIS screwdriver head to remove the 3.7mm long JIS #0 screws at the base of the hard drive.

  5. Toshiba Qosmio X505-Q860 Hard Disk Drive Replacement: 5 단계, 이미지 3개 중 1개 Toshiba Qosmio X505-Q860 Hard Disk Drive Replacement: 5 단계, 이미지 3개 중 2개 Toshiba Qosmio X505-Q860 Hard Disk Drive Replacement: 5 단계, 이미지 3개 중 3개
    • Next, use the pull tab to pull down and detach the hard drive from the connector.

    • Now the hard drive is loose and can be lifted straight out of the laptop.

결론

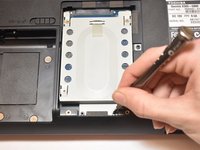
To reassemble your device, follow these instructions in reverse order.

다른 한 분이 해당 안내서를 완성하였습니다.

작성자

4다른 기여자 명과 함께

Danielle Lapensee-Rankine

회원 가입일: 02/05/19

570 평판

안내서 5개를 작성함

댓글 0개

댓글 쓰기

조회 통계:

지난 24시간: 2

지난 7일: 12

지난 30일: 33

전체 시간: 1,380