주요 콘텐츠로 건너뛰기
Trek Neko Bike Brake Pad Replacement

Trek Neko Bike Brake Pad Replacement

Camille Nikaido

Camille Nikaido3 다른 기여자

최종 수정일 May 11, 2023

15 - 30 분
조정

Use this guide to replace a worn or damaged brake pad on your Trek Neko Bike.

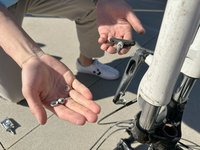
Bike brakes allow you to stop your bike quickly and safely. Brake pads wear down over time or can break from damage. If you notice reduced stopping power, squeaking or grinding noises, or visible damage to your brake pad, it may be a sign that you need to replace it. Brake pads have a wear indicator line that shows when they need to be replaced. If your brake pad is worn down to the line, it's time to replace it.

It is important to replace your bike brake pad as soon as you notice any of these signs. Continuing to use worn out brake pads can be dangerous because it will be more difficult to stop quickly and safely.

필요한 것

iFixit은 귀하가 이 링크를 통해 구매할 때 커미션을 받습니다.
  1. Trek Neko Bike Brake Pad Replacement, Bike Brake Pad: 1 단계, 이미지 2개 중 1개 Trek Neko Bike Brake Pad Replacement, Bike Brake Pad: 1 단계, 이미지 2개 중 2개
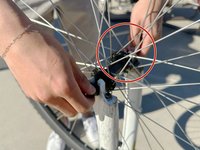
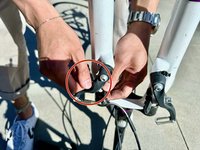
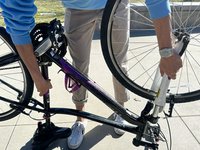
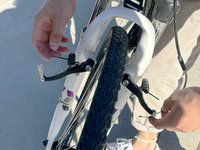
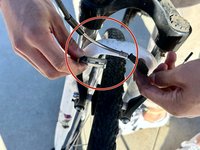
    • Squeeze the two brake arms together.

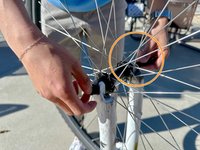
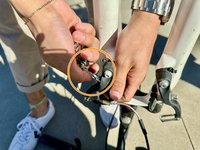
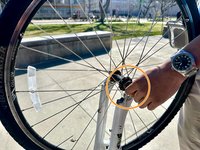
    • Angle the brake noodle down.

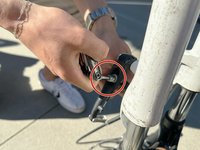
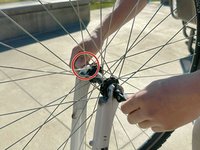
    • Push the quick release down to release the brake noodle.

  2. Trek Neko Bike Brake Pad Replacement: 2 단계, 이미지 1개 중 1개
    • Flip the bike over so that the seat is on the ground.

  3. Trek Neko Bike Brake Pad Replacement: 3 단계, 이미지 3개 중 1개 Trek Neko Bike Brake Pad Replacement: 3 단계, 이미지 3개 중 2개 Trek Neko Bike Brake Pad Replacement: 3 단계, 이미지 3개 중 3개
    • Open the quick release lever on the bike wheel.

    • Rotate the lever in a counter clockwise direction to loosen the wheel.

    • Remove the wheel from the bike frame.

  4. Trek Neko Bike Brake Pad Replacement: 4 단계, 이미지 2개 중 1개 Trek Neko Bike Brake Pad Replacement: 4 단계, 이미지 2개 중 2개
    • Loosen the locking bolt on the brake pad with a 5 mm Allen wrench.

    • Remove the locking bolt, washers, and brake pad from the brake pad housing.

  5. Trek Neko Bike Brake Pad Replacement: 5 단계, 이미지 2개 중 1개 Trek Neko Bike Brake Pad Replacement: 5 단계, 이미지 2개 중 2개
    • Insert the new brake pad.

    • Insert the washers.

    • Insert the locking bolt.

  6. Trek Neko Bike Brake Pad Replacement: 6 단계, 이미지 2개 중 1개 Trek Neko Bike Brake Pad Replacement: 6 단계, 이미지 2개 중 2개
    • Tighten the brake pad locking bolt bolt clockwise until it is finger tight.

    • Tighten the bolt with a 5 mm Allen wrench.

  7. Trek Neko Bike Brake Pad Replacement: 7 단계, 이미지 3개 중 1개 Trek Neko Bike Brake Pad Replacement: 7 단계, 이미지 3개 중 2개 Trek Neko Bike Brake Pad Replacement: 7 단계, 이미지 3개 중 3개
    • Reinsert the wheel.

    • Tighten the bolt on the wheel until it is finger tight.

    • Center the wheel in the frame.

    • Close the quick release lever to secure the wheel.

  8. Trek Neko Bike Brake Pad Replacement: 8 단계, 이미지 2개 중 1개 Trek Neko Bike Brake Pad Replacement: 8 단계, 이미지 2개 중 2개
    • Place the bike right side up.

  9. Trek Neko Bike Brake Pad Replacement: 9 단계, 이미지 3개 중 1개 Trek Neko Bike Brake Pad Replacement: 9 단계, 이미지 3개 중 2개 Trek Neko Bike Brake Pad Replacement: 9 단계, 이미지 3개 중 3개
    • Insert the brake noodle into the quick release lever.

    • Angle the quick release lever upwards so that the brake noodle clicks into place.

  10. Trek Neko Bike Brake Pad Replacement: 10 단계, 이미지 2개 중 1개 Trek Neko Bike Brake Pad Replacement: 10 단계, 이미지 2개 중 2개
    • Squeeze the brakes to check proper fitment.

    • Tighten or loosen the quick release bolt on the brake arms to adjust based on preference.

결론

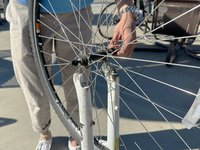
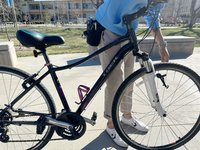
With properly installed brake pads, you can now safely ride your bike!

다른 2명이 해당 안내서를 완성하였습니다.

작성자

3다른 기여자 명과 함께

Camille Nikaido

회원 가입일: 02/02/23

181 평판

안내서 1개를 작성함

UC Davis, Team 1-9, Andersen Winter 2023 UC Davis, Team 1-9, Andersen Winter 2023 회원

UCD-ANDERSEN-W23S1G9

3 회원들

안내서 1개 작성

댓글 0개

댓글 쓰기

조회 통계:

지난 24시간: 2

지난 7일: 18

지난 30일: 38

전체 시간: 424