주요 콘텐츠로 건너뛰기

Vtech Kidizoom Smart Watch DX Buttons Replacement

필요한 것

  1. Vtech Kidizoom Smart Watch DX Buttons Replacement, Master Switch: 1 단계, 이미지 1/1
    • Make sure the master switch is "OFF" before disassembly, to avoid an electric shock.

    • Flip the watch over with the back facing up.

  2. Vtech Kidizoom Smart Watch DX Buttons Replacement: 2 단계, 이미지 1/1
    • Remove the four 6.0 mm screws on the back plate with the Phillips #00 screwdriver.

  3. Vtech Kidizoom Smart Watch DX Buttons Replacement: 3 단계, 이미지 1/1
    • Gently pull the back plate from the watch casing.

  4. Vtech Kidizoom Smart Watch DX Buttons Replacement: 4 단계, 이미지 1/2 Vtech Kidizoom Smart Watch DX Buttons Replacement: 4 단계, 이미지 2/2
    • Lift the master switch from the circuit board.

  5. Vtech Kidizoom Smart Watch DX Buttons Replacement, Circuit Board: 5 단계, 이미지 1/2 Vtech Kidizoom Smart Watch DX Buttons Replacement, Circuit Board: 5 단계, 이미지 2/2
    • The speaker wires are fragile. They may break if excessive force is used to remove the circuit board.

    • Removal of the circuit board requires soldering.

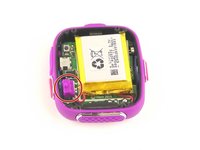
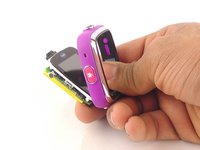
    • Gently push on the display from the front, near the camera. The circuit board and display will pop out through the back.

  6. Vtech Kidizoom Smart Watch DX Buttons Replacement: 6 단계, 이미지 1/1
    • Lift the circuit board carefully from the casing, without breaking or detaching the speaker wires at the bottom of the circuit board.

  7. Vtech Kidizoom Smart Watch DX Buttons Replacement: 7 단계, 이미지 1/1
    • Note which wire is connected to which lead before continuing. There are no markers on the circuit board to indicate where each wire belongs.

    • De-solder the black speaker wire from the circuit board.

  8. Vtech Kidizoom Smart Watch DX Buttons Replacement: 8 단계, 이미지 1/1
    • De-solder the red speaker wire, as in the previous step.

  9. Vtech Kidizoom Smart Watch DX Buttons Replacement: 9 단계, 이미지 1/1
    • Wait for the solder to cool down and solidify, then remove the circuit board from the casing.

  10. Vtech Kidizoom Smart Watch DX Buttons Replacement, Buttons: 10 단계, 이미지 1/1
    • Use the the tweezers to pull off the blue rubber cover behind the button.

    • The blue cover is adhesive, so you can stick it back onto the back of the buttons after replacement.

  11. Vtech Kidizoom Smart Watch DX Buttons Replacement: 11 단계, 이미지 1/1
    • Use tweezers to separate the backside tab from the front side of the button.

  12. Vtech Kidizoom Smart Watch DX Buttons Replacement: 12 단계, 이미지 1/1
    • Push the other half of the button out of the casing.

    • Repeat steps 11 and 12 for all buttons.

결론

To reassemble your device, follow these instructions in reverse order.

다른 2명이 해당 안내서를 완성하였습니다.

Mohammed Alyaarubi

회원 가입일: 01/20/16

365 평판

안내서 1개 작성함

USF Tampa, Team 10-6, Remmell Spring 2016 USF Tampa, Team 10-6, Remmell Spring 2016 회원

USFT-REMMELL-S16S10G6

4 회원들

안내서 12개 작성하였습니다

댓글 한 개

Where can you buy the replacement cover?

Katrina Nullatamby - 답글

댓글 쓰기

조회 통계:

24 시간 전: 0

7일 전: 1

30일 전: 7

전체 시간: 5,543