주요 콘텐츠로 건너뛰기

Wahl Professional Designer Motor Replacement

필요한 것

  1. Wahl Professional Designer Motor Replacement, Motor: 1 단계, 이미지 1/2 Wahl Professional Designer Motor Replacement, Motor: 1 단계, 이미지 2/2
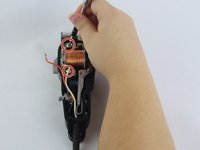
    • Unscrew the 12 mm Phillips head screws located at the top of the cover and at the bottom two corners, using a Phillips #1 Screwdriver.

  2. Wahl Professional Designer Motor Replacement: 2 단계, 이미지 1/3 Wahl Professional Designer Motor Replacement: 2 단계, 이미지 2/3 Wahl Professional Designer Motor Replacement: 2 단계, 이미지 3/3
    • Remove the wires connected to the motor by firmly grasping both sides of a wire and wiggling until it is released.

  3. Wahl Professional Designer Motor Replacement: 3 단계, 이미지 1/3 Wahl Professional Designer Motor Replacement: 3 단계, 이미지 2/3 Wahl Professional Designer Motor Replacement: 3 단계, 이미지 3/3
    • Unscrew the two 20.5 mm Phillip head screw located on the motor using a Phillip's #1 screwdriver.

  4. Wahl Professional Designer Motor Replacement: 4 단계, 이미지 1/2 Wahl Professional Designer Motor Replacement: 4 단계, 이미지 2/2
    • Gently remove the motor from the device.

결론

To reassemble your device, follow these instructions in reverse order.

다른 한 분이 해당 안내서를 완성하였습니다.

Sophia Swearengin

회원 가입일: 09/26/17

718 평판

안내서 5개 작성하였습니다

USF Tampa, Team S14-G5, Boczar Fall 2017 USF Tampa, Team S14-G5, Boczar Fall 2017 회원

USFT-BOCZAR-F17S14G5

2 회원들

안내서 5개 작성하였습니다

댓글 0개

댓글 쓰기

조회 통계:

24 시간 전: 0

7일 전: 3

30일 전: 7

전체 시간: 1,166