주요 콘텐츠로 건너뛰기

Xbox One Elite Controller (Model 1698) Joystick Potentiometer Replacement

필요한 것

  1. Xbox One Elite Controller (Model 1698) Joystick Potentiometer Replacement, Show me the Screws!: 1 단계, 이미지 1/2 Xbox One Elite Controller (Model 1698) Joystick Potentiometer Replacement, Show me the Screws!: 1 단계, 이미지 2/2
    • You can remove the side panels with a pry tool.

    • You don't need to remove the rubber. The rubber on this controller was already bad

  2. Xbox One Elite Controller (Model 1698) Joystick Potentiometer Replacement, Removing the back panel screws: 2 단계, 이미지 1/1
    • Remove the 5 Torx Security Bit (TR9) screws

  3. Xbox One Elite Controller (Model 1698) Joystick Potentiometer Replacement, Popping that back panel off: 3 단계, 이미지 1/3 Xbox One Elite Controller (Model 1698) Joystick Potentiometer Replacement, Popping that back panel off: 3 단계, 이미지 2/3 Xbox One Elite Controller (Model 1698) Joystick Potentiometer Replacement, Popping that back panel off: 3 단계, 이미지 3/3
    • Pry the panel next to the 3.5mm port

    • Be careful to not rip the ribbon shown in the next step

  4. Xbox One Elite Controller (Model 1698) Joystick Potentiometer Replacement, Warning Carefully remove the ribbon: 4 단계, 이미지 1/2 Xbox One Elite Controller (Model 1698) Joystick Potentiometer Replacement, Warning Carefully remove the ribbon: 4 단계, 이미지 2/2
    • Be careful to not rip the ribbon cable

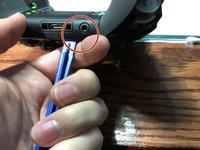
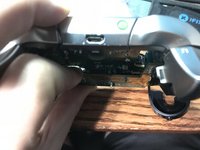
    • You can pop the connector up to remove the ribbon easily

    • Ribbon Cable

  5. Xbox One Elite Controller (Model 1698) Joystick Potentiometer Replacement, Screws on controller motherboard: 5 단계, 이미지 1/1
    • Remove the 2 Torx (T6) screws

  6. Xbox One Elite Controller (Model 1698) Joystick Potentiometer Replacement, Desolder wires from motherboard: 6 단계, 이미지 1/2 Xbox One Elite Controller (Model 1698) Joystick Potentiometer Replacement, Desolder wires from motherboard: 6 단계, 이미지 2/2
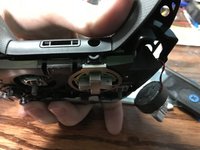
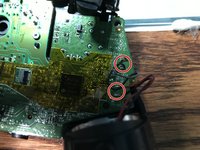
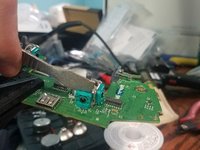
    • Desolder the 4 wires on each side, these control the vibrations and the RT LT

  7. Xbox One Elite Controller (Model 1698) Joystick Potentiometer Replacement, Remove the motherboard: 7 단계, 이미지 1/2 Xbox One Elite Controller (Model 1698) Joystick Potentiometer Replacement, Remove the motherboard: 7 단계, 이미지 2/2
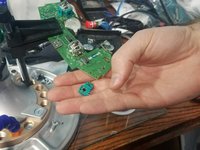
    • Pull up from the "top" side of the controller on the sister board.

  8. Xbox One Elite Controller (Model 1698) Joystick Potentiometer Replacement, Desolder Button Pins: 8 단계, 이미지 1/1
    • These can be difficult to desolder. It is best to use a 650F degree soldering iron, if you have this available. If you are having trouble desoldering it with the old solder, adding fresh solder makes removal of the old solder easier.

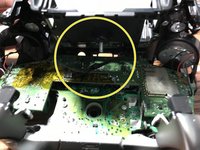
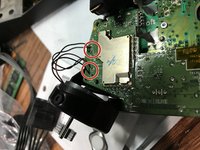
    • Desolder the 4 pins holding the pins in on the left analog stick.

    • Desolder the 4 pins holding the button in on the right analog stick.

  9. Xbox One Elite Controller (Model 1698) Joystick Potentiometer Replacement, Desolder potentiometers: 9 단계, 이미지 1/1
    • A 650F degree soldering iron is required. If you are having trouble desoldering these components, add new solder to make removal easier.

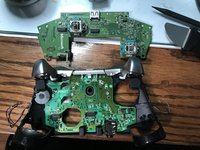
    • First, desolder the left analog stick.

    • Next, desolder the 6 pins for the right analog stick.

  10. Xbox One Elite Controller (Model 1698) Joystick Potentiometer Replacement, Desolder Ground Pins: 10 단계, 이미지 1/1
    • A soldering iron that can reach at minimum 650F is required. If you are having trouble desoldering the old analog sticks, add fresh solder to make removal of the old analog sticks easier.

    • Desolder the left analog stick from the controller.

    • Desolder the right analog stick from the controller.

  11. Xbox One Elite Controller (Model 1698) Joystick Potentiometer Replacement, Troubleshooting: 11 단계, 이미지 1/3 Xbox One Elite Controller (Model 1698) Joystick Potentiometer Replacement, Troubleshooting: 11 단계, 이미지 2/3 Xbox One Elite Controller (Model 1698) Joystick Potentiometer Replacement, Troubleshooting: 11 단계, 이미지 3/3
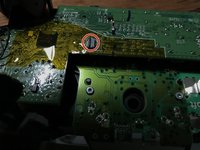
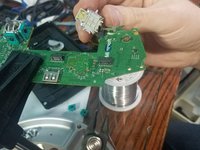
    • If you are having trouble desoldering here are the two things you can do to solve.

    • You can use a screw driver to open the resistors and then remove them from the board allowing access to the ground pins

    • Now using snips you can cut the pins and then use a soldering iron to both sides and remove the cut pin gently with pliers

결론

To reassemble your device, follow these instructions in reverse order.

다른 15명이 해당 안내서를 완성하였습니다.

EasyAsABC123

회원 가입일: 01/22/10

2,407 평판

안내서 5개 작성하였습니다

댓글 35개

I’ve replaced a thumbstick sensor on one of these controllers recently, and it doesn’t register movement like the other, original one. It can be described as the entire intended range of movement being compressed down into a very narrow band over the travel of the stick. The deadzone is quite large now, relatively speaking. Can this kind of behavior be attributed to a bad soldering job (all directions are recognized during tests), or is it perhaps just a bad sensor?

Brandon - 답글

Bad solder job is unlikely, i’d assume the new joystick doesn’t have the same specs as the old one.

EasyAsABC123 -

i cant get the module out. I desoldered the pins but it seems like the module is glued onto the board? Tutorials doesnt show that part

Patrick “II JumPeR I” Korell - 답글

It is just soldered in, hold the soldering iron the the pins and pull gently. If you pull too hard you might damage a solder pad, although it is unlikely.

I have a desolder vacuum gun and I still have the issue you are describing I'll be fixing an elite controller tomorrow so I'll record that and take more pictures to update this.

EasyAsABC123 -

@easyasabc

Would be great if you could do that :)

Patrick “II JumPeR I” Korell - 답글

댓글 쓰기

조회 통계:

24 시간 전: 15

7일 전: 80

30일 전: 423

전체 시간: 48,807