주요 콘텐츠로 건너뛰기
Xbox Series S Plastic Case Replacement

Xbox Series S Plastic Case Replacement

Robert Boyd

Robert Boyd2 다른 기여자

최종 수정일 March 26, 2025

10 - 20 분
조정

Follow this guide to remove and replace the plastic case of the Xbox Series S. You might do this to replace a broken case or install a custom version.

  1. Xbox Series S Plastic Case Replacement, Peel off the sticker coverings: 1 단계, 이미지 3개 중 1개 Xbox Series S Plastic Case Replacement, Peel off the sticker coverings: 1 단계, 이미지 3개 중 2개 Xbox Series S Plastic Case Replacement, Peel off the sticker coverings: 1 단계, 이미지 3개 중 3개
    이 단계에 사용된 도구:
    Tweezers
    $4.99
    • Before you start this guide, turn off the Xbox and unplug any cables from it.

    • Use tweezers to peel off the two white screw covers located on the bottom corners of the back panel.

  2. Xbox Series S Plastic Case Replacement, Remove the back panel screws: 2 단계, 이미지 1개 중 1개
    이 단계에 사용된 도구:
    Magnetic Project Mat
    $19.95
    • Use a T8 Torx driver to remove the two 10 mm-long screws securing the back panel to the bottom panel.

    • Throughout this repair, keep track of each screw and make sure it goes back exactly where it came from.

  3. Xbox Series S Plastic Case Replacement, Remove the bottom panel: 3 단계, 이미지 3개 중 1개 Xbox Series S Plastic Case Replacement, Remove the bottom panel: 3 단계, 이미지 3개 중 2개 Xbox Series S Plastic Case Replacement, Remove the bottom panel: 3 단계, 이미지 3개 중 3개
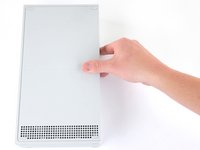
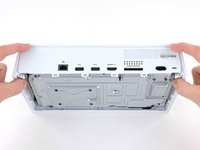
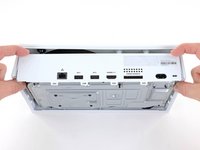
    • Slide the bottom panel horizontally toward the back of the console until it comes to a stop.

    • This slides the clips out of the slots on the plastic case.

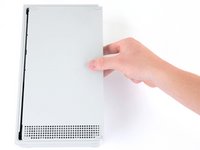
    • Lift straight up and remove the bottom panel from the plastic case.

  4. Xbox Series S Plastic Case Replacement, Remove the plastic case screws: 4 단계, 이미지 1개 중 1개
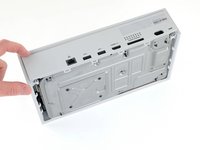
    • Use a T10 Torx driver to remove the seven 51 mm-long screws securing the chassis to the plastic case.

  5. Xbox Series S Plastic Case Replacement, Remove the plastic case: 5 단계, 이미지 3개 중 1개 Xbox Series S Plastic Case Replacement, Remove the plastic case: 5 단계, 이미지 3개 중 2개 Xbox Series S Plastic Case Replacement, Remove the plastic case: 5 단계, 이미지 3개 중 3개
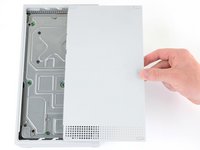
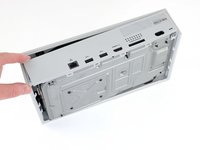
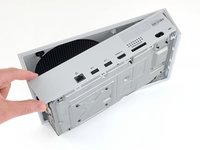
    • With the bottom of the Xbox facing you, pull the two bottom-rear corners of the plastic case away from each other.

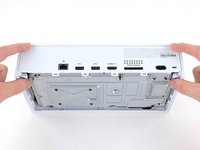
    • As you pull the corners apart, slide the back panel towards the bottom of the device. This releases the back panel from the plastic case.

    • The back panel should now settle on top of the clips on the back of the plastic case.

    • The back panel is permanently attached to the aluminum chassis.

    • Do not attempt to fully remove the chassis from the plastic case with this technique. You may risk breaking your case.

  6. Xbox Series S Plastic Case Replacement: 6 단계, 이미지 3개 중 1개 Xbox Series S Plastic Case Replacement: 6 단계, 이미지 3개 중 2개 Xbox Series S Plastic Case Replacement: 6 단계, 이미지 3개 중 3개
    • Pull the bottom-left corner away from the chassis while swinging the chassis away from the plastic case.

    • You may need to lift the chassis to free it from the clips on the bottom-front of the plastic case during this process.

    • Remove the plastic case from the chassis.

결론

To reassemble your device, follow these instructions in reverse order.

Take your e-waste to an R2 or e-Stewards certified recycler.

Repair didn’t go as planned? Try some basic troubleshooting, or ask our Answers community for help.

다른 8명이 해당 안내서를 완성하였습니다.

작성자

2다른 기여자 명과 함께

Robert Boyd

회원 가입일: 02/01/21

29,403 평판

안내서 94개를 작성함

댓글 3개

Where can i find custom case for the xbox series s?

Joe - 답글

What about the back plate?

Legitti - 답글

it says you cant remove it

Pavement Creator - 답글

댓글 쓰기

조회 통계:

지난 24시간: 43

지난 7일: 279

지난 30일: 1,304

전체 시간: 39,575