이 번역은 기계에 의해 생성된 것이며, 아직 사람이 검토하지 않았습니다. 이 언어를 아세요? 리뷰 보기.

iPhone 4 후면 패널 교체

최종 수정일 2026년 8월 3일
조회수: 101만
통계 보기:
- 지난 24시간
- 17
- 지난 7일:
- 91
- 지난 30일:
- 322
- 전체 시간:
- 1,008,723
댓글: 29
20 comments on steps, 9 guide comments.
Go to guide comments완료함: 812 813
812명이 이 안내서를 "완료"로 표시했습니다. 다음은 귀하의 차례입니까?
813명이 이 안내서를 "완료"로 표시했습니다. 귀하를 포함해서요 — 수고하셨어요!
즐겨찾기: 373 374
373명이 이 가이드를 즐겨찾기 (및 구독) 했습니다. 다음은 귀하의 차례입니까?
374명이 이 가이드를 즐겨찾기 (및 구독) 했습니다 — 귀하를 포함해서요!
추천 가이드
해당 안내서는 iFixit 직원들이 뛰어난 안내서로 판명하였습니다.
소개
1단계로 이동하기 ↓후면 패널을 제거하여 iPhone 4 내부 부품에 접근하세요.
필요한 것
부품

도구


동영상 개요
-
-
-
분해를 시작하기 전에 iPhone 전원을 끄세요.
-
iPhone 4 후면 커버에는 2개의 #000 필립스 나사 또는 Apple의 5포인트 "펜타로브" 나사가 사용되었을 수 있습니다 (두 번째 이미지). 어떤 나사가 있는지 확인하고, 해당 나사를 제거할 수 있는 올바른 스크루드라이버를 준비하세요.
-
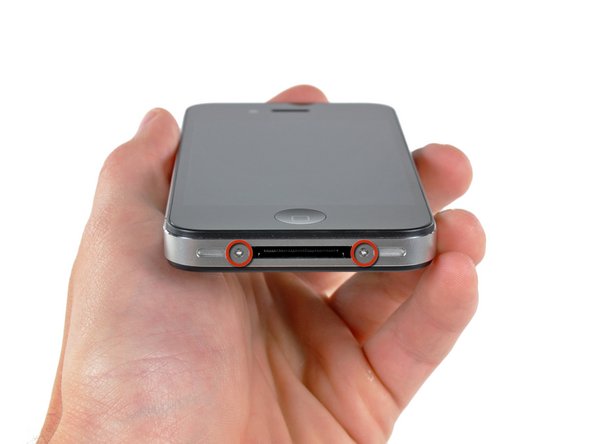
도크 커넥터 옆에 있는 3.6 mm 펜타로브 나사 또는 필립스 #000 나사 2개를 제거하세요.
 FixBot에 문의하기
-
-
-


기기를 재조립하려면 이 지침을 역순으로 따르세요.
다른 812명이 해당 안내서를 완성하였습니다.
첨부 문서

9가이드 댓글
The replacement part for the iPhone 4 rear panel has two thin, clear overlays on the inside surface--a larger one that runs the full length, and a small one that only covers the lens. These should be removed prior to installation. Also, the first rear panel replacement I got from iFixit was not an exact fit and would not easily "click" into place. They replaced it for free and the second one clicked right in.
rudisill49 - 답글 공유
On step 3 when replacing the back panel with a new one, they aren't kidding about removing ALL the protective slips. There's THREE of them.
1), the obvious back slip that protects the new back.
2). the one inside the back protecting the side with the camera lens
3). the little square one OVER the lens itself.
First time I tried to reinstall my back, that tiny little square over the lens prohibited my ability to actually get the back on completely. My husband jammed it for me, but the screws still wouldn't take. It's amazing that these things are so precise that the tiny little film on the lens would make it that much tighter.
Anyways, hope that helps somebody. :)
rachelfinder - 답글 공유
Easiest repair I've ever done. Thanks y'all!
