주요 콘텐츠로 건너뛰기

이 버전에는 잘못된 편집 사항이 있을 수 있습니다. 최신 확인된 스냅샷으로 전환하십시오.

필요한 것

  1. 이 단계는 번역되지 않았습니다. 번역을 도와주십시오

    : 1 단계, 이미지 1/1
    • Before you begin, discharge your iPhone battery below 25%. A charged lithium-ion battery can catch fire and/or explode if accidentally punctured.

    • Power off your iPhone before beginning disassembly.

    • Remove the two 3.6 mm Pentalobe P2 screws next to the dock connector.

    • Be sure the driver is well-seated when removing Pentalobe screws—they are easy to strip.

  2. 이 단계는 번역되지 않았습니다. 번역을 도와주십시오

    : 2 단계, 이미지 1/2 : 2 단계, 이미지 2/2
    • Push the rear panel toward the top edge of the iPhone.

    • The panel will move about 2 mm.

  3. 이 단계는 번역되지 않았습니다. 번역을 도와주십시오

    : 3 단계, 이미지 1/1
    • Pull the rear panel away from the back of the iPhone, being careful not to damage the plastic clips attached to the rear panel.

    • Remove the rear panel from the iPhone.

  4. , 배터리: 4 단계, 이미지 1/2 , 배터리: 4 단계, 이미지 2/2
    • 배터리 커넥터를 로직 보드에 고정하는 다음 나사들을 풀어주세요:

    • 1.7mm 나사 한 개

    • 1.5mm 나사 한 개

  5. : 5 단계, 이미지 1/3 : 5 단계, 이미지 2/3 : 5 단계, 이미지 3/3
    • 압력 접점이 제 위치에서 빠질 때까지 배터리 커넥터에서 조심히 밀어내세요.

    • 압력 접점을 분리하세요.

  6. : 6 단계, 이미지 1/3 : 6 단계, 이미지 2/3 : 6 단계, 이미지 3/3
    • 플라스틱 여는 도구를 사용하여 로직 보드 소켓에서 배터리 커넥터를 살살 들어 올리세요.

    • 여는 도구 끝을 라우드스피커 인클로저와 커넥터의 금속 커버 사이에 여는 도구 끝을 놓고 커넥터의 하단 가장자리를 먼저 들어 올리세요.

    • 배터리 커넥터는 로직 보드에서 수직으로 분리됩니다. 옆으로 힘을 가하지 마세요.

    • 배터리 커넥터 소켓 자체를 들어내지 않도록 주의하세요. 아니면 로직 보드에서 분리될 수 있습니다. 아주 작은 납땜 지점 네 곳이 이 실수를 기다리고 있습니다!

  7. , 재조립 팁: 7 단계, 이미지 1/2 , 재조립 팁: 7 단계, 이미지 2/2
    • 재조립하는 동안 압력 접점을 제자리에 조심히 배치해야 합니다. 접점은 사진에 표시된 Philips/십자 나사 기둥 위에 놓여야 하며 금색 접점이 배터리 커넥터를 향해야 합니다.

    • 윈덱스나 이소프로필 알코올과 같은 탈지제를 사용하여 압력 접점을 청소해야 합니다. 손가락에 묻은 기름은 무선 간섭을 일으킬 수 있습니다.

  8. : 8 단계, 이미지 1/2 : 8 단계, 이미지 2/2
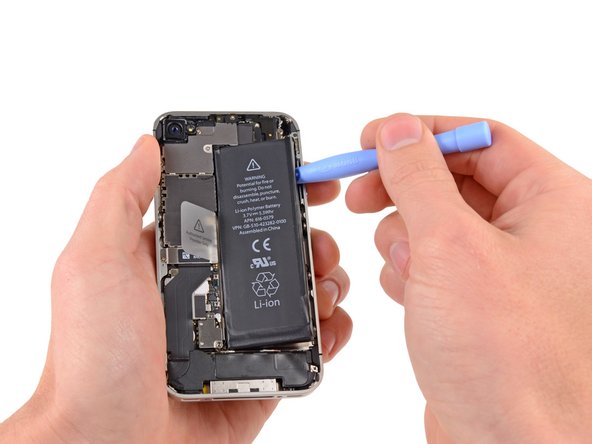
    • 배터리와 iPhone 하단 근처 외부 케이스 사이에 플라스틱 여는 도구 가장자리를 끼우세요.

    • 플라스틱 여는 도구를 배터리 오른편 가장자리를 따라 밀며 올려서 외부 케이스에 고정하는 여러 지점의 접착제를 완전히 분리하세요.

    • 접착제가 너무 강하면 배터리 가장자리 아래에 고농도 (90% 이상) 이소프로필 알코올 몇 방울을 떨어뜨리세요.

    • 알코올 용액이 접착제를 약화시킬 때까지 약 1분 동안 기다리세요.

    • 플라스틱 여는 도구의 평평한 끝을 사용하여 배터리를 살살 들어 올리세요.

    • 배터리를 강제로 빼려고 하지 마세요. 필요하다면 알코올을 몇 방울 더 떨어뜨려 접착제를 더 약화시키세요. 절대로 들어올리는 도구로 배터리를 변형하거나 구멍을 내지 마세요.

    • 휴대폰에 알코올 용액이 남아 있는 경우 새 배터리를 설치하기 전에 조심히 닦아내거나 자연 건조하세요.

  9. : 9 단계, 이미지 1/2 : 9 단계, 이미지 2/2
    • 노출된 투명 플라스틱 당김 탭을 사용하여 배터리를 iPhone에 고정하는 접착제를 벗기세요.

    • 플라스틱 당김 탭은 매우 쉽게 찢어질 수 있으므로 너무 세게 당기지 않도록 주의하세요.

    • 배터리를 분리하세요.

    • 교체용 배터리가 플라스틱 슬리브에 들어 있는 경우, 설치하기 전에 리본 케이블에서 분리하세요.

    • 교체용 배터리가 접힘 없는 케이블과 함께 제공된 경우 배터리를 휴대폰에 설치하기 전에 케이블을 적절한 모양으로 조심히 접어주세요.

    • 교체 배터리를 설치하는 동안 배터리 커넥터를 휴대폰에 임시로 연결하여 제대로 정렬되었는지 확인하세요. 일단 배터리가 접착제로 고정되면 배터리 커넥터를 분리하세요.

    • 재조립하고 나서 강제 재시작하세요. 이렇게 하면 여러 문제를 예방하고 문제 해결을 간소화할 수 있습니다.

  10. 이 단계는 번역되지 않았습니다. 번역을 도와주십시오

    : 10 단계, 이미지 1/2 : 10 단계, 이미지 2/2
    • Remove the following screws securing the dock connector cable cover to the logic board:

    • One 1.5 mm Phillips screw

    • One 1.2 mm Phillips screw

    • Remove the metal dock connector cable cover.

  11. 이 단계는 번역되지 않았습니다. 번역을 도와주십시오

    : 11 단계, 이미지 1/1
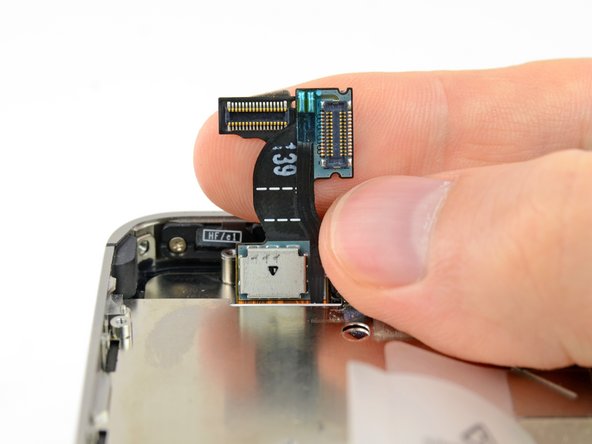
    • Use the edge of a plastic opening tool to pry the dock cable up from its socket on the logic board.

  12. 이 단계는 번역되지 않았습니다. 번역을 도와주십시오

    : 12 단계, 이미지 1/1
    • Peel the dock connector cable off the adhesive securing it to the logic board and the side of the speaker enclosure.

  13. 이 단계는 번역되지 않았습니다. 번역을 도와주십시오

    : 13 단계, 이미지 1/2 : 13 단계, 이미지 2/2
    • Use the edge of a plastic opening tool to pry the cellular antenna cable up from its socket on the logic board.

    • De-route the cellular antenna cable out from under the metal fingers attached to the logic board.

  14. 이 단계는 번역되지 않았습니다. 번역을 도와주십시오

    : 14 단계, 이미지 1/1
    • Be wary of the outer plastic ring located on top of the rear camera's flash assembly. It can be easily displaced if not removed during disassembly.

    • You can use tweezers, a plastic opening tool, or a spudger to remove the outer plastic ring.

  15. 이 단계는 번역되지 않았습니다. 번역을 도와주십시오

    : 15 단계, 이미지 1/1
    • Remove the following four screws securing the cable cover to the logic board:

    • One 2.7 mm Phillips screw

    • One 2.6 mm Phillips screw

    • One 1.3 mm Phillips screw

    • One 1.2 mm Phillips screw

  16. 이 단계는 번역되지 않았습니다. 번역을 도와주십시오

    : 16 단계, 이미지 1/2 : 16 단계, 이미지 2/2
    • Use the edge of a plastic opening tool to pry the cable cover tabs out of their slots cut into the EMI shield on the logic board.

    • Lift the cable cover from its edge nearest the top and remove it from the iPhone.

  17. 이 단계는 번역되지 않았습니다. 번역을 도와주십시오

    : 17 단계, 이미지 1/2 : 17 단계, 이미지 2/2
    • Use the edge of a plastic opening tool to pry the rear camera connector up from its socket on the logic board.

    • Be careful not to break any components off the surrounding area on the logic board as you pry upwards.

    • Remove the rear camera from the iPhone.

    • There is a small rubber gasket that sits underneath the rear-facing camera. Make sure that it is properly seated before reassembly.

  18. 이 단계는 번역되지 않았습니다. 번역을 도와주십시오

    : 18 단계, 이미지 1/2 : 18 단계, 이미지 2/2
    • Use a SIM eject tool or a paperclip to eject the SIM and its tray.

    • This may require a significant amount of force.

    • Remove the SIM and its tray.

  19. 이 단계는 번역되지 않았습니다. 번역을 도와주십시오

    : 19 단계, 이미지 1/2 : 19 단계, 이미지 2/2
    • Remove the five cables near the top of the logic board in the following order:

    • Headphone jack/volume button cable

    • Front facing camera cable

    • Digitizer cable

    • Display data cable

    • Power button cable (located underneath the headphone jack/volume button cable as shown in the second picture.)

    • To disconnect the cables, use the edge of a plastic opening tool to gently lift their connectors up and out of the sockets on the logic board.

    • Be careful not to break any of the small and delicate surface mount components as you disconnect the cables.

  20. 이 단계는 번역되지 않았습니다. 번역을 도와주십시오

    : 20 단계, 이미지 1/1
    • Remove the 1.5 mm Phillips screw securing the grounding clip to the logic board near the headphone jack.

  21. 이 단계는 번역되지 않았습니다. 번역을 도와주십시오

    : 21 단계, 이미지 1/2 : 21 단계, 이미지 2/2
    • Use the tip of a spudger to pry the small grounding clip up off the logic board.

    • Carefully grasp the grounding clip and remove it from the iPhone.

    • Before reassembly, be sure to clean all metal-to-metal contact points on the grounding clip (not the mating halves of connectors) with a de-greaser such as windex or isopropyl alcohol. The oils on your fingers have the potential to cause grounding issues.

  22. 이 단계는 번역되지 않았습니다. 번역을 도와주십시오

    : 22 단계, 이미지 1/1
    이 단계에 사용된 도구:
    Standoff Screwdriver for iPhones
    $5.49
    구매
    • Remove the 4.8 mm standoff screw near the headphone jack.

    • Standoff screws are best removed using a standoff screwdriver or bit.

    • In a pinch, a small flathead screwdriver will do the job—but use extra caution to ensure it doesn't slip and damage surrounding components.

  23. 이 단계는 번역되지 않았습니다. 번역을 도와주십시오

    : 23 단계, 이미지 1/1
    • Use the edge of a plastic opening tool to disconnect the Wi-Fi antenna from the logic board.

  24. 이 단계는 번역되지 않았습니다. 번역을 도와주십시오

    : 24 단계, 이미지 1/2 : 24 단계, 이미지 2/2
    • If present, peel the piece of black tape covering the hidden screw near the power button.

    • Remove the 2.6 mm Phillips screw securing the logic board near the power button.

    • (Use caution when removing this screw and removing the power contact held by it; the contact tab will come loose with the screw)

    • Notice the small rubber bumper under the screen & digitizer cables (which are detached at top above the Q-code). This bumper can fall off of the logic board when removed or get stuck to the cables and fall off later.

  25. 이 단계는 번역되지 않았습니다. 번역을 도와주십시오

    : 25 단계, 이미지 1/1
    • Remove the following screws securing the logic board to the case:

    • One 2.5 mm Phillips screw near the vibrator motor

    • One 2.4 mm Phillips screw

    • One 3.6 mm standoff along the side of the logic board nearest the battery opening.

    • Use a standoff driver bit and driver handle to remove the single 3.6 mm standoff screw.

    • In a pinch, a small flathead screwdriver will do the job—but use extra caution to ensure it doesn't slip and damage surrounding components.

  26. 이 단계는 번역되지 않았습니다. 번역을 도와주십시오

    : 26 단계, 이미지 1/1
    • Carefully lift the logic board from the end closest to the speaker enclosure and slide it away from the top edge of the iPhone.

    • Remove the logic board.

    • Before reassembly, be sure to clean all metal-to-metal contact points on the logic board (not the mating halves of connectors) with a de-greaser such as windex or isopropyl alcohol. The oils on your fingers have the potential to cause grounding issues.

    • There is a small rubber bumper that sits on the top edge of the logic board where the digitizer and screen cables come through the case. It protects the cables as they bend over the top of the logic board. This can either get stuck to the cables or fall off the logic board when it comes out. Look back over step 22 for more details.

  27. 이 단계는 번역되지 않았습니다. 번역을 도와주십시오

    : 27 단계, 이미지 1/1
    • Be sure not to lose the small grounding finger for the rear facing camera near the power button. This finger rests on top of the PCB, screwed down, and covered with the adhesive black plastic tape.

  28. 이 단계는 번역되지 않았습니다. 번역을 도와주십시오

    : 28 단계, 이미지 1/3 : 28 단계, 이미지 2/3 : 28 단계, 이미지 3/3
    • Wedge the plastic opening tool between the vibrator and the side of the iPhone.

    • Pry the vibrator up to release it from the adhesive securing it to the iPhone.

    • Remove the vibrator.

  29. 이 단계는 번역되지 않았습니다. 번역을 도와주십시오

    : 29 단계, 이미지 1/1
    • Remove the two 2.4 mm Phillips screws from the sides of the speaker enclosure assembly.

  30. 이 단계는 번역되지 않았습니다. 번역을 도와주십시오

    : 30 단계, 이미지 1/1
    • Remove the small plastic bracket that was installed under the screw closest to the dock connector cable.

  31. 이 단계는 번역되지 않았습니다. 번역을 도와주십시오

    : 31 단계, 이미지 1/2 : 31 단계, 이미지 2/2
    • Remove the speaker enclosure assembly from the iPhone.

    • Before reinstalling the speaker enclosure assembly's screws, be sure the Wi-Fi grounding fingers are installed below the lip in the iPhone's metal case as seen in the second picture.

    • Before reassembly, be sure to clean all metal-to-metal contact points between the grounding fingers of the Wi-Fi antenna and the case of the iPhone with a de-greaser such as windex or isopropyl alcohol. The oils on your fingers have the potential to cause wireless interference issues.

  32. 이 단계는 번역되지 않았습니다. 번역을 도와주십시오

    : 32 단계, 이미지 1/1
    • Remove the small pieces of black tape covering the display mounting tabs.

    • Note: These corner screws are not the same thickness as the other 1.5mm screws. Set them aside separately.

  33. 이 단계는 번역되지 않았습니다. 번역을 도와주십시오

    : 33 단계, 이미지 1/1
    • Remove the 1.5 mm Phillips screw securing the display assembly near the power button.

  34. 이 단계는 번역되지 않았습니다. 번역을 도와주십시오

    : 34 단계, 이미지 1/1
  35. 이 단계는 번역되지 않았습니다. 번역을 도와주십시오

    : 35 단계, 이미지 1/1
    • Remove the 1.5 mm Phillips screw near the lower microphone.

  36. 이 단계는 번역되지 않았습니다. 번역을 도와주십시오

    : 36 단계, 이미지 1/1
    • Remove the 1.5 mm Phillips screw near the dock connector cable.

  37. 이 단계는 번역되지 않았습니다. 번역을 도와주십시오

    : 37 단계, 이미지 1/2 : 37 단계, 이미지 2/2
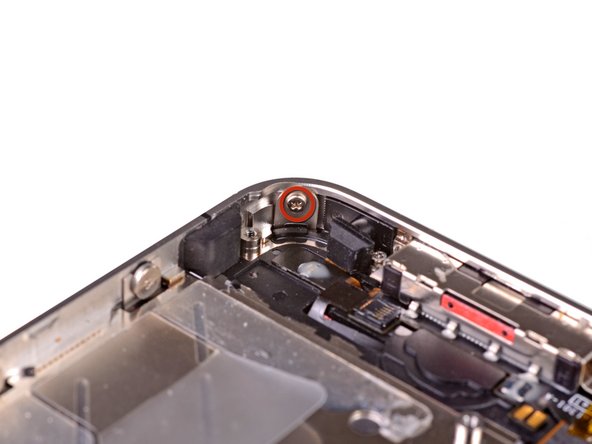
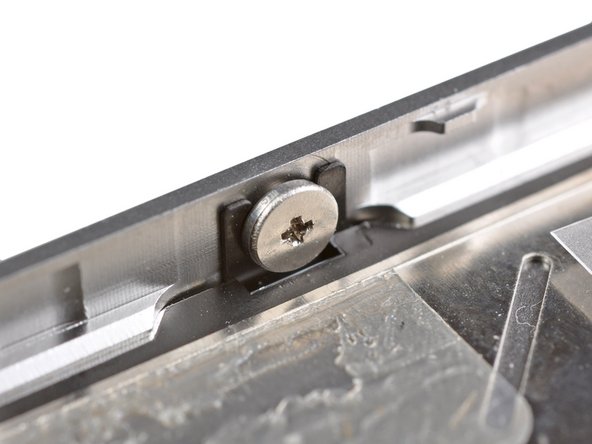
    • Loosen the three large-headed Phillips screws along the volume button side of the iPhone about one half turn.

    • It is not necessary to completely remove these screws. When reinstalling the display assembly, be sure the washers are closest to the screw head (as seen in the second picture).

  38. 이 단계는 번역되지 않았습니다. 번역을 도와주십시오

    : 38 단계, 이미지 1/1
    • Loosen the three large-headed Phillips screws along the other side of the iPhone about one half turn.

  39. 이 단계는 번역되지 않았습니다. 번역을 도와주십시오

    : 39 단계, 이미지 1/1
    • Use the edge of a plastic opening tool to gently pry up the display assembly around its perimeter.

  40. 이 단계는 번역되지 않았습니다. 번역을 도와주십시오

    : 40 단계, 이미지 1/1
    • Remove the display assembly from the iPhone.

  41. 이 단계는 번역되지 않았습니다. 번역을 도와주십시오

    : 41 단계, 이미지 1/2 : 41 단계, 이미지 2/2
    • To successfully install a new/replacement display assembly, note the following:

    • Remember to switch the home button from your old display to the new display (in most cases, this is not provided). The home button gasket is thin rubber, so care must be taken not to tear it. Also, check that the mesh for the speaker hole is present in the replacement; if not, move it over from the old display.

    • Be sure to peel off the protective backing (usually blue or pink) from the new panel before installing it.

    • If your replacement display does not come with a 7 mm clear plastic ring surrounding the front-facing camera, be sure to transfer it between the old and new display.

  42. 이 단계는 번역되지 않았습니다. 번역을 도와주십시오

    : 42 단계, 이미지 1/3 : 42 단계, 이미지 2/3 : 42 단계, 이미지 3/3
    • Whether installing a replacement display assembly or re-using the existing display assembly, note the following:

    • Carefully straighten the digitizer and LCD data cables, and feed them through the slot cut in the outer case.

    • The middle photo shows the digitizer cable being correctly fed through to its full length.

    • This photo shows the display assembly being installed incorrectly, with too much slack in the digitizer cable, which then forms a bend/loop that gets caught in the slot. The third photo also shows this loop.

    • If the digitizer cable has been installed incorrectly, it will not reach its socket on the logic board. Do not attempt to pull it through by force, or it will be cut by the sharp edge of its slot in the enclosure. Remove the display assembly, straighten the cable, and re-feed the cable through completely and correctly.

  43. 이 단계는 번역되지 않았습니다. 번역을 도와주십시오

    : 43 단계, 이미지 1/1
    • During reassembly, do not touch the metallic area at the base of the LCD data cable, as this can cause problems with the LCD. If you do touch it accidentally, clean it gently with an alcohol wipe before continuing.

    • After reassembly, clean the touchscreen surface with an alcohol wipe prior to turning the iPhone back on. The alcohol helps dissipate any lingering static electricity, which can cause problems with the display.

    • After reassembly, connect the iPhone to an AC power source before turning it on for the first time. Once the iPhone has booted up successfully, you can disconnect the AC power.

    • After reassembly, protect your new display from any scratches by installing a new screen protector.

  44. 이 단계는 번역되지 않았습니다. 번역을 도와주십시오

    : 44 단계, 이미지 1/1
    • Use the edge of a plastic opening tool to gently peel the bottom right corner of the home button assembly from the display assembly.

  45. 이 단계는 번역되지 않았습니다. 번역을 도와주십시오

    : 45 단계, 이미지 1/2 : 45 단계, 이미지 2/2
    • Use a pair of tweezers to peel the home button assembly off the adhesive securing it to the display assembly.

    • Remove the home button assembly from the display assembly.

  46. 이 단계는 번역되지 않았습니다. 번역을 도와주십시오

    : 46 단계, 이미지 1/1
    • Remove the home button from the home button gasket.

  47. 이 단계는 번역되지 않았습니다. 번역을 도와주십시오

    : 47 단계, 이미지 1/1
    • Home button remains.

결승점

다른 215명이 해당 안내서를 완성하였습니다.

Walter Galan

694,773 평판

안내서 1,203개 작성하였습니다

댓글 3개

I found the tear down somewhat easier than it's predecessor (IPhone 4) though for those attempting this kind of thing for the first time, extreme care should be taken to ensure the right tool is used for each job (ie. Phillips driver for Phillips screw etc.). I inherited this job from a friend that didn't know the difference between Phillips and pentalobe screws and hence destroyed the head of the first screw (and the pentalobe driver) once inside the unit.

Take care and you will enjoy a new found love for the device that YOU repaired.

Rob - 답글

I completed the teardown, but the metal fingers on the new display don't match the old one, hence the 6 screws that you loosen before removing the display no longer line up. VERY annoying... my phone is in pieces now until I can get a replacement display. Anyone else had this problem? BEWARE.. attempt to check yours before getting too far, line up the new display with the side screws and make sure it fits, it wasn't off by much so check they line up exactly. Did I get a iphone 4 display instead of a 4s? I dunno.. i've emailed ifixit to find out.

John Le Breton - 답글

Did you put the screen + digitizer in upside down or backwards?

Daniel Reutcky -

댓글 쓰기

조회 통계:

24 시간 전: 3

7일 전: 31

30일 전: 180

전체 시간: 178,715