이 버전에는 잘못된 편집 사항이 있을 수 있습니다. 최신 확인된 스냅샷으로 전환하십시오.
필요한 것
-
-
분해를 시작하기 전에 iPhone 전원을 끄세요.
-
Lightning 커넥터 옆에 위치한 3.6mm-길이 Pentalobe/펜타로브/별나사 두 개를 풀어주세요.
-
-
-
파란색 핸들을 뒤로 당겨 Anti-Clamp의 팔을 풀어 주세요 .
-
Anti-Clamp의 팔을 iPhone의 왼편 또는 오른편 가장자리로 밀어 주세요.
-
흡입 컵을 iPhone의 홈 버튼 바로 위 하단 가장자리 근처에 배치하세요—전면에 하나, 후면에 하나.
-
흡입 컵을 함께 눌러서 원하는 부위에 흡입하세요.
-
-
-
배터리 커넥터 브래킷을 고정하는 다음 Phillips/십자 나사들을 분리하세요:
-
2.2mm 나사 한 개
-
3.2mm 나사 한 개
-
-
-
-
전면 패널 어셈블리 케이블 브래킷을 고정하는 Phillips/십자 나사 다섯 개를 분리하세요:
-
1.2mm 나사 세 개
-
1.7mm 나사 한 개
-
3.1mm 나사 한 개
-
-
이 단계는 번역되지 않았습니다. 번역을 도와주십시오
-
Remove the following Phillips #00 screws from the upper cable bracket:
-
One 2.9 mm screw
-
One 2.2 mm screw
-
-
이 단계는 번역되지 않았습니다. 번역을 도와주십시오
-
Remove the following four Phillips #00 screws from the contact bracket:
-
One 1.5 mm screw
-
One 1.4 mm screw
-
Two 2.1 mm screws
-
-
이 단계는 번역되지 않았습니다. 번역을 도와주십시오
-
Use the flat end of a spudger to lift the volume control cable connector up off of its socket.
-
-
이 단계는 번역되지 않았습니다. 번역을 도와주십시오
-
Remove the following Phillips #00 screws from the volume control cable brackets:
-
Two 2.3 mm screws
-
One 1.8 mm scew
-
-
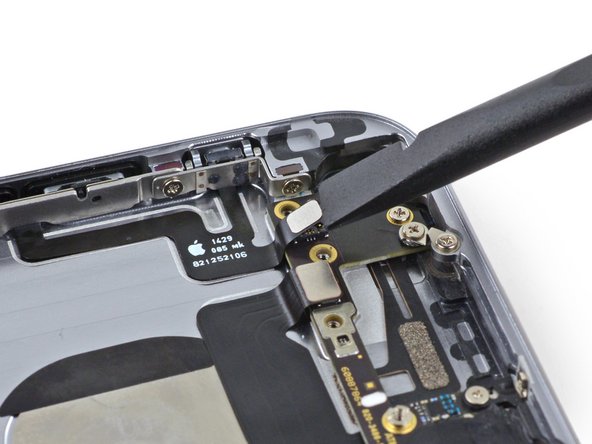
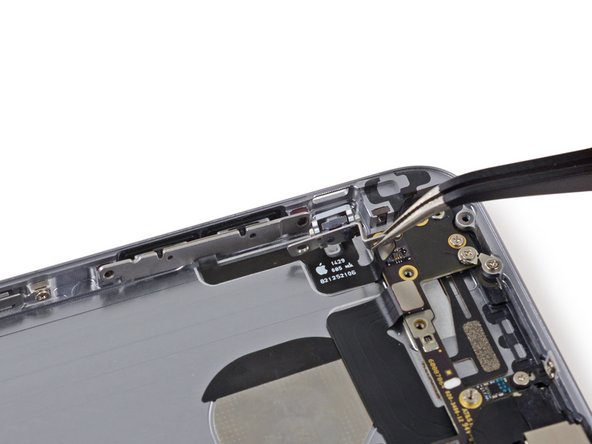
이 단계는 번역되지 않았습니다. 번역을 도와주십시오
-
Pull the hold switch and volume control button brackets away from the rear case to allow access to the button covers.
-
-
이 단계는 번역되지 않았습니다. 번역을 도와주십시오
-
Begin to peel the volume control button cable up from the rear case starting from the connector end.
-
Be gentle when peeling the thin portions of the cable up from the case.
-
Remove the volume control button cable from the rear case.
-


다른 59명이 해당 안내서를 완성하였습니다.


댓글 2개
These instructions are so AWESOME to be able to reference! That last 1.8mm screw was a pain to get out of my phone. Step-by-Step, worked EXCELLENT. Thanks for posting these!
TRICKY BITS: replacing the mute switch lever onto the cable assembly is a bit…interesting. It was only when I used the Head Magnifier that I was able to see the mechanics of the switch and fit it on. There needs to be a seriously microscopic shot of that mechanical fit!
But, get the magnifier, it’s great for digging out splinters from your fingers.
SUGGESTION: Once you get the switch and the bracket situated, but before you stick the control cable to the case, make sure the switch functions. I had to loosen the three screws and place pressure on the assembly, holding the switch firmly in place, before it made a solid fit-then I tightened the three screws. Voila, the switch works!
Only then should did I bond the cable to the case
And now my phone rings again! Yay, no more missed calls!