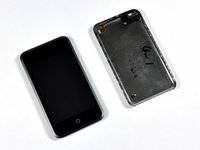
주요 콘텐츠로 건너뛰기

iPod Touch 1st Generation Back Panel Replacement

필요한 것

  1. iPod Touch 1st Generation Back Panel Replacement, Case: 1 단계, 이미지 1/1
    • Opening the case is a tough and potentially dangerous task. A good amount of force is required to wedge the plastic opening tool in between the case seams. The case may be damaged if this step is not done properly. Make sure not to hurt yourself while opening your iPod.

    • Insert the small plastic opening tool into the seam in between plastic display panel and the metal back panel. The angled edge should point towards the metal back panel.

    • Hold the tool in place once it is wedged inside and the two panels are separated.

  2. iPod Touch 1st Generation Back Panel Replacement: 2 단계, 이미지 1/3 iPod Touch 1st Generation Back Panel Replacement: 2 단계, 이미지 2/3 iPod Touch 1st Generation Back Panel Replacement: 2 단계, 이미지 3/3
    • There are seven interlocking retaining clips on each side of the iPod. The large plastic opening tool will be used to separate the front panel from the metal back of the iPod.

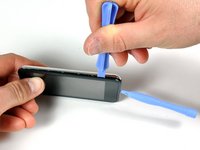
    • Insert the large opening tool into the right side of the iPod, with the edge of the tool pointing towards the metal back.

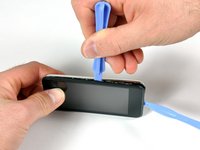
    • Gently enlarge the existing crevice by wiggling the large opening tool and moving it to the right.

    • Continue doing so until the right side of the iPod is loose.

  3. iPod Touch 1st Generation Back Panel Replacement: 3 단계, 이미지 1/3 iPod Touch 1st Generation Back Panel Replacement: 3 단계, 이미지 2/3 iPod Touch 1st Generation Back Panel Replacement: 3 단계, 이미지 3/3
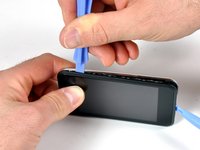
    • Switch to the other side of the iPod.

    • Follow the same procedure as in the previous step to release the seven clips holding the panels in place.

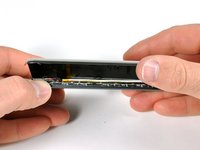
    • Once the panels are separated on this side, the back panel can be separated from the rest of the iPod.

  4. iPod Touch 1st Generation Back Panel Replacement: 4 단계, 이미지 1/3 iPod Touch 1st Generation Back Panel Replacement: 4 단계, 이미지 2/3 iPod Touch 1st Generation Back Panel Replacement: 4 단계, 이미지 3/3
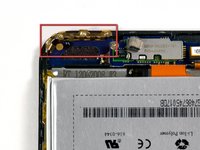
    • Gently lift the rear panel using your fingers.

    • The front and back of the iPod should now be completely separated.

    • The gold antenna (third picture) can easily fall out from its housing. Make sure that the antenna is securely in place before closing the iPod.

  5. iPod Touch 1st Generation Back Panel Replacement, Back Panel: 5 단계, 이미지 1/1
    • The back panel can now be replaced.

결론

To reassemble your device, follow these instructions in reverse order.

다른 36명이 해당 안내서를 완성하였습니다.

Walter Galan

694,561 평판

안내서 1,203개 작성하였습니다

댓글 0개

댓글 쓰기

조회 통계:

24 시간 전: 1

7일 전: 10

30일 전: 31

전체 시간: 83,692