As a continuation of the Epson Stylus Photo 820 teardown, this is a teardown of the printer's printhead.


-
-
Here it is - the Epson Stylus Photo 820's printhead assembly.
-
-
-
-
Let's take a look at the circuit board.
-
This flexible circuit connects the actual print head to the circuit board.
-
The dual ribbon cable connector
-
The contacts for the ink cartridge chips
-
This appears to be a test point of some kind.
-
This decoder/multiplexer chip on the flexible circuit appears to take 16 inputs and provides over 240 outputs for the print head.
-
-
-
Here is a color-coded diagram of how the printhead is built. The only difference is that there 3 ink nozzles in a row instead of over 40.
-
Ink flows from the cartridge into the printhead through the red circles.
-
Ink flows into chambers underneath the piezo elements (marked by orange lines).
-
Individually addressable piezo elements for each nozzle cover the ink chambers.
-
The piezo elements are connected to a common ground by metal strips.
-
(Second image) The ribbon cable (shown as a blue overlay) connects the other terminal of all the piezo elements to the multiplexer.
-
-
-
Let's answer your last question about the printhead now: How does it print?
-
The action starts in the second picture.
-
The ink inlet fills the chamber with ink (yellow).
-
The ink is prevented from exiting the nozzle by surface tension.
-
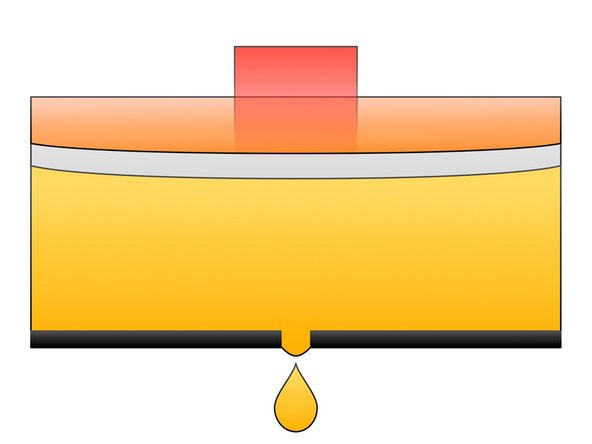
(Third image) When the printer needs to print, electrical current is applied to the piezo element which expands, creates pressure, and forces a single drop of ink out of the nozzle.
-
The (microscopic) drop of ink falls on the paper.
-
The contraction of the piezo element causes the remaining ink in the nozzle opening to be sucked back into the chamber.
-
Keep in mind that this printer has to control over 240 piezo elements which move over the paper many times in the time it takes to print a single page.
-
-
-
It is hard to give a bad repairability score to this device, because only one part of it will need to be replaced.
-
The ink cartridges are very easy to replace (as they should be).
-
The entire assembly is held together by one screw.
-
The actual print head is very delicate and is too small to be repaired, so if it breaks the entire printer will have to be replaced.
-
Update: I have now granted a repairability score to the Epson Stylus 820 Photo printer.
-


댓글 2개
Wow THIS IS A VERY GOOD ARTICLE. MUCH LOVE
I would not give Epson a 9/10 since their printers fail for many other non-repairable reasons. In particular, the microprocessor code is very flaky and throws general errors which can be impossible to hunt down. An example is startup testing of all components. Epsons will test a scanner, and before you can diagnose any problems, it cancels the startup and shuts down all access. E-90 errors are nearly impossible to find if they’re not simple paper jams. Mechanically: 9/10 Electronically: 2/10
Herb Kanis - 답글