주요 콘텐츠로 건너뛰기

필요한 것

동영상 개요

해당 분해도는 수리 안내서가 아닙니다. PlayStation 3 Super Slim 수리는 저희 서비스 설명서를 사용하십시오.

  1. PlayStation 3 Super Slim Teardown - Video tutorial, PlayStation 3 Super Slim Teardown - Video tutorial: 1 단계, 이미지 1/3 PlayStation 3 Super Slim Teardown - Video tutorial, PlayStation 3 Super Slim Teardown - Video tutorial: 1 단계, 이미지 2/3 PlayStation 3 Super Slim Teardown - Video tutorial, PlayStation 3 Super Slim Teardown - Video tutorial: 1 단계, 이미지 3/3
    • Remove the three rubber feet, warranty sticker and four screws.

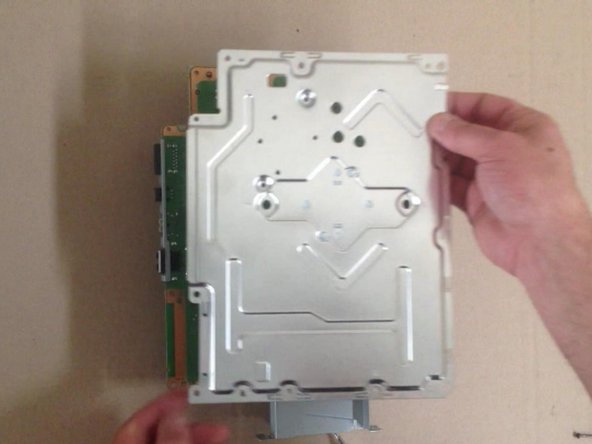
    • Gently pull up on the bottom cover to remove it.

  2. PlayStation 3 Super Slim Teardown - Video tutorial: 2 단계, 이미지 1/3 PlayStation 3 Super Slim Teardown - Video tutorial: 2 단계, 이미지 2/3 PlayStation 3 Super Slim Teardown - Video tutorial: 2 단계, 이미지 3/3
    • Slide the HDD cover toward the rear of the device to remove it.

    • Remove the blue screw shown to remove the HDD caddy with a #1 Phillips.

    • Remove the 3 chassis screws with a TR8 Bit.

  3. PlayStation 3 Super Slim Teardown - Video tutorial: 3 단계, 이미지 1/3 PlayStation 3 Super Slim Teardown - Video tutorial: 3 단계, 이미지 2/3 PlayStation 3 Super Slim Teardown - Video tutorial: 3 단계, 이미지 3/3
    • Use a metal spudger to push the tab on the rear top finisher, and lift up to remove it.

  4. PlayStation 3 Super Slim Teardown - Video tutorial: 4 단계, 이미지 1/3 PlayStation 3 Super Slim Teardown - Video tutorial: 4 단계, 이미지 2/3 PlayStation 3 Super Slim Teardown - Video tutorial: 4 단계, 이미지 3/3
    • Repeat step 3 for the front top finisher.

  5. PlayStation 3 Super Slim Teardown - Video tutorial: 5 단계, 이미지 1/3 PlayStation 3 Super Slim Teardown - Video tutorial: 5 단계, 이미지 2/3 PlayStation 3 Super Slim Teardown - Video tutorial: 5 단계, 이미지 3/3
    • Remove the two TR8 screws indicated in the disk reader.

    • Remove the five Phillips #1 screws shown around the edge of the top cover.

    • Lift the top cover up to remove it.

  6. PlayStation 3 Super Slim Teardown - Video tutorial: 6 단계, 이미지 1/3 PlayStation 3 Super Slim Teardown - Video tutorial: 6 단계, 이미지 2/3 PlayStation 3 Super Slim Teardown - Video tutorial: 6 단계, 이미지 3/3
    • Move the optical disk reader assembly to the left to expose one of the screws holding the power supply in.

    • Remove the two Phillip #1 screws indicated and carefully disconnect the cable on the right side of the power supply.

    • Lift the power supply straight up to remove it.

    • The left side has a board connector underneath, so there will be some resistance when lifting.

  7. PlayStation 3 Super Slim Teardown - Video tutorial: 7 단계, 이미지 1/3 PlayStation 3 Super Slim Teardown - Video tutorial: 7 단계, 이미지 2/3 PlayStation 3 Super Slim Teardown - Video tutorial: 7 단계, 이미지 3/3
    • Carefully disconnect the ribbon cables indicated.

    • Lift the optical disk reader up to remove it.

    • Disconnect and remove the white cable and ribbon cable indicated.

  8. PlayStation 3 Super Slim Teardown - Video tutorial: 8 단계, 이미지 1/3 PlayStation 3 Super Slim Teardown - Video tutorial: 8 단계, 이미지 2/3 PlayStation 3 Super Slim Teardown - Video tutorial: 8 단계, 이미지 3/3
    • Remove the seven Phillips #1 screws indicated.

    • Lift the motherboard assembly up out of the lower half of the case to remove it.

    • Carefully disconnect the Wi-Fi antenna cables and fan connector indicated by red arrows.

  9. PlayStation 3 Super Slim Teardown - Video tutorial: 9 단계, 이미지 1/3 PlayStation 3 Super Slim Teardown - Video tutorial: 9 단계, 이미지 2/3 PlayStation 3 Super Slim Teardown - Video tutorial: 9 단계, 이미지 3/3
    • Remove the six Phillip #1 screws indicated to separate the heatsink and shield from the motherboard.

  10. PlayStation 3 Super Slim Teardown - Video tutorial: 10 단계, 이미지 1/1
    • Congrats!

ZFix

회원 가입일: 12/09/13

191,055 평판

안내서 330개 작성하였습니다

Master Techs Master Techs 회원

Community

322 회원들

안내서 2,506개 작성하였습니다

댓글 13개

What's the name of the screwdriver that undo's the star shaped screws?

themasterassassin8787 - 답글

It is a T8 Torx screwdriver! I'll add the tools to this guide =)

Sam Goldheart -

i took apart my ps3 super slim and put it back together but there is no power what so ever no red light at all

pastorjon.m - 답글

Same here did you fix it?

Kriss -

One thing to pay attention to: The T8 Torx screws (at least on my 500GB model) are Tamper Proof TR8 screws, meaning you need a special screwdriver to undo them. A normal T8 wont work.

Wesley V - 답글

댓글 쓰기

조회 통계:

24 시간 전: 38

7일 전: 270

30일 전: 1,032

전체 시간: 94,449