소개
We've got our hands on the new iPod nano 5G, now with a video camera! We got our nano early on the morning of September 10, 2009.
Want up-to-the-minute updates? Follow @ifixit on twitter.
필요한 것
-
-
Apple's got a routine going with the nano. Never fail, come September, we get a new one.
-
1G - September 7, 2005
-
2G - September 12, 2006
-
3G - September 5, 2007
-
4G - September 9, 2008
-
5G - September 9, 2009
-
This is the first time Apple's had a similar exterior design two releases in a row. The rear-mounted video camera is the only clear sign that we have a new device in our hands.
-
Notice the white wrapper around the packaging. Not even Apple employees got to sneak a peek at this one.
-
-
-
Shiny!
-
Many of the new features include a pedometer, voice recorder, voiceover, a genius mix feature, FM radio, a speaker, oh, and a little thing called a VIDEO CAMERA!
-
The one thing the nano didn't receive this release is a capacity upgrade. Like the 4th Gen, this nano comes in 8 and 16 GB capacities.
-
You can [www.twitter.com/ifixit|follow us on twitter] to get all the latest updates as we're doing the teardown!
imixx의 인용문:
Where's the speaker?
The speaker is shown in Step 14. It looks like it's one of these: http://www.murata.com/products/article/p... (or equivalent.)
-
-
-
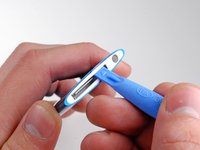
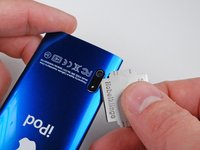
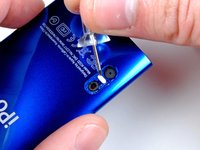
A Plastic Opening Tool makes quick work of the plastic bezel surrounding the dock connector.
-
There's not much to see here yet. We're working on getting to the good stuff...
-
So far, there's a lot in common with the 4th Gen nano.
-
-
-
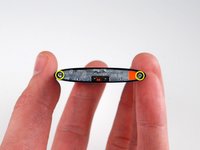
Unlike some earlier iPods, the hold switch isn't directly attached to the logic board.
-
That's a really thin ribbon cable. Then again, there's not a lot of data that needs to go through it.
Make sure the remove the base plate by removing the very small screws. Which make Step 10 (later on) much more easy.
Take great care with the hold switch ribbon cable. I've broken two up to now. It has the strength of a piece of 2mm wide bathroom tisue. Also has a right angle bend so it willl tear more easily. You will find two very small screws holding the switch to the small metal bracket. Don't remove them - just slacken them and slip the switch off as the holes are slotted. This frees the large metal top piece and you have less weight hanging on that ribbon. Incidentally, if you do have the bad luck to tear the cable all is not lost as the lock position is with the switch closed (shorted).
Pete Green - 답글
-
-
-
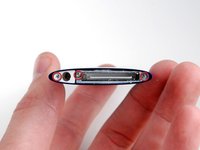
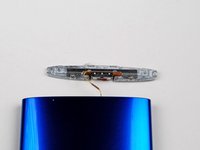
The camera bezel appears to be keeping the iPod's insides from coming out.
-
Eine Deutsche Rasierklinge should fix that...
-
The microphone by the camera ensures you get sound with your VGA moving pictures.
-
Use a pin to remove the small white retainer from between the camera and microphone holes. This keeps the components from sliding toward the bottom of the nano.
Actually, it's a German fad blade to remove callus from your feet.
Is it necessary to remove the lens cover to remove the body?
-
-
-
이 단계에 사용된 도구:Spudger$3.99
-
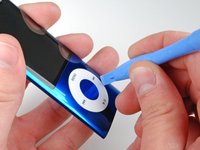
Apple has redesigned the click wheel on this nano. Instead of being (fairly permanently) affixed to the case, we were able to rotate and lift the click wheel.
-
You can use a spudger to completely remove the click wheel without taking the rest of the iPod apart.
How exactly is the click wheel removed? You have to rotate it left or right before it lifts off? Does it lift off easy or does it snap/pop off?
Phillip Clark의 인용문:
How exactly is the click wheel removed? You have to rotate it left or right before it lifts off? Does it lift off easy or does it snap/pop off?
No rotation possible as I far could see, glue to keep it in place. And a very small clip hidden behind the play/pause button
It is not removed by rotation. There are two spots holding it in, one on the top (menu) and one on the bottom (play/pause). The one on the bottom is put underneath the rectangular protrusion from the bottom metal bezel (the thing around the dock connector). Once you remove the metal bezel, then the click wheel should just lift out, although like Rick said there is a small amount of glue so you may need to use a spudger.
Click wheel: I have found traces of adhesive here on a metal rim about 0.5mm wide which is part of the machined case. This rim is then cut away into four 1cm long pieces. One at 10 oclock, 4 oclock, 8 oclock and so on. Not much adhesive - but don't underestimate - it's very strong stuff. At the top of the clickwheel (at 12 oclock) is a small metal tab which slides under the ipod body. When prying out the clickwheel, lift from the bottom, otherwise you are pulling against this metal tab as well as the adhesive. Some heat on this area helps to release the adhesive. Don't end up with the metal plate under the clickwheel looking like a potato chip as happpend with my first teardown.
Pete Green - 답글
-
-
-
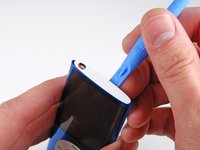
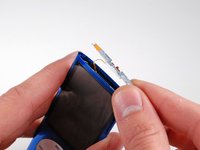
There's a thick slab of glass covering the LCD. Unlike the iPhone, we haven't seen issues with broken glass on the nanos.
-
If you want your screen to look nice, don't touch it. Fingerprints are quite noticeable on the glass.
Removing will be much more easier if your first use step 10 to push the internals out a small bit and than gentely push the window out at the upper edges from inside out.
To take off the glass, do we do it similarly to the 4th gen nano, where you just push it towards the clickwheel a bit to loosen the top first? or is a different method better here?
Can you only get the glass off by taking apart the rest of it?
Is it necessary to remove the glass to remove the body? Can it be left as it is?
-
-
-
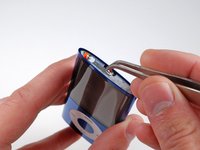
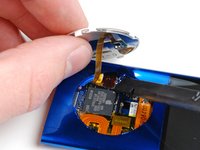
Removing the internals... It's a tight squeeze, but we got them out. Getting this iPod open wasn't easy. We don't recommend trying this at home. Take great care not to scratch the screen on the sharp recess for the click wheel, bend up slightly if necessary.
-
This iPod employs copious amounts of glue and adhesive to hold everything together. That makes it easy for Apple to put together, but hard to take apart.
Any idea whether the adhesives and glues used in the Nano are designed to withstand repeated exposure to high humidity as often happens when people strap the device against their body while exercising? I owned a Nano Gen 3 that stopped working after only a couple months. Other people at my gym using their Nano the same way I do reported the same problem with their Gen 3. I never had problems with the Gen 1 or 2 and have no experience with Gen 4.
Made sure to protect your ribbon cables from breaking from the sharp metal edges of the clickwheel using a small piece of hard plastic (plectrum for example)
It was tough getting it out until I heated the rear of the case with a heat gun. That helped to soften the glue and slowly push the assembly out. Having a "push tool" that was shaped like the top opening would have helped too as it would have distributed the force evenly instead of having to go side to side.
There's also some adhesive residue on the edges of the screen that needs to be cut with an Xacto knife.
-
-
-
iPod, sans casing.
-
The tolerances on this iPod are incredibly tight, there's no wasted space inside.
Missing a step on how-to remove the metal frame. Takes a fairly bit of effort to disassembly all attached objects of the frame before you are able to lift the 'mainboard' with battery attached out of it.
-
-
-
The new nano features a larger display (2.2" and 240x376). This is the same width as the 4th Generation nano, but 56 pixels taller. On a pixel basis, that's 17.5% more screen real estate.
-
Apple keeps putting bigger screens in the same size devices. The footprint of the iPod nano has stayed the same over the last four years, but this display has four times the pixels of the original nano.
-
-
-
The battery. Apple warns you right from the get-go that your iPod may melt and/or spontaneously combust: "Potential for fire or buring." We assume they mean burning. It is assembled in China, so we'll give them a little slack.
-
Supposedly if you burn this battery, it will burn.
nneonneo의 인용문:
It actually has a typo: "Potential for fire or buring.".
Cutting these batteries with a sharp knife produces neat looking sparks all around the blade. Between the layers of the foil in the battery is a clear slimy/lumpy substance, akin to semi dried alcohol hand sanitizer.
-
-
-
Here's the speaker. Like the Touch 2nd Gen, the audio simply comes out the bottom of the iPod.
-
For something only about a millimeter thick, it's not really fair to complain about audio quality.
-
-
-
Removing the connector that connects the microphone, speaker, hold switch, and headphone jack to the logic board.
where's the pic of the front of the camera? ? ? ? ?
-
-
-
Removing the camera.
-
It's nice to see that the camera's a separate module and not integrated into the board.
Any one offer an extension cable for the camera so it can used in a more creative way?
-
-
-
The camera, in all its VGA resolution glory. The camera itself is less than 3 mm thick.
-
Space may have been a factor in not including a better camera. Excluding its mount, the camera in the iPhone 3G is about 6 mm thick. The 5th Gen nano is 6.2 mm thick at its thickest point.
-
Unlike the nano, the touch, at 8.5 mm thick, could conceivably support an iPhone-sized camera, although it would certainly be an engineering challenge.
-
-
-
In our iPod, Toshiba is the source for the 8 GB of flash memory. On the chip:
-
TH58NVG6D2ELA49
-
ID8038
-
TAIWAN
-
09299AE
-
It looks like this was made in Taiwan in week 29 of 2009 (mid-July).
-
Also visible to the right of the Toshiba chip is the rubber mounting fixture for the camera, assumedly to dampen vibrations.
-
-
-
The front of the logic board.
-
The main ARM processor dwarfs everything else on the board. Similar to previous iPods, we expect this is an Apple-branded Samsung processor.
-
Here's the markings from the processor:
-
339S0081 ARM
-
K4X51323PG-UGC6
-
EDE168AG 0928
-
APL0378A00
-
N1X2XW 0931
jdcompman의 인용문:
EDIT: Easier to see in Step 20
Yup, a word from the (recently) wise: remove the click wheel before you slide the internals out.
I was about to make the same comment, noticed that right away. It is a bit scary when even the experts have trouble opening these things intact 0.0 I guess Apple's so hellbent on making these things thinner they sacrifice serviceability. I wonder what their yields and raw production costs are like? Their computers are much easier to work on, even if the iMac does require a big suction cup to pull the glass panel off..
-
-
-
The shiny chip is visible from this angle:
-
338S0559
-
ATWV0926
-
SGP
-
-
-
~ The End ~
-
Credits:
-
Pictures and hardware analysis: iFixit
-
Flying to Pennsylvania to take apart the new iPod nano for you: iFixit's summer intern.
-
Want a programming job with us? We're hiring.
3.5mm connector missing in final image?
borshak의 인용문:
Hey, but what about axelerometer? Apple was remove it from iPod nano 5G? Or we still can shake nano for next song?
It's still in there, that's how the shake to shuffle feature works. Also, is can detect which way the ipod it turned and put video in that direction (left or right from its usual upright position), and it can decide whether to record video in portrait or landscape mode.
-


댓글 15개
stevev1의 인용문:
where's the FM radio?
It uses the head phone wire because all u need is the right programming and a 2 foot wire to get radio
Yup, they can be found here.
its not a tutorial if you need fix use the repair guide
Hi, any idea where i can buy just the 338S0559 audio amplifier chip or if not can anybody point me to where i can buy a logic board with the IC on it?
Can anyone put a new screen and battery in my 5th gen Ipod Nano?
iPods have come wrapped in that white wrapper for a while now - thats nothing new. It prevents the cases from getting scratched in transit.
warren602 - 답글