주요 콘텐츠로 건너뛰기
Asus X553MA-BPD07051 Hard Drive Replacement

Asus X553MA-BPD07051 Hard Drive Replacement

Stephanie DeCarvalho

Stephanie DeCarvalho3 다른 기여자

최종 수정일 November 16, 2022

10 - 35 분
조정

If you are having issues with windows giving you error messages for your hard drive, or have identified that there are bad sectors in the hard drive, this is an indication that the hard drive should be replaced on the laptop. Once you have identified that the hard drive is indeed the issue, replace it using this guide. For more troubleshooting advice, click here. Ensure that before removing the hard drive, the laptop is powered off, and the battery has been removed.

필요한 것

수리 키트

이 키트는 이 안내서를 완료하는데 필요한 모든 부품과 도구를 포함하고 있습니다.

부품

도구

더보기...

동영상 개요

  1. Asus X553MA-BPD07051 Hard Drive Replacement, Battery: 1 단계, 이미지 2개 중 1개 Asus X553MA-BPD07051 Hard Drive Replacement, Battery: 1 단계, 이미지 2개 중 2개
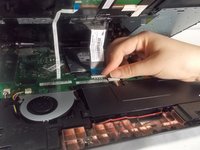
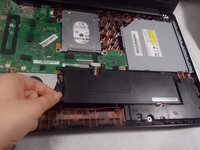
    • Use a Phillips #0 screwdriver (PH0 bit) to remove the four 5.0 mm screws that are securing the bottom of the laptop.

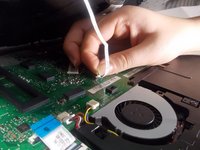
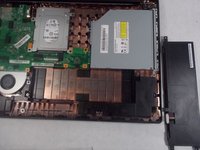
    • Use a Phillips #0 screwdriver (PH0 bit) to remove the six 11.0 mm screws that are securing the bottom of the laptop.

  2. Asus X553MA-BPD07051 Hard Drive Replacement: 2 단계, 이미지 1개 중 1개
    • Lift the edges of the keyboard using the plastic iFixit opening tool and raise the keyboard slightly to see the inside of the laptop.

    • Do not lift the keyboard too high as the keyboard is connected to the motherboard by two ribbon connectors that must be detached.

  3. Asus X553MA-BPD07051 Hard Drive Replacement: 3 단계, 이미지 2개 중 1개 Asus X553MA-BPD07051 Hard Drive Replacement: 3 단계, 이미지 2개 중 2개
    • Lift back the clip on the ribbon tape, and pull the tape out in order to remove the keyboard from the laptop.

    • Remove both pieces of the ribbon tape connecting the keyboard to the motherboard.

  4. Asus X553MA-BPD07051 Hard Drive Replacement: 4 단계, 이미지 1개 중 1개
    • Remove the bundled cable connector attaching the battery to the motherboard with the plastic iFixit opening tool.

    • Make sure that you do not remove the entire connector by applying too much force. Only the white plastic connector should be removed from the metal part on the motherboard.

  5. Asus X553MA-BPD07051 Hard Drive Replacement: 5 단계, 이미지 2개 중 1개 Asus X553MA-BPD07051 Hard Drive Replacement: 5 단계, 이미지 2개 중 2개
    • Use Phillips #0 screwdriver (PH0 bit) to remove the four 6.0 mm screws attaching the battery to the laptop.

  6. Asus X553MA-BPD07051 Hard Drive Replacement: 6 단계, 이미지 2개 중 1개 Asus X553MA-BPD07051 Hard Drive Replacement: 6 단계, 이미지 2개 중 2개
    • Lift the battery up and remove it completely from the laptop.

  7. Asus X553MA-BPD07051 Hard Drive Replacement, Hard Drive: 7 단계, 이미지 2개 중 1개 Asus X553MA-BPD07051 Hard Drive Replacement, Hard Drive: 7 단계, 이미지 2개 중 2개
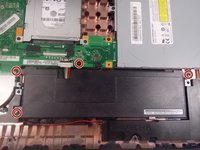
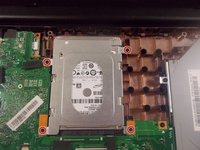
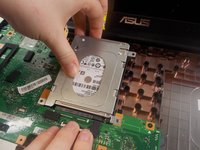
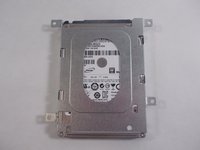
    • Use a Phillips #0 screwdriver (PH0 bit) to remove the four 6.0 mm screws that are securing the hard drive.

  8. Asus X553MA-BPD07051 Hard Drive Replacement: 8 단계, 이미지 2개 중 1개 Asus X553MA-BPD07051 Hard Drive Replacement: 8 단계, 이미지 2개 중 2개
    • Lift the hard drive up and pull it towards the screen so that it disconnects from the motherboard.

    • Use caution when disconnecting the hard drive from the motherboard, so that neither connector gets broken.

결론

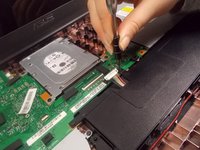
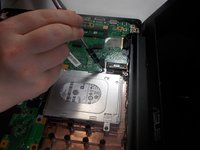
To reassemble your device, follow these instructions in reverse order.

다른 2명이 해당 안내서를 완성하였습니다.

작성자

3다른 기여자 명과 함께

Stephanie DeCarvalho

회원 가입일: 10/21/19

949 평판

안내서 5개를 작성함

UMass Dartmouth, Team S1-G4, Botvin Fall 2019 UMass Dartmouth, Team S1-G4, Botvin Fall 2019 회원

UMASSD-BOTVIN-F19S1G4

3 회원들

안내서 5개를 작성함

댓글 2개

Thanks. Step 4 cost me time and money because this guide isn’t full. You need to move metal bracket before disconnecting the battery otherwise there’s no way to remove it without tearing whole connector. @%^$$@$#!

ryuuganhp - 답글

ryuuganhp, thanks for your comment. Very important and helpful.

Łukasz Szwykowski - 답글

댓글 쓰기

조회 통계:

지난 24시간: 0

지난 7일: 3

지난 30일: 19

전체 시간: 1,666