주요 콘텐츠로 건너뛰기
Dell Inspiron 13-7347 Motherboard Replacement

Dell Inspiron 13-7347 Motherboard Replacement

Kyle Smith

Kyle Smith5 다른 기여자

최종 수정일 February 16, 2025

20 분
조정
잘못된 도구
학생이 작성 중

This guide is to help anyone looking to remove and replace the Dell Inspiron 17-7347 laptop motherboard. This will be a step-by-step process of replacing the motherboard. It will require several tools that you will want to gather before opening the computer. There are several things you need to know before replacing a motherboard. Step 1) Make sure your data is backed up on a cloud or another computer. Step 2) Make sure you have the correct tools needed for the job. Step 3) When replacing and using the tools be careful not to strip or break the parts.

Make sure to follow the steps carefully and correctly.

필요한 것

도구

  1. Dell Inspiron 13-7347 Motherboard Replacement, Battery: 1 단계, 이미지 3개 중 1개 Dell Inspiron 13-7347 Motherboard Replacement, Battery: 1 단계, 이미지 3개 중 2개 Dell Inspiron 13-7347 Motherboard Replacement, Battery: 1 단계, 이미지 3개 중 3개
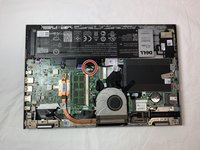
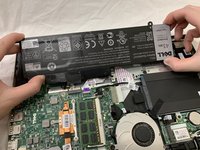
    • Flip the device over, so that the back is facing up.

    • Using a Phillips screwdriver, remove the 10 2.5mm x 8mm screws

    • Use the suction cup to lift off the back case.

  2. Dell Inspiron 13-7347 Motherboard Replacement: 2 단계, 이미지 3개 중 1개 Dell Inspiron 13-7347 Motherboard Replacement: 2 단계, 이미지 3개 중 2개 Dell Inspiron 13-7347 Motherboard Replacement: 2 단계, 이미지 3개 중 3개
    • Remove the two 2mm x 3mm screws that secure the battery to the device.

  3. Dell Inspiron 13-7347 Motherboard Replacement: 3 단계, 이미지 3개 중 1개 Dell Inspiron 13-7347 Motherboard Replacement: 3 단계, 이미지 3개 중 2개 Dell Inspiron 13-7347 Motherboard Replacement: 3 단계, 이미지 3개 중 3개
    • Unplug the cable that connects the USB / SD Reader IO Board to the motherboard.

  4. Dell Inspiron 13-7347 Motherboard Replacement: 4 단계, 이미지 3개 중 1개 Dell Inspiron 13-7347 Motherboard Replacement: 4 단계, 이미지 3개 중 2개 Dell Inspiron 13-7347 Motherboard Replacement: 4 단계, 이미지 3개 중 3개
    • Lift the battery steadily from the device.

    • Tilt the battery upward while removing.

  5. Dell Inspiron 13-7347 Motherboard Replacement, Fan: 5 단계, 이미지 2개 중 1개 Dell Inspiron 13-7347 Motherboard Replacement, Fan: 5 단계, 이미지 2개 중 2개
    • You should be able to identify the fan.

    • This is the 2mm x 2mm JIS #00 screw.

    • This is the 2mm x 3mm JIS #00 screw.

  6. Dell Inspiron 13-7347 Motherboard Replacement: 6 단계, 이미지 2개 중 1개 Dell Inspiron 13-7347 Motherboard Replacement: 6 단계, 이미지 2개 중 2개
    • Remove the 2mm x 2mm JIS #00 screw.

    • Remove the 2mm x 3mm JIS #00 screw.

  7. Dell Inspiron 13-7347 Motherboard Replacement: 7 단계, 이미지 2개 중 1개 Dell Inspiron 13-7347 Motherboard Replacement: 7 단계, 이미지 2개 중 2개
    • Detach the cable that connects the fan and the motherboard.

    • The cable is extremely fragile.

  8. Dell Inspiron 13-7347 Motherboard Replacement: 8 단계, 이미지 2개 중 1개 Dell Inspiron 13-7347 Motherboard Replacement: 8 단계, 이미지 2개 중 2개
    • Detach the cord that connects the fan and the motherboard.

  9. Dell Inspiron 13-7347 Motherboard Replacement: 9 단계, 이미지 1개 중 1개
    • Remove the fan.

  10. Dell Inspiron 13-7347 Motherboard Replacement, Hard Drive: 10 단계, 이미지 2개 중 1개 Dell Inspiron 13-7347 Motherboard Replacement, Hard Drive: 10 단계, 이미지 2개 중 2개
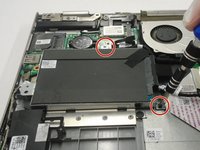
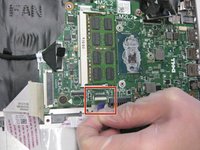
    • Using a Phillips #0 screwdriver, loosen and remove the two 3.0 mm hard drive screws.

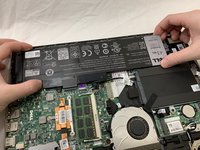
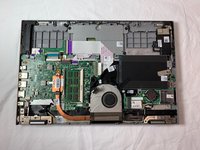
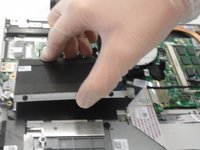
    • Lift the hard drive up and out of the device.

  11. Dell Inspiron 13-7347 Motherboard Replacement, Display Assembly: 11 단계, 이미지 3개 중 1개 Dell Inspiron 13-7347 Motherboard Replacement, Display Assembly: 11 단계, 이미지 3개 중 2개 Dell Inspiron 13-7347 Motherboard Replacement, Display Assembly: 11 단계, 이미지 3개 중 3개
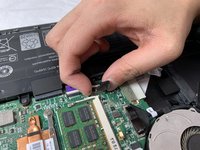
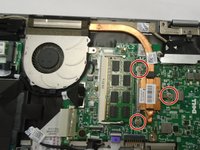
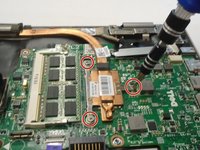
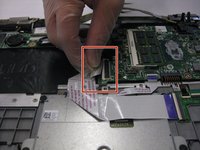
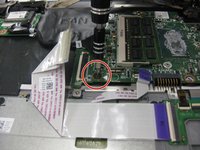
    • Using a Phillips #0 screwdriver, loosen the three 3.0 mm heat sink screws.

    • Remove the Heat Sink.

    • When reinstalling the heat sink, be sure to clean both contact surfaces with isopropyl alcohol and reapply thermal paste.

  12. Dell Inspiron 13-7347 Motherboard Replacement: 12 단계, 이미지 1개 중 1개
    • Using a Phillips #0 screwdriver, remove the two 5.0 mm screws on the metal bracket.

    • Remove the metal bracket.

  13. Dell Inspiron 13-7347 Motherboard Replacement: 13 단계, 이미지 1개 중 1개
    • Loosen and reposition the display cable.

    • The display cable will not be removed. Do not attempt to remove the display cable.

  14. Dell Inspiron 13-7347 Motherboard Replacement: 14 단계, 이미지 3개 중 1개 Dell Inspiron 13-7347 Motherboard Replacement: 14 단계, 이미지 3개 중 2개 Dell Inspiron 13-7347 Motherboard Replacement: 14 단계, 이미지 3개 중 3개
    • Using a Phillips #0 screwdriver, remove the 5.0mm screw on the left display hinge bracket.

    • Using a Phillips #0 screwdriver, remove the two 5.0mm screws on the right display hinge bracket.

    • Lift and remove the display assembly.

  15. Dell Inspiron 13-7347 Motherboard Replacement, Motherboard: 15 단계, 이미지 3개 중 1개 Dell Inspiron 13-7347 Motherboard Replacement, Motherboard: 15 단계, 이미지 3개 중 2개 Dell Inspiron 13-7347 Motherboard Replacement, Motherboard: 15 단계, 이미지 3개 중 3개
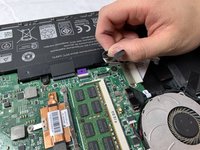
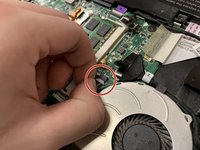
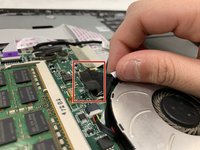
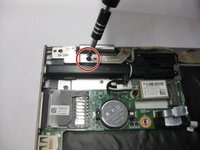
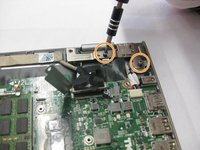
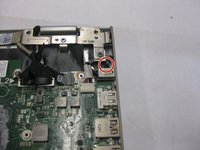
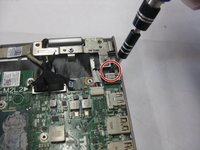
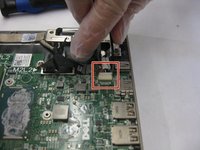
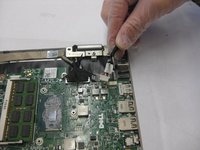
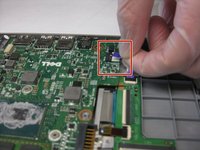
    • Using a Phillips #0 screwdriver, remove the 5.0 mm DC jack screw.

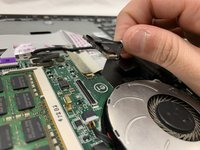
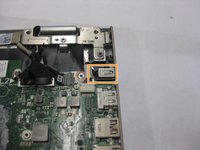
    • Unplug and remove the DC jack.

  16. Dell Inspiron 13-7347 Motherboard Replacement: 16 단계, 이미지 2개 중 1개 Dell Inspiron 13-7347 Motherboard Replacement: 16 단계, 이미지 2개 중 2개
    이 단계에 사용된 도구:
    Tweezers
    $4.99
    • Using your fingers or a pair of tweezers, unplug and loosen the display cable by pulling it straight out of its connector.

  17. Dell Inspiron 13-7347 Motherboard Replacement: 17 단계, 이미지 1개 중 1개
    • Using your fingers or a pair of tweezers, unplug the speaker cable by pulling it straight out of its connector.

  18. Dell Inspiron 13-7347 Motherboard Replacement: 18 단계, 이미지 2개 중 1개 Dell Inspiron 13-7347 Motherboard Replacement: 18 단계, 이미지 2개 중 2개
    • Unplug and remove keyboard cable.

  19. Dell Inspiron 13-7347 Motherboard Replacement: 19 단계, 이미지 3개 중 1개 Dell Inspiron 13-7347 Motherboard Replacement: 19 단계, 이미지 3개 중 2개 Dell Inspiron 13-7347 Motherboard Replacement: 19 단계, 이미지 3개 중 3개
    • Using your fingers or a pair of tweezers, unplug the three motherboard cables by pulling them straight out of their connectors.

  20. Dell Inspiron 13-7347 Motherboard Replacement: 20 단계, 이미지 2개 중 1개 Dell Inspiron 13-7347 Motherboard Replacement: 20 단계, 이미지 2개 중 2개
    • Using a Phillips #0 screwdriver, remove one 2.5mm motherboard screw.

    • Remove the motherboard.

결론

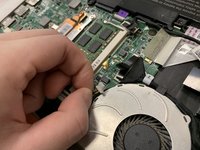
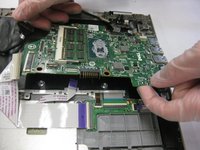
To reassemble your device, follow these instructions in reverse order.

댓글 0개

댓글 쓰기

조회 통계:

지난 24시간: 0

지난 7일: 1

지난 30일: 9

전체 시간: 523