주요 콘텐츠로 건너뛰기
Dell Inspiron 1525 CPU Replacement

Dell Inspiron 1525 CPU Replacement

Miroslav Djuric

Miroslav Djuric3 다른 기여자

최종 수정일 November 13, 2015

15 - 20 분
조정
추천 가이드

Use this guide to replace the CPU in a Dell Inspiron 1525.

필요한 것

도구

  1. Dell Inspiron 1525 CPU Replacement, Battery: 1 단계, 이미지 1개 중 1개
    • Locate the battery release switch on the bottom of the laptop.

  2. Dell Inspiron 1525 CPU Replacement: 2 단계, 이미지 2개 중 1개 Dell Inspiron 1525 CPU Replacement: 2 단계, 이미지 2개 중 2개
    • Slide the battery release switch away from the lock symbol until you hear the battery click.

    • Slide the battery towards the back of the laptop until it comes free.

  3. Dell Inspiron 1525 CPU Replacement, Bottom Cover: 3 단계, 이미지 2개 중 1개 Dell Inspiron 1525 CPU Replacement, Bottom Cover: 3 단계, 이미지 2개 중 2개
    • Remove/loosen the eight 4.80 mm Phillips #1 screws securing the bottom panel.

    • The screws may only need to be loosened, as they are generally retained by plastic washers.

    • Remove the bottom panel.

  4. Dell Inspiron 1525 CPU Replacement, Heat Sink: 4 단계, 이미지 3개 중 1개 Dell Inspiron 1525 CPU Replacement, Heat Sink: 4 단계, 이미지 3개 중 2개 Dell Inspiron 1525 CPU Replacement, Heat Sink: 4 단계, 이미지 3개 중 3개
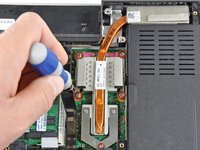
    • Loosen the five #1 Phillips screws securing the heat sink and clean it with compressed air

    • These screws are attached to the heat sink assembly.

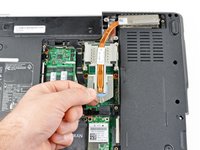
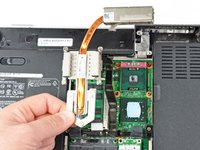
    • Gently lift the heat sink from side indicated in the picture.

    • The heat sink may feel like it is glued to the chips because of the thermal paste. Gently wiggle the heat sink back and forth to help break it free.

    • Be sure to thoroughly clean off the old thermal paste and apply new thermal paste before reinstalling the heat sink. Follow our thermal paste application guide for detailed instructions.

  5. Dell Inspiron 1525 CPU Replacement, CPU: 5 단계, 이미지 2개 중 1개 Dell Inspiron 1525 CPU Replacement, CPU: 5 단계, 이미지 2개 중 2개
    • Use a small flathead screwdriver to turn the ZIF-socket cam screw counterclockwise until it can't be turned anymore.

    • Lift the CPU out of its socket, being careful not to bend its pins.

    • Processor orientation can be determined by matching the corner of the processor with a small triangle to the corner of the pink module with a small triangle.

    • Don't forget to apply thermal paste to the new processor. Also clean and apply fresh thermal paste to the video processor. Follow our thermal paste application guide for detailed instructions.

결론

To reassemble your device, follow these instructions in reverse order.

다른 4명이 해당 안내서를 완성하였습니다.

작성자

3다른 기여자 명과 함께

Miroslav Djuric

159,496 평판

안내서 144개를 작성함

댓글 0개

댓글 쓰기

조회 통계:

지난 24시간: 0

지난 7일: 4

지난 30일: 14

전체 시간: 8,685