주요 콘텐츠로 건너뛰기
Dell Latitude E7440 WLAN Card Replacement

Dell Latitude E7440 WLAN Card Replacement

Akash Kedia

Akash Kedia다른 한 명의 기여자

최종 수정일 March 8, 2019

15 분
쉬움
추천 학생 안내서

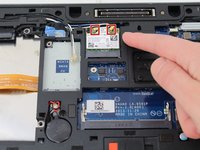
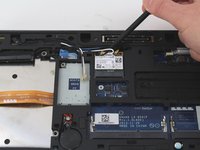
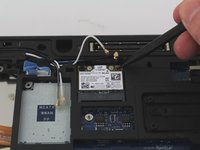
Before replacing your WLAN card, please refer to our Troubleshooting Guide. If your laptop is still not receiving a WiFi connection, but your other devices are, you will need to replace your WLAN card. Dell has made this process simple.

필요한 것

도구

  • Phillips #0 Screwdriver
    Phillips #0 Screwdriver
  • Spudger
    Spudger
  1. Dell Latitude E7440 WLAN Card Replacement, Prepare the laptop: 1 단계, 이미지 1개 중 1개
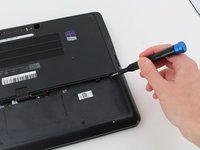
    • Power off your laptop before starting.

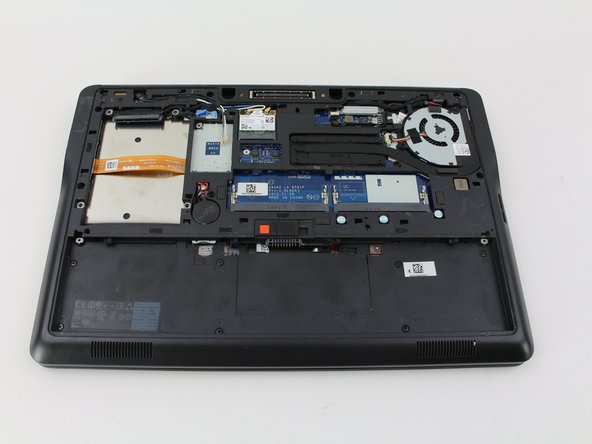
    • Flip the device over so that the vents on the bottom are facing away from you.

  2. Dell Latitude E7440 WLAN Card Replacement, Release the battery: 2 단계, 이미지 3개 중 1개 Dell Latitude E7440 WLAN Card Replacement, Release the battery: 2 단계, 이미지 3개 중 2개 Dell Latitude E7440 WLAN Card Replacement, Release the battery: 2 단계, 이미지 3개 중 3개
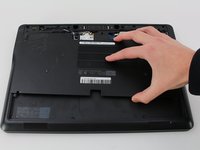
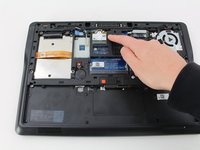
    • Place your finger on the latch located in the center of the laptop.

    • Slide the latch to the right, applying enough force to reveal a red indicator.

    • You will hear a soft click when the latch has been disengaged.

  3. Dell Latitude E7440 WLAN Card Replacement, Remove the battery: 3 단계, 이미지 1개 중 1개
    • Lift the battery by the top, away from the laptop body.

  4. Dell Latitude E7440 WLAN Card Replacement, WLAN Card: 4 단계, 이미지 2개 중 1개 Dell Latitude E7440 WLAN Card Replacement, WLAN Card: 4 단계, 이미지 2개 중 2개
    • Remove two M2 x 3mm Phillips #0 screws from the base cover.

  5. Dell Latitude E7440 WLAN Card Replacement: 5 단계, 이미지 3개 중 1개 Dell Latitude E7440 WLAN Card Replacement: 5 단계, 이미지 3개 중 2개 Dell Latitude E7440 WLAN Card Replacement: 5 단계, 이미지 3개 중 3개
    • Slide the base cover down slightly and remove it to find the WLAN card.

  6. Dell Latitude E7440 WLAN Card Replacement: 6 단계, 이미지 3개 중 1개 Dell Latitude E7440 WLAN Card Replacement: 6 단계, 이미지 3개 중 2개 Dell Latitude E7440 WLAN Card Replacement: 6 단계, 이미지 3개 중 3개
    • Disconnect the white and black wires attached to the WLAN card by pulling them away from the card.

    • You can use the nylon spudger to disconnect a wire by placing it between the curved part of the wire and gently pulling.

    • When attaching the wires to the WLAN card, place the wire head directly above the connectors and apply pressure to the head to reconnect it.

  7. Dell Latitude E7440 WLAN Card Replacement: 7 단계, 이미지 3개 중 1개 Dell Latitude E7440 WLAN Card Replacement: 7 단계, 이미지 3개 중 2개 Dell Latitude E7440 WLAN Card Replacement: 7 단계, 이미지 3개 중 3개
    • Remove a M2 x 3mm Phillips #0 screw from the WLAN card.

    • Gently pull the WLAN card out of its socket.

결론

To reassemble your device, follow these instructions in reverse order.

다른 7명이 해당 안내서를 완성하였습니다.

작성자

1다른 기여자 명과 함께

Akash Kedia

회원 가입일: 01/24/19

1,445 평판

안내서 5개를 작성함

Cal Poly, Team S2-G5, White Winter 2019 Cal Poly, Team S2-G5, White Winter 2019 회원

CPSU-WHITE-W19S2G5

4 회원들

안내서 5개를 작성함

댓글 0개

댓글 쓰기

조회 통계:

지난 24시간: 5

지난 7일: 17

지난 30일: 63

전체 시간: 4,384